
 | Time to read: About 20-30 minutes |
 | Intended for: O365 engineers, SharePoint architects |
 | Key takeaway: In this blog post, I’ll walk you, step-by-step, through how to loop through multiple list items in a SharePoint modern site using Power Automate. |
In a previous article I wrote back in 2015, I showed you how to loop through multiple items in a list using SharePoint 2010 Workflows. In this post, I’m going to walk you through the modern version of how to achieve the same results with a more stream-lined looking email. ** With the way Power Automate works (as opposed to the old workflows), we can actually achieve the same results with a different approach. We will see this in a future article. **
The workflow will take items entered in a list that are tasks and checks the status of each task whenever you want it to. We will use the Recurrence Action in Power Automate to achieve this. I realize there may be other ways to get the same result but you can use this process for anything you want…not just projects. Keep that in mind.
For this tutorial, we are using Office 365 and Power Automate. We will create two lists and two workflows in SharePoint online.
**Click on any of the images to see a larger view**
Step 1 – Create lists
If you would rather not create the lists from scratch, you can get the list templates here but you will need to run a PowerShell script using the SharePoint Online Management Shell to allow saving and adding list templates:
$adminSiteUrl = "https://YourTenant-admin.sharepoint.com/"
$cred = Get-Credential
Connect-SPOService $adminSiteUrl -Credential $cred
Set-SPOSite "https://YourTenant.sharepoint.com/sites/YourSite" -DenyAddAndCustomizePages 0
After running the PowerShell script you will see the list templates in the the Web Designer Galleries where you could upload both of the list templates provided. This is of course assuming that you are using a SharePoint modern site. If it is a classic site you do not have to run the script.
If you are creating the lists from scratch and cannot run the script:
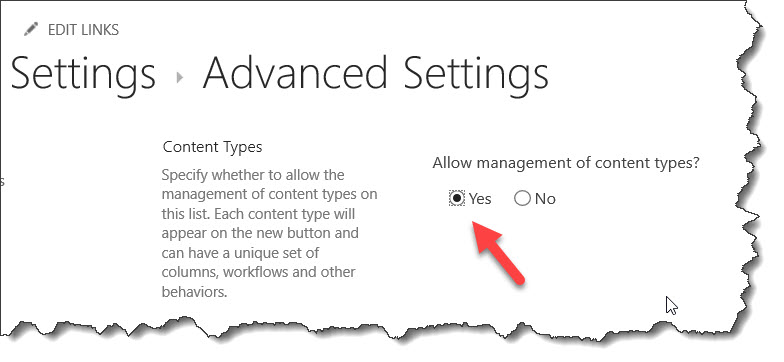
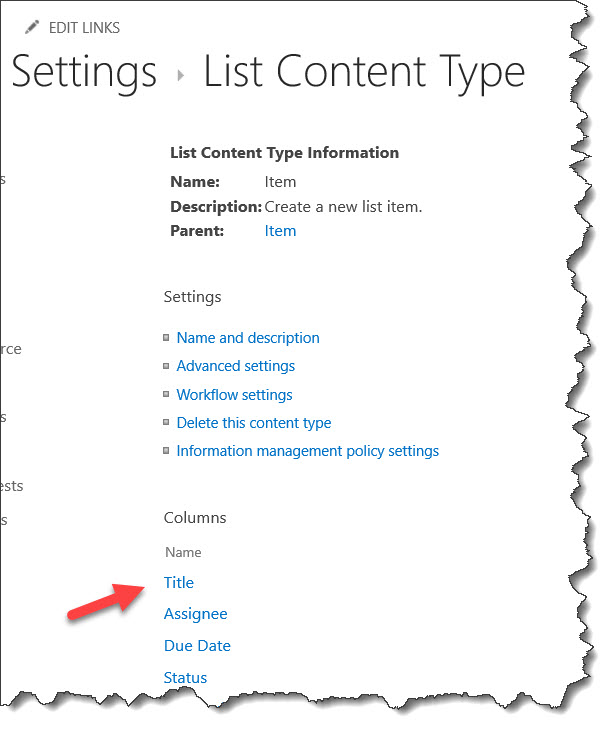
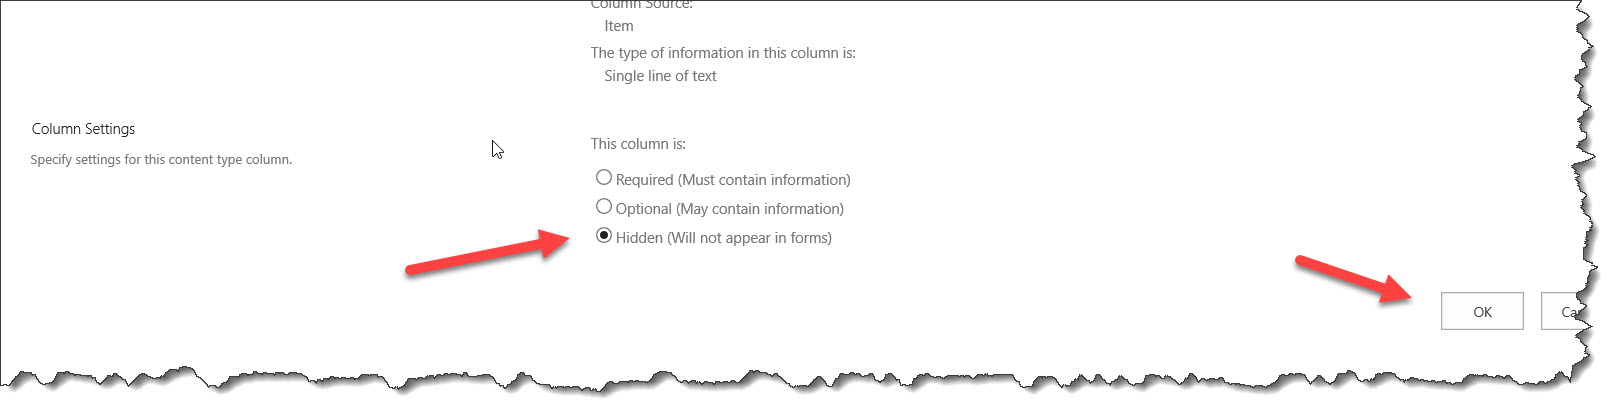
List Name: Project Tasks. This is the main list we will use that houses all of the tasks assigned to a user. Make sure to make the Title field not required in this list. I usually make this field Hidden when you allow the management of content types(click on images to see larger versions):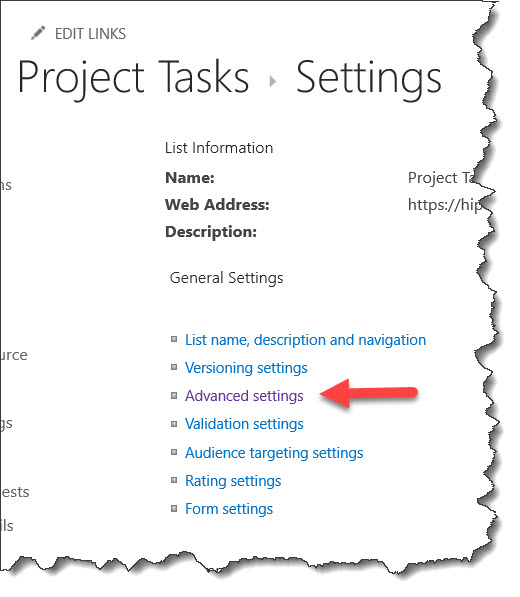
Lets hide the Title field(click on images to see larger versions):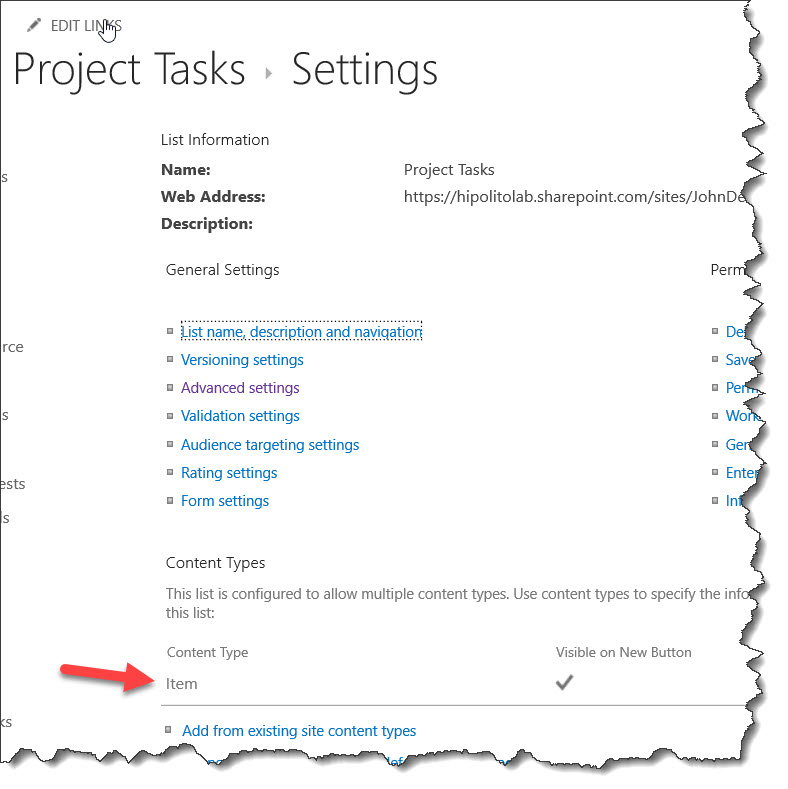
Column: Assignee – Person or Group. Required field.
Column: DueDate – Date and Time. Required field, Date Only, Standard format.
Column: Status – Choice Drop-Down Menu. Required field with the options New, In Process, Completed, and Cancelled.
Column: TaskDeliverable – Multiple lines of text. Required field, Plain text.
Column: AssigneeEmailAddress – Single line of text . Not required. I keep usually this field hidden.
List Name: Email Source. This list contains all of the necessary HTML and counts needed to compile the email. This list should not be edited by any user. In this list I also hide the Title field and make sure it is not required as shown above.
Column: AssigneeEmailAddress – Single line of text.
Column: ActiveTasks – Number. Number of decimal places = 0, Default value = 0.
Column: WeeklySummaryRunDate – Single line of text.
Column: EmailBody – Multiple lines of text, Plain text.
Column: HTMLCreated – Number. Number of decimal places = 0, Default value = 0.
Step 2 – Create Workflows using Power Automate
Login to Power Automate and click on “My Flows” in the left navigation area: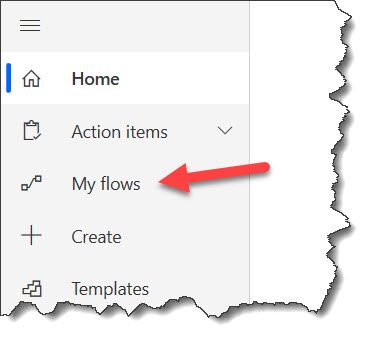
Click on “New” and select “Automated-from blank”: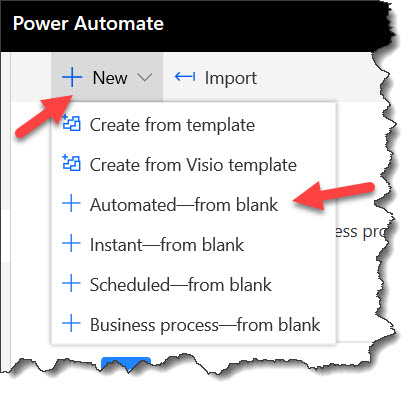
In the “Build an automated flow” window enter “Add Item” as the flow name. In the “Choose your flows trigger” field, type in “Created” so that we can find the “When an item is created” for SharePoint trigger. Click on “When an item is created”, then click on the “Create” button: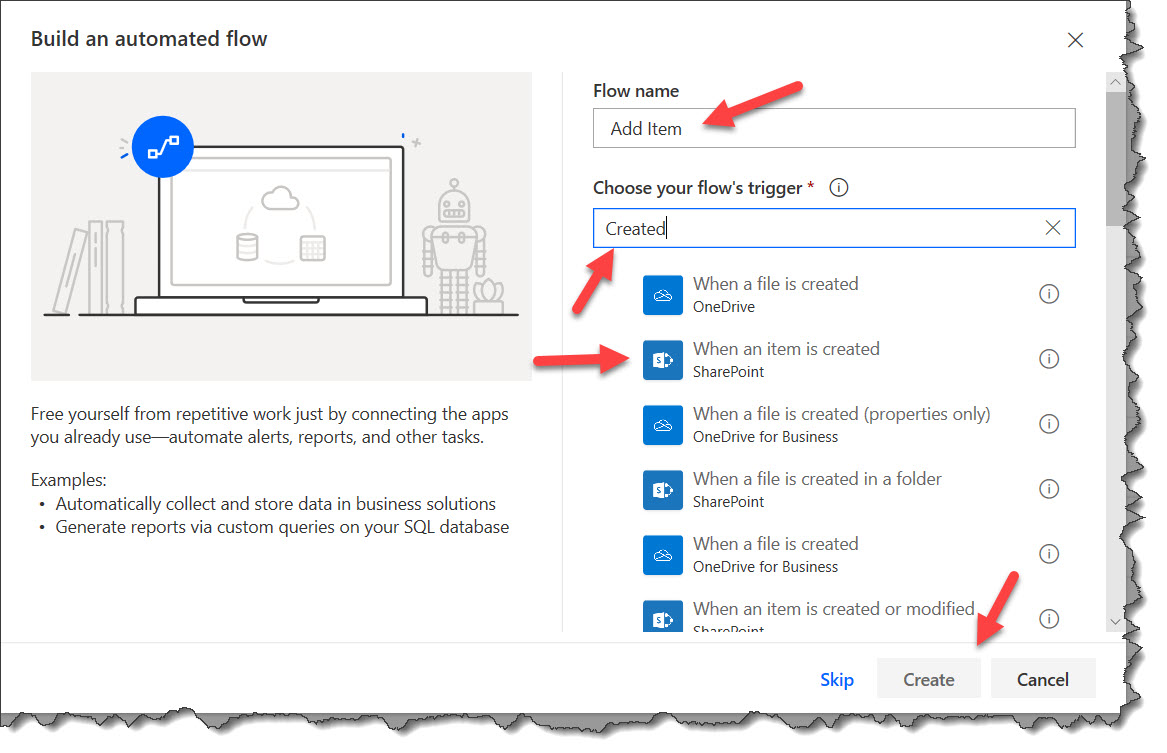
If the trigger you added is not already expanded, simply click on the blue bar to expand it: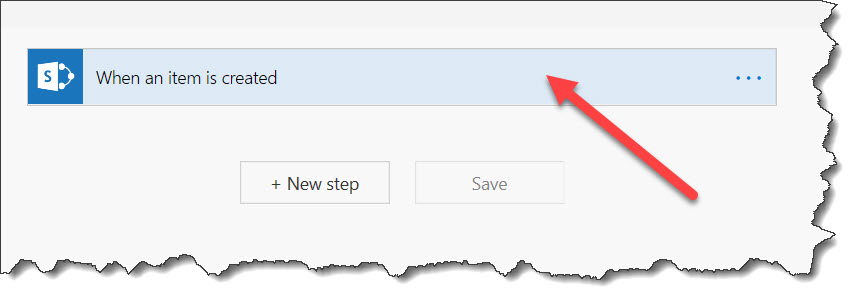
It is extremely important that we rename each action we add so that it is easy to select the correct items from the data sources when needed. Let’s rename this trigger to “Create New Task” by clicking on the three ellipses and then click on “Rename” from the menu: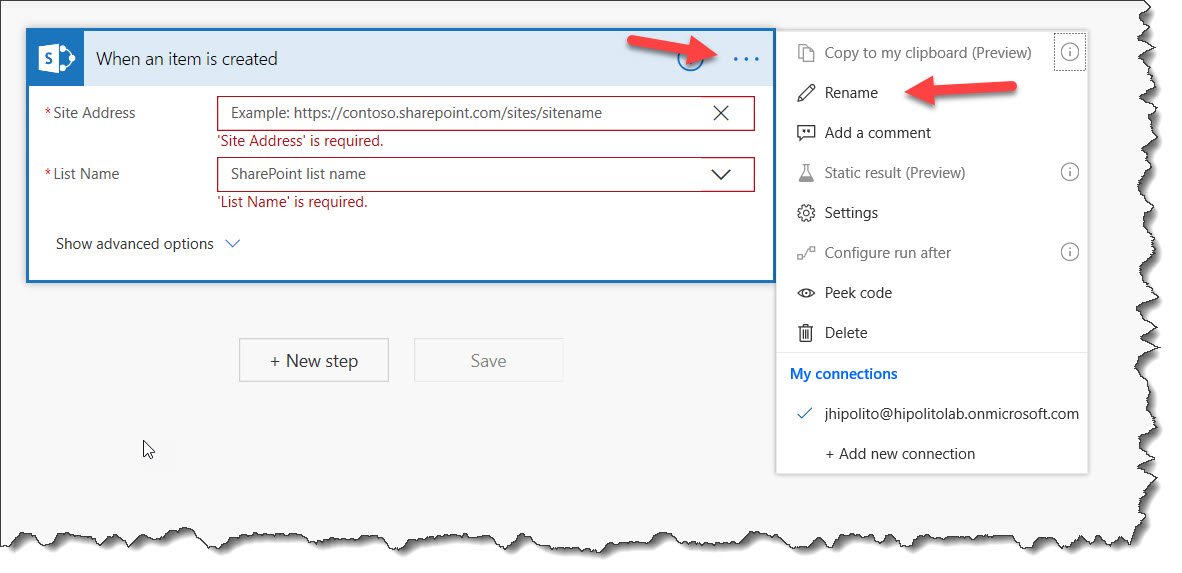
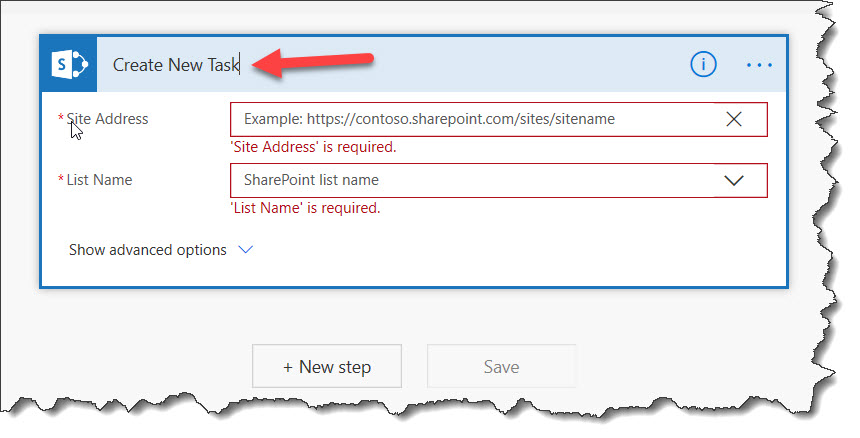
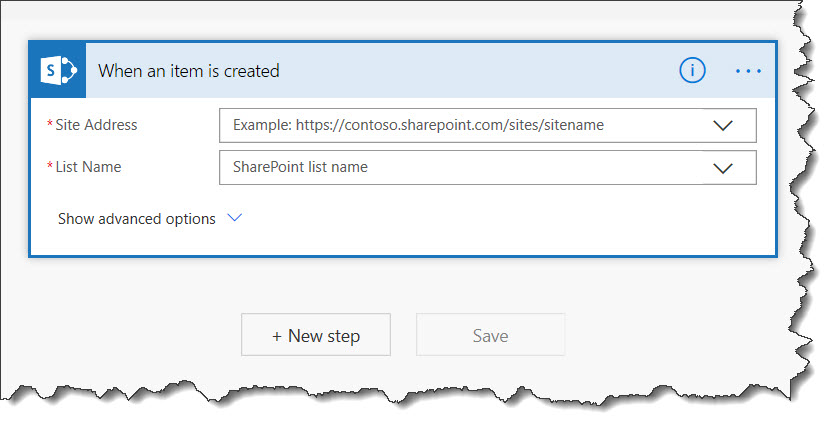
Select the site where you have your “Project Tasks” list and then select the “Project Tasks” list: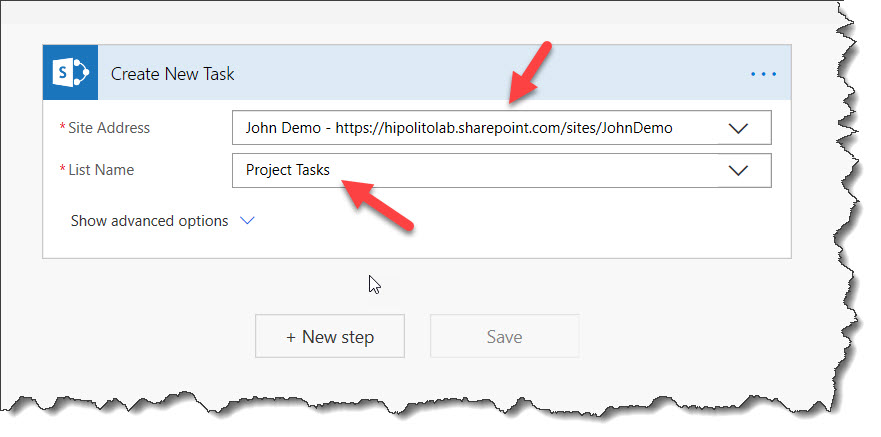
If you’d like you can click on the blue bar to collapse the “Create New Task” trigger action.
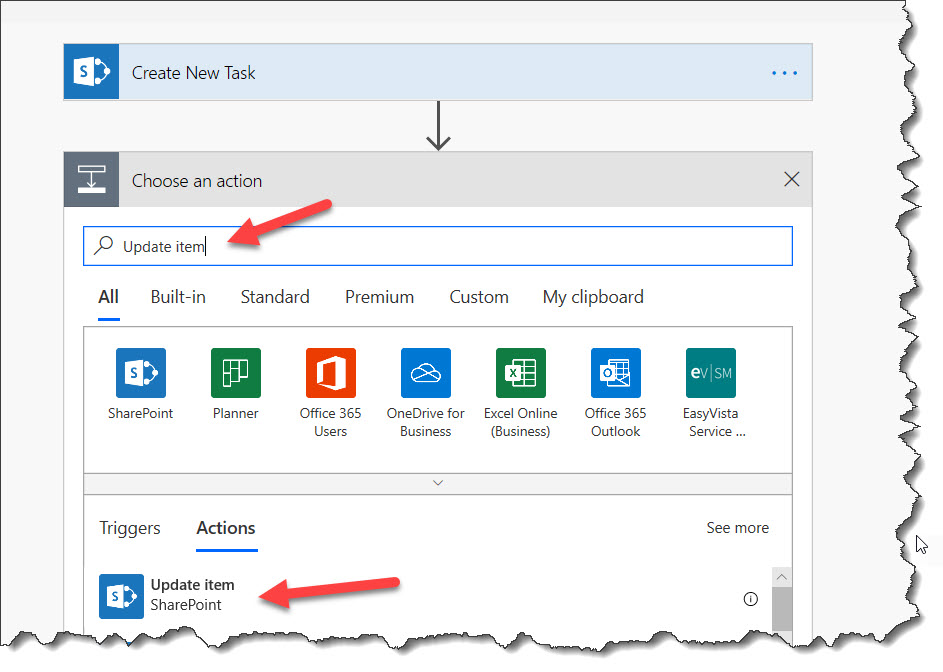
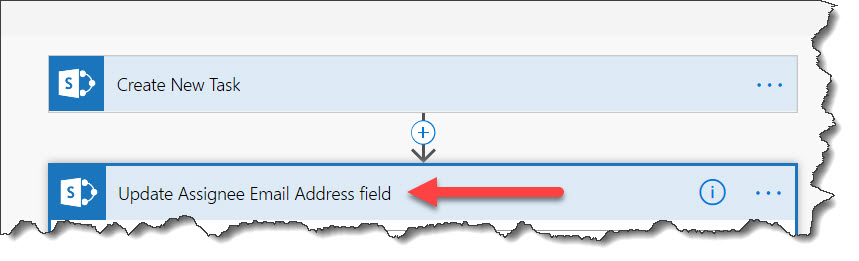
Click on the “New step” button. In the “Search connectors and actions” field, type in “Update item” and select the “Update item” SharePoint action. You now have a new “Update Item” action. Let’s rename it to “Update Assignee Email Address field”.
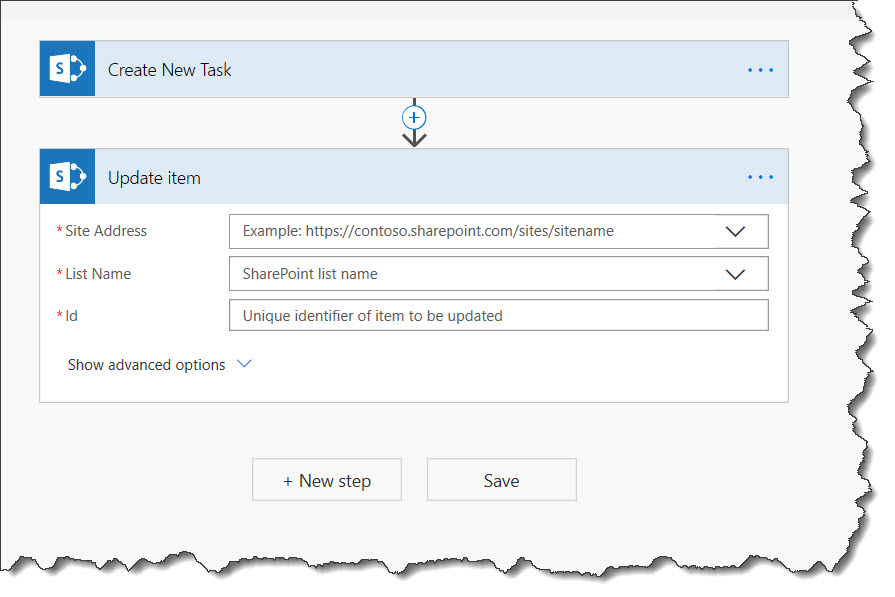
Select the site where your lists are and then select the “Project Tasks” list: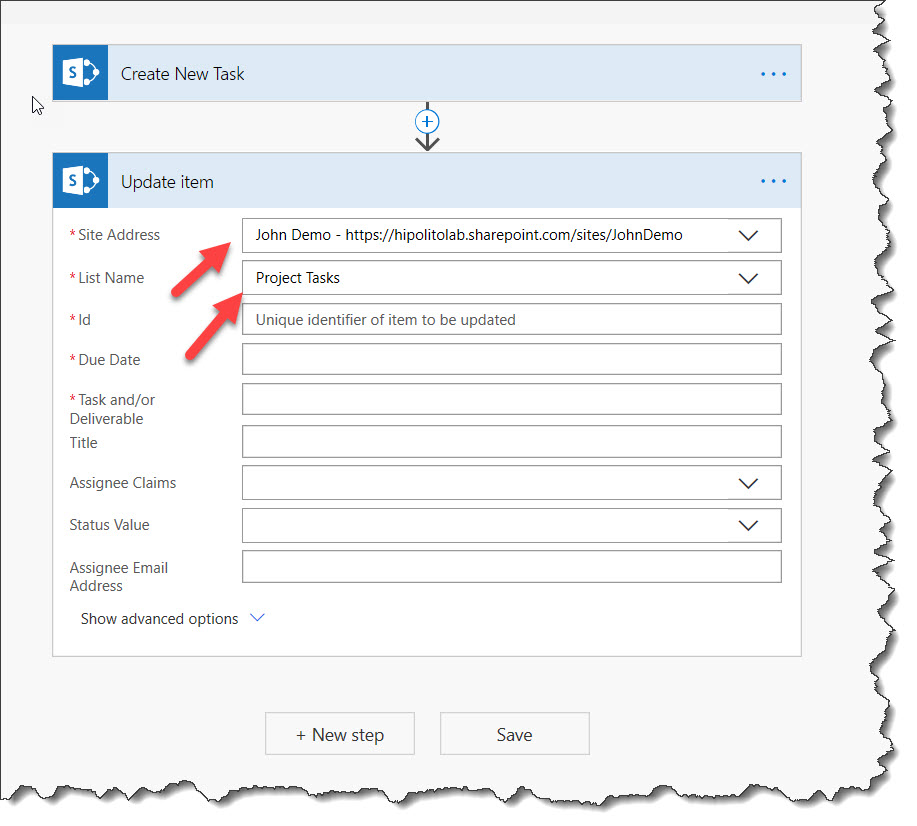
Click in the “Id” field and then click on the List item “ID” in the Dynamic Content area. This adds it to the field. As you can see you are taking the ID of each item taken from the trigger action we created. This is why it is important to rename your actions so that it makes it easier to reference the correct fields: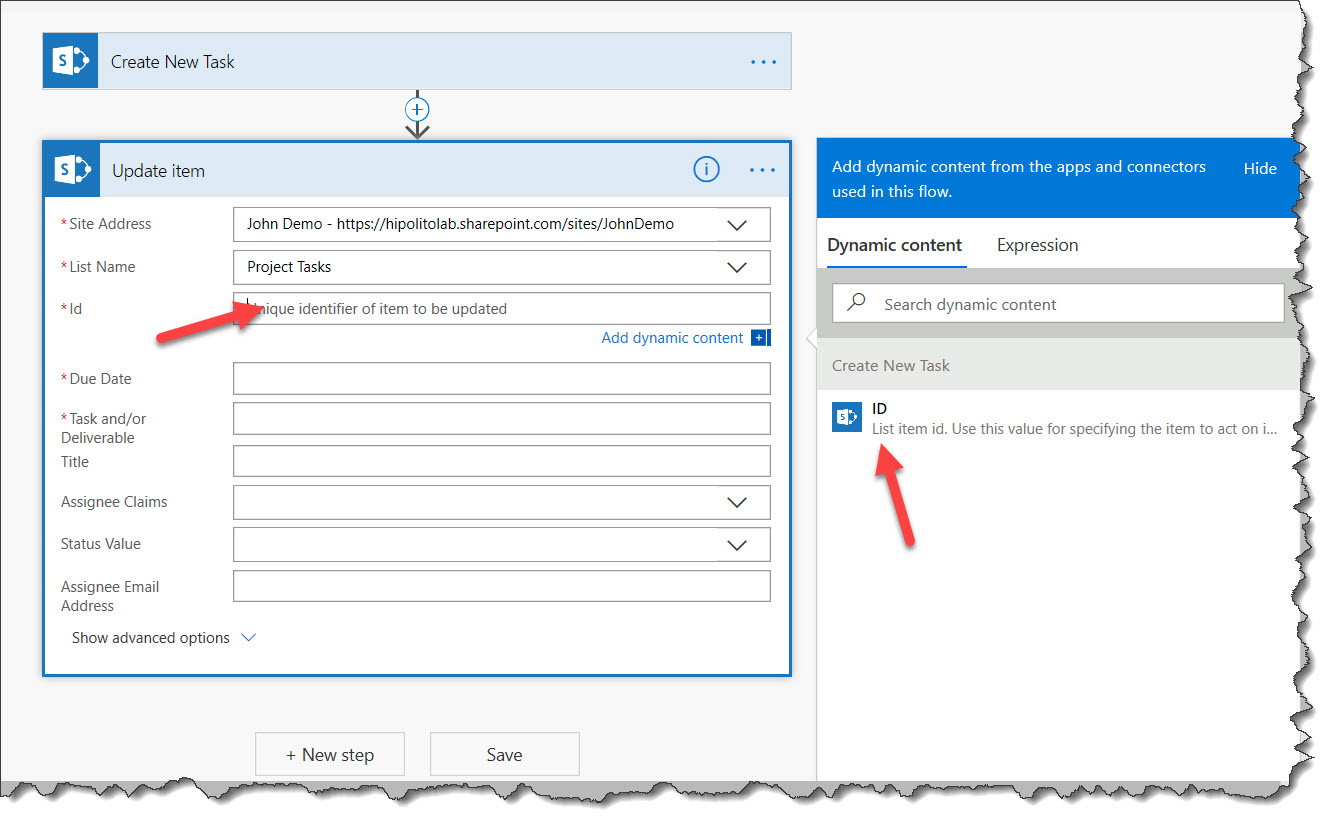
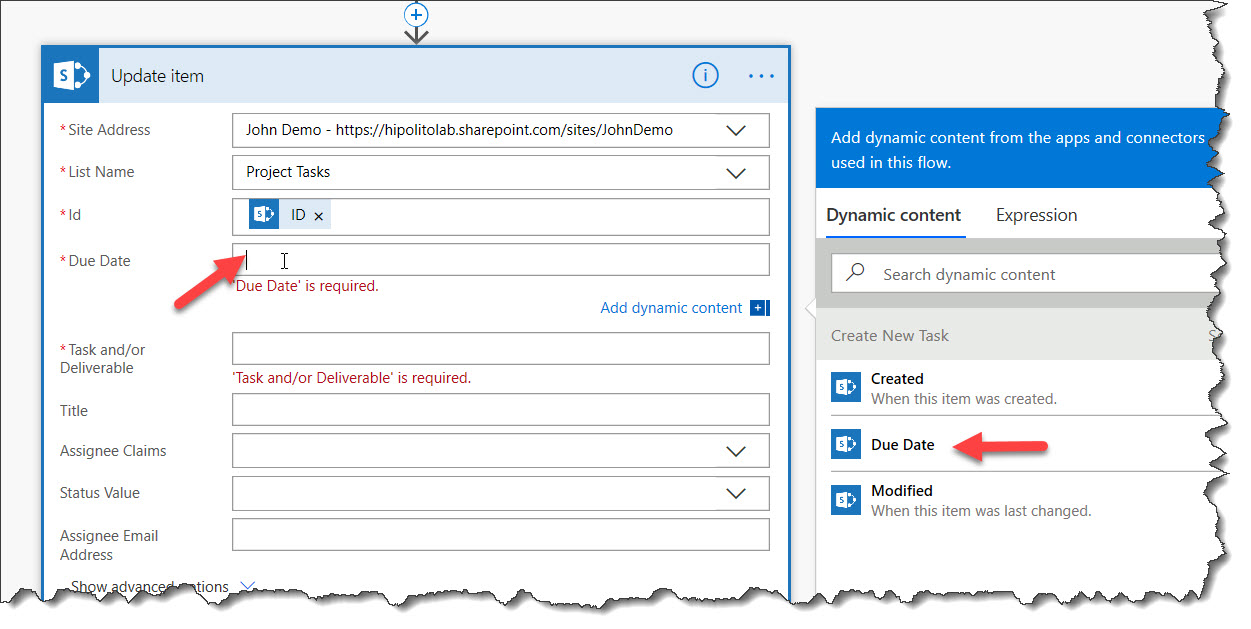
Now we will add the “Due Date”. Click in the “Due Date” field and then select “Due Date” from the Dynamic Content area:
Add the TasksDeliverable field:
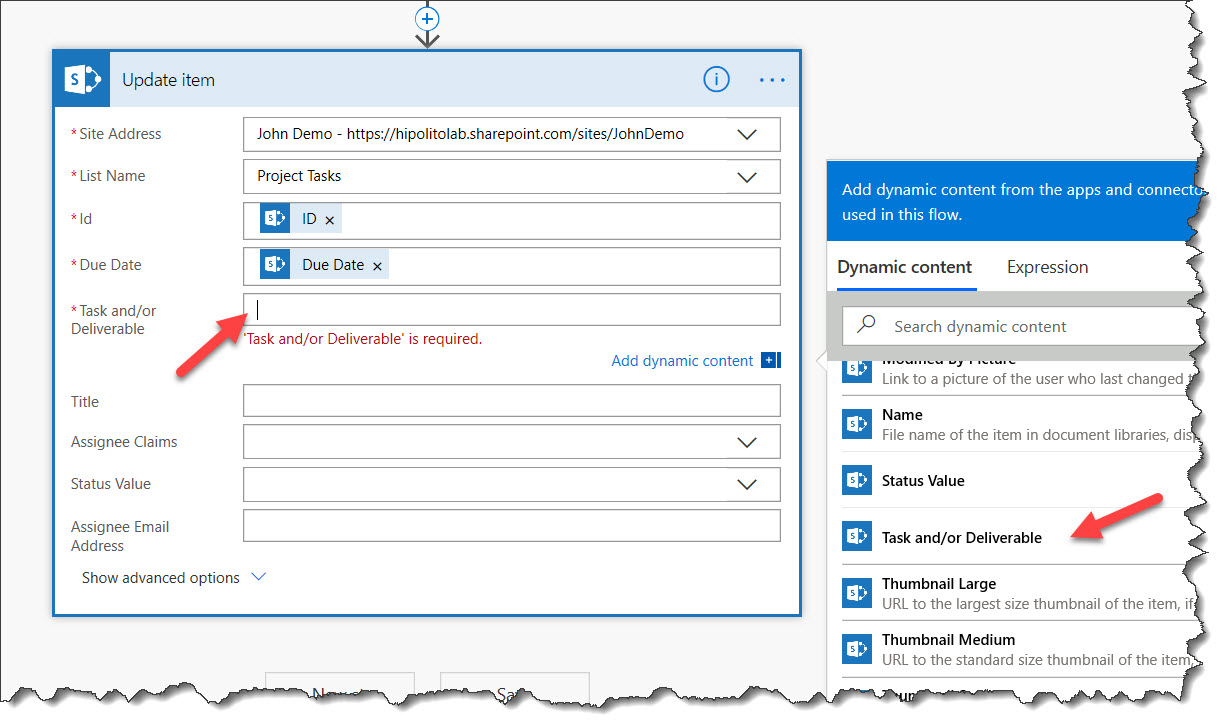
Now select the AssigneeEmailAddress field. Make sure to select the correct email field in the Dynamic Content area. In this case it is “Assignee Email”. Click on the “Save” button:
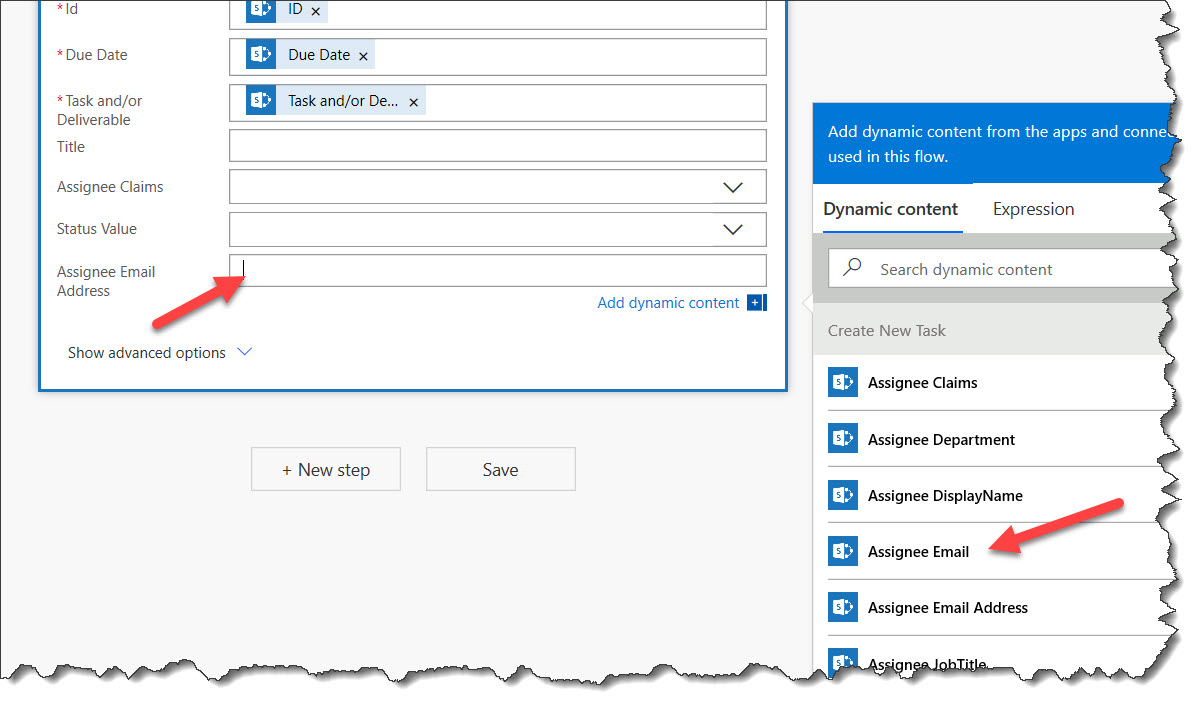
The actions you have just completed extract the email address from the “Assignee” Person field so we can use it to filter off items in the “Email Source” list we will use in the next steps.
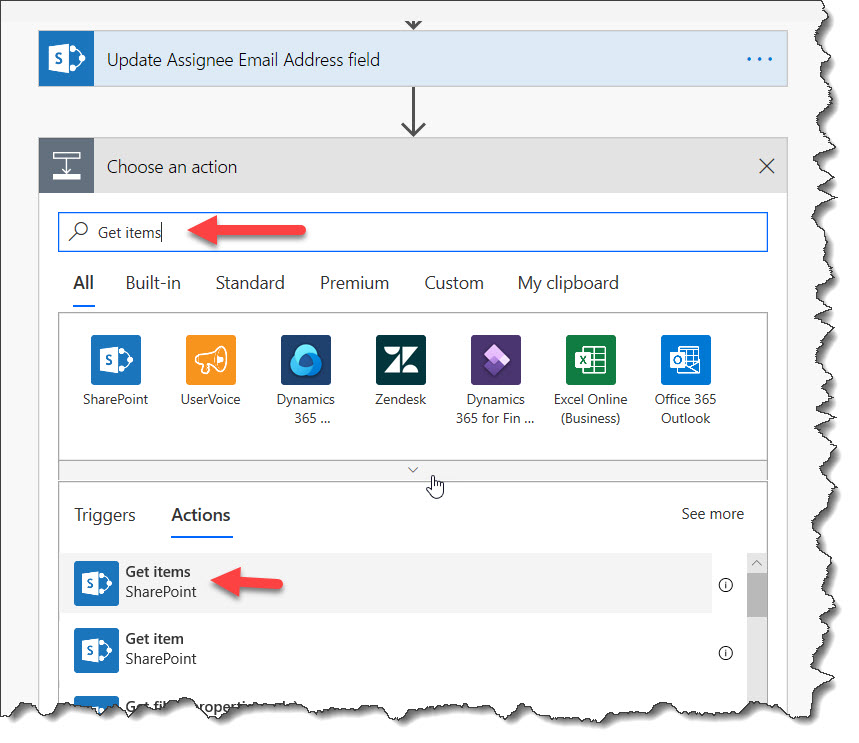
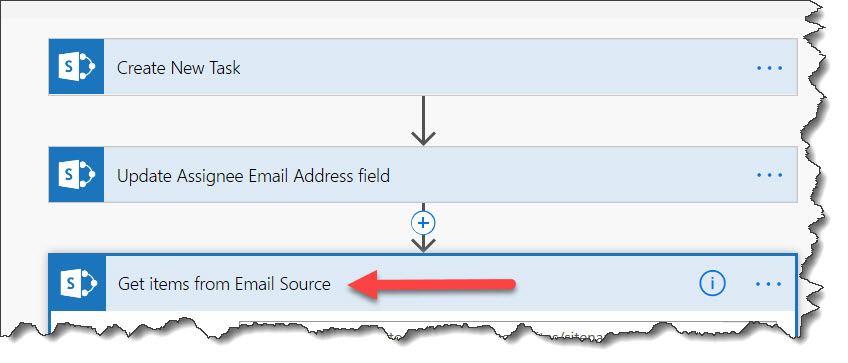
Click on the “New step” button. In the “Search connectors and actions” field, type in “Get items” and select the “Get items” SharePoint action. Do not select “Get item”. You now have a new “Get items” action. Let’s rename it to “Get items from Email Source”. 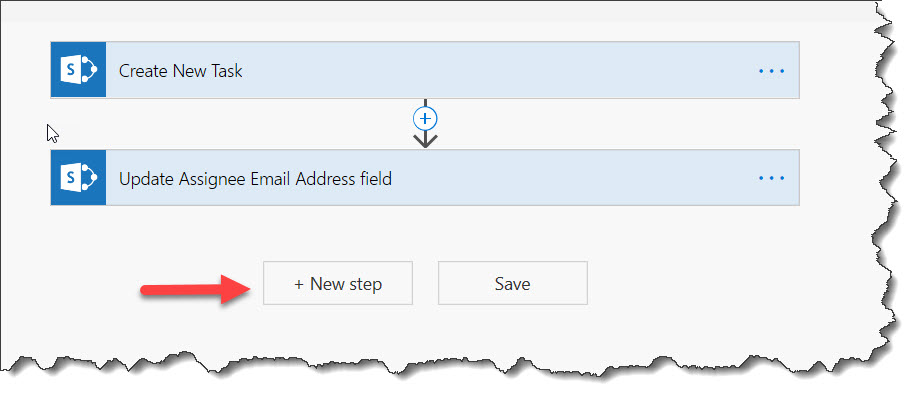
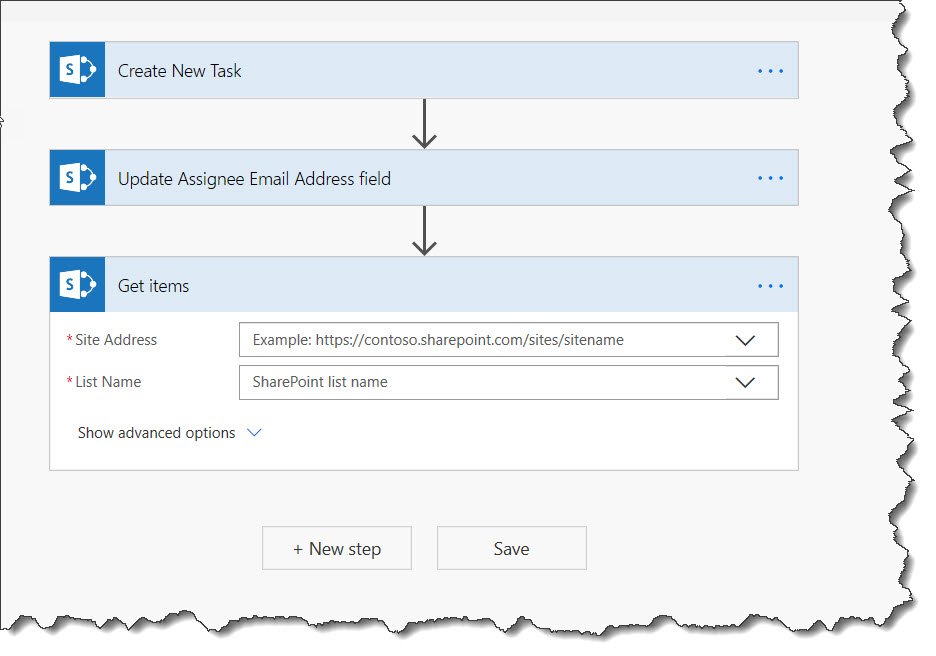
Select the site and the “Email Source” list: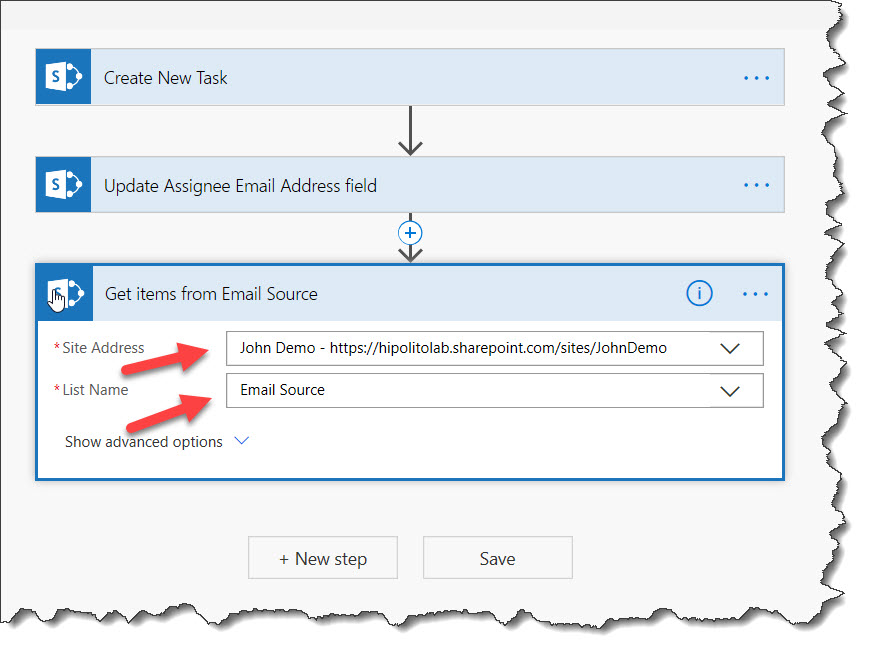
Click on the “Show advanced option” down arrow: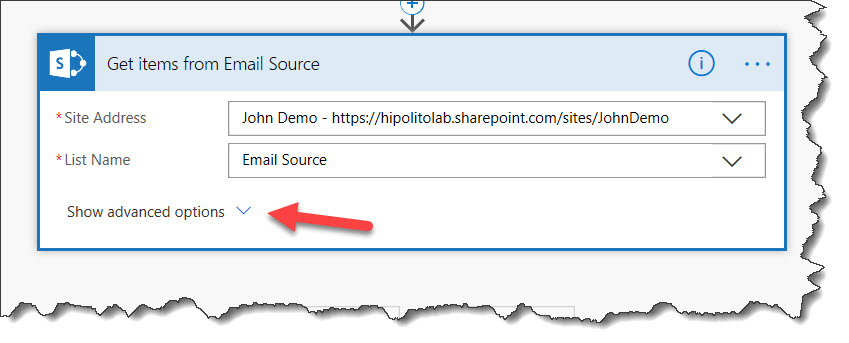
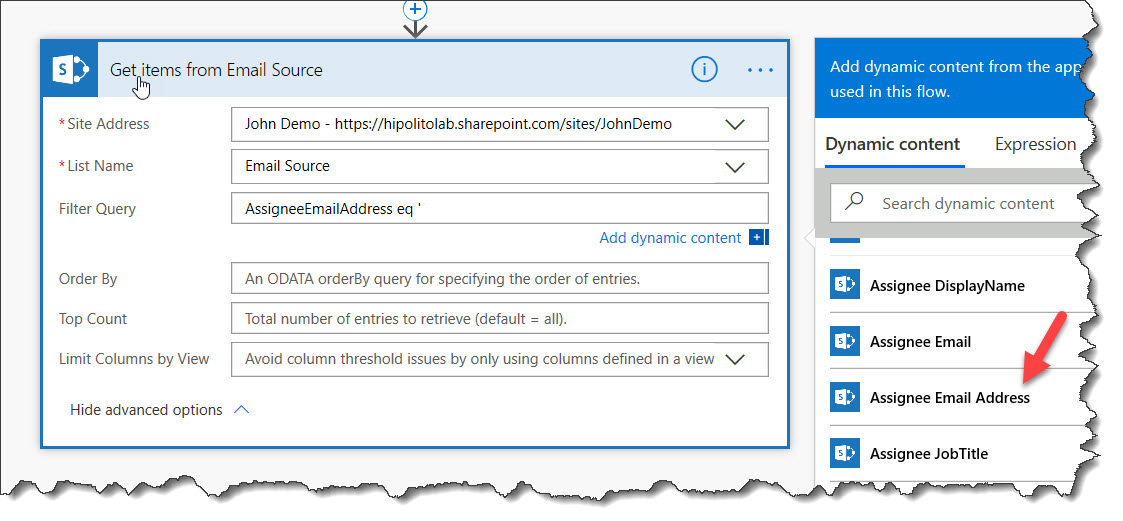
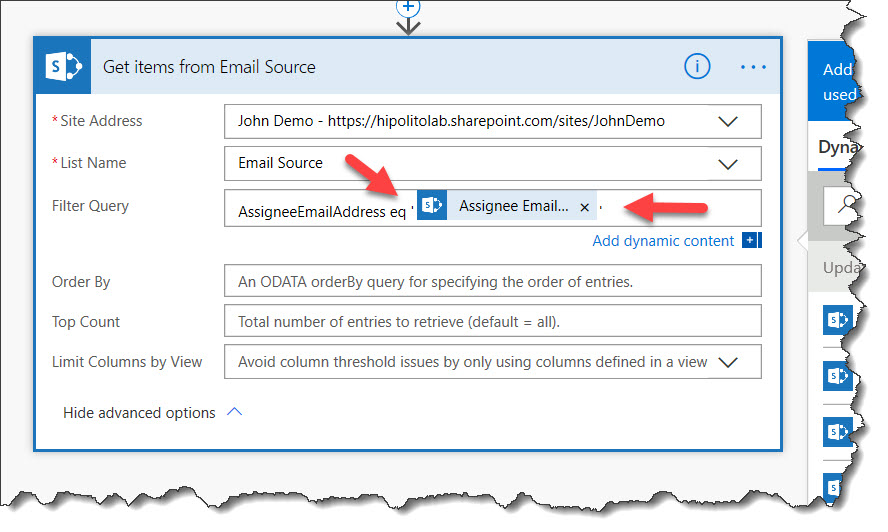
In the “Filter Query” field type in “AssigneeEmailAddress eq” and then a space after followed by a single quote (click on the image to see a close up). In the Dynamic content area on the right, select the “AssigneeEmailAddress” field or whatever you named it in the Project Tasks list. D0 not select the “Assignee Email” field. Directly after the field is added, type in another single quote(see the last image below to see the close up):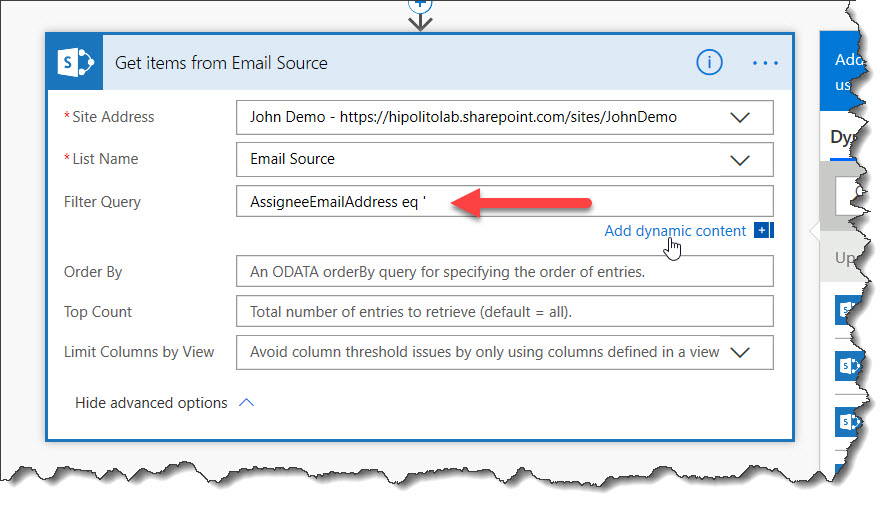
Save your workflow.
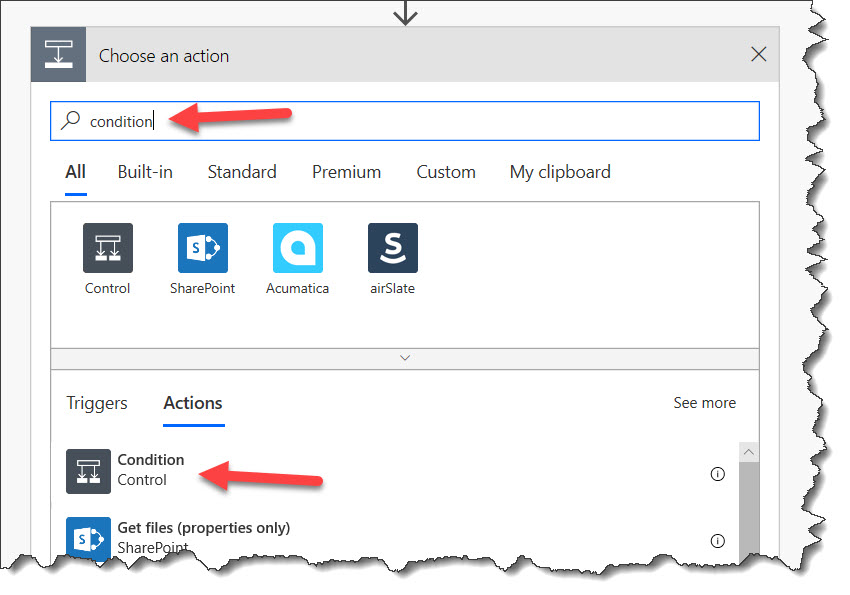
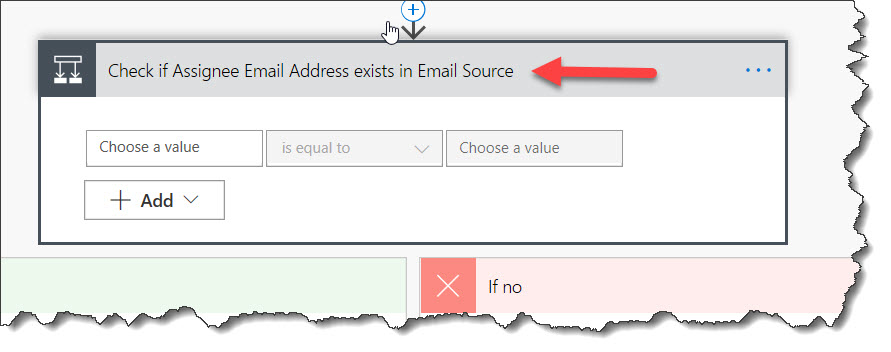
Click on “New step”. In the “Search connectors and actions” field, type in condition and select the “Condition” control. After adding it we will rename the condition “Check if Assignee Email Address exists in Email Source”: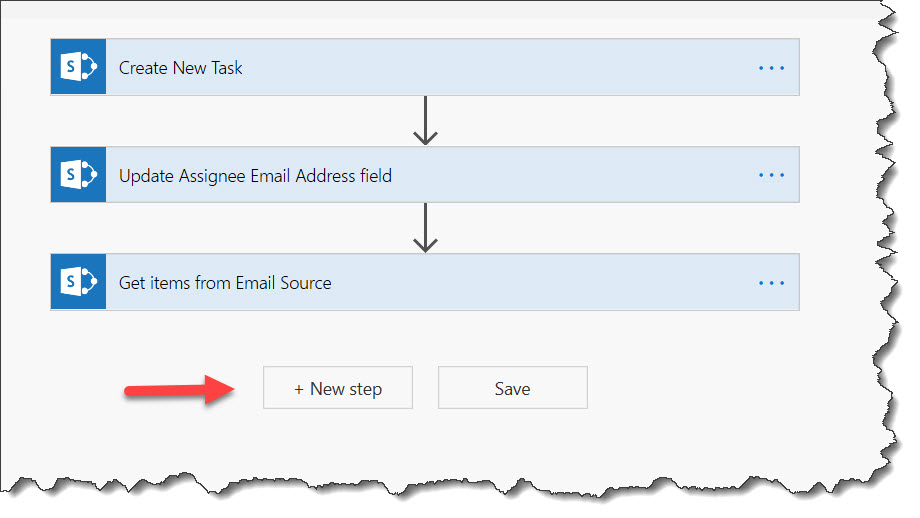
Click in side the first “Choose a value” field and then click on the expression tab: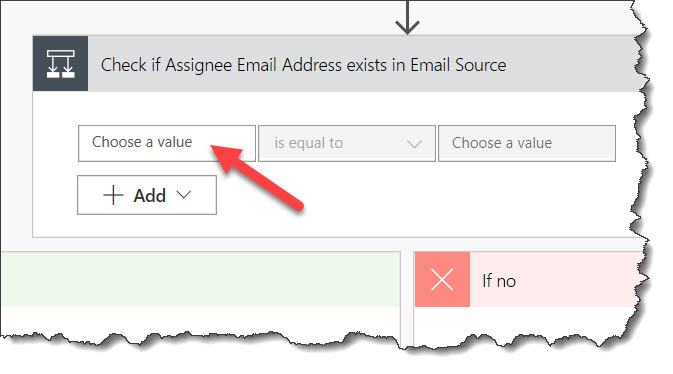
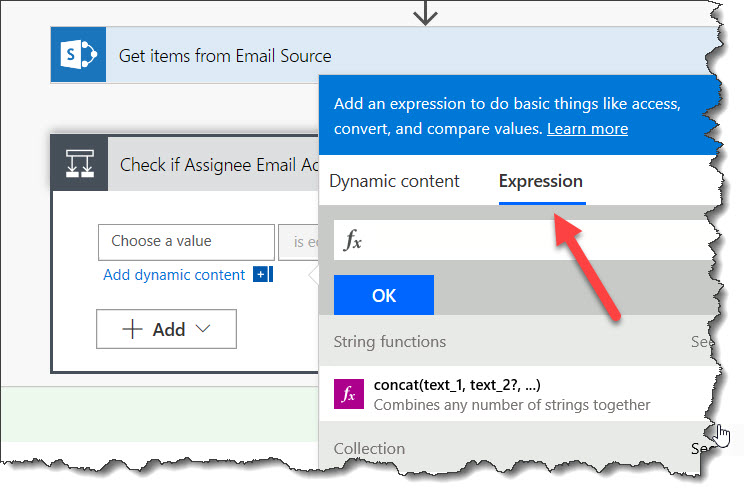
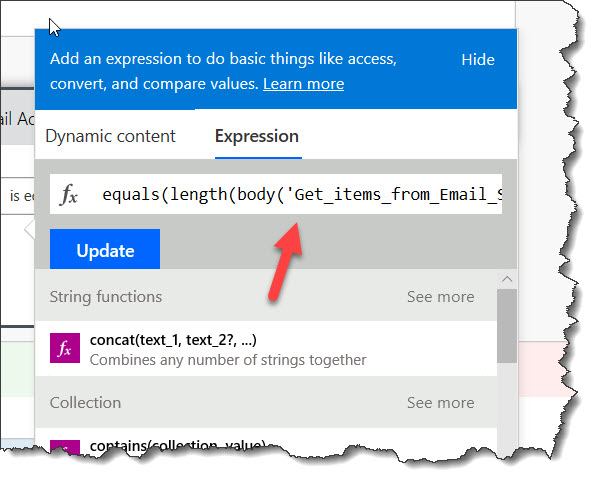
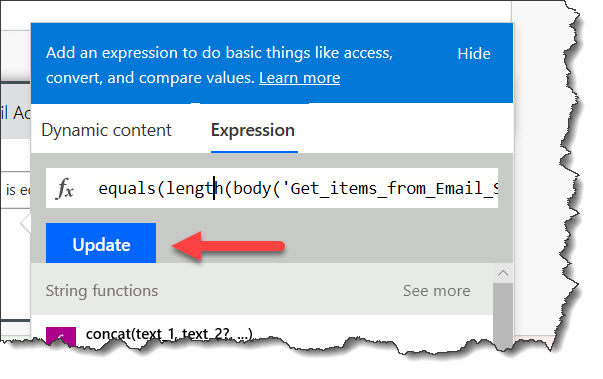
Click in the Expression field and paste in the following formula. The body should be the name of the “Get Items” action we added previously separating each word by underscores. Make sure to click on the “OK” button when done:equals(length(body('Get_items_from_Email_Source')?['value']), 0)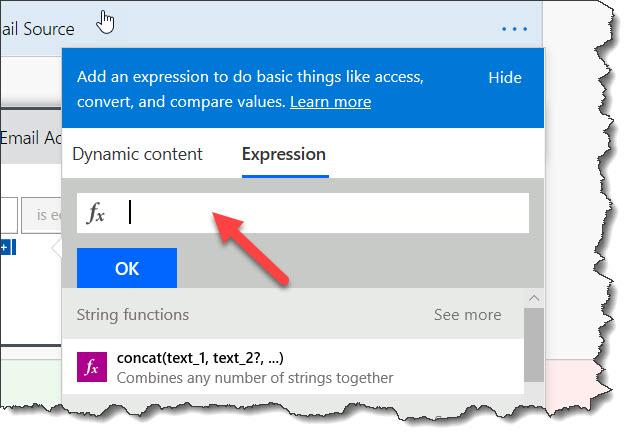
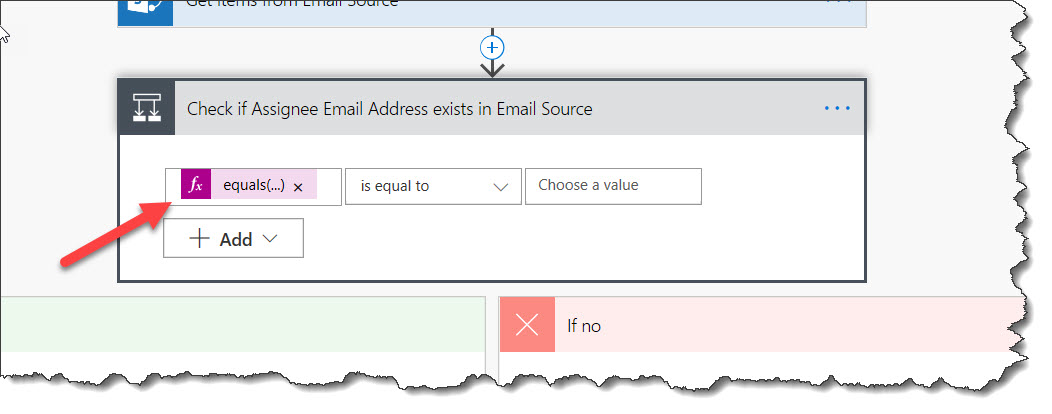
Make sure that the condition is set to “is equal to” and “true”:
Click on “Add an action in the “If yes” condition: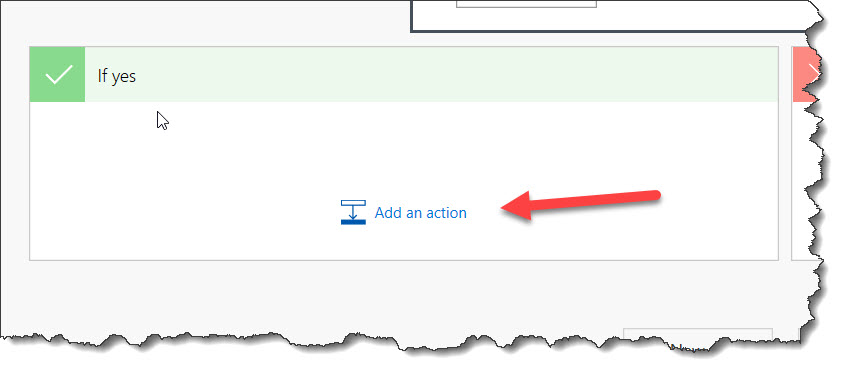
In the “Search connectors and actions” field, type in “create item” and select the “Create item” SharePoint action. You now have a “Create item” action. Let’s rename it “Add to Email Source”: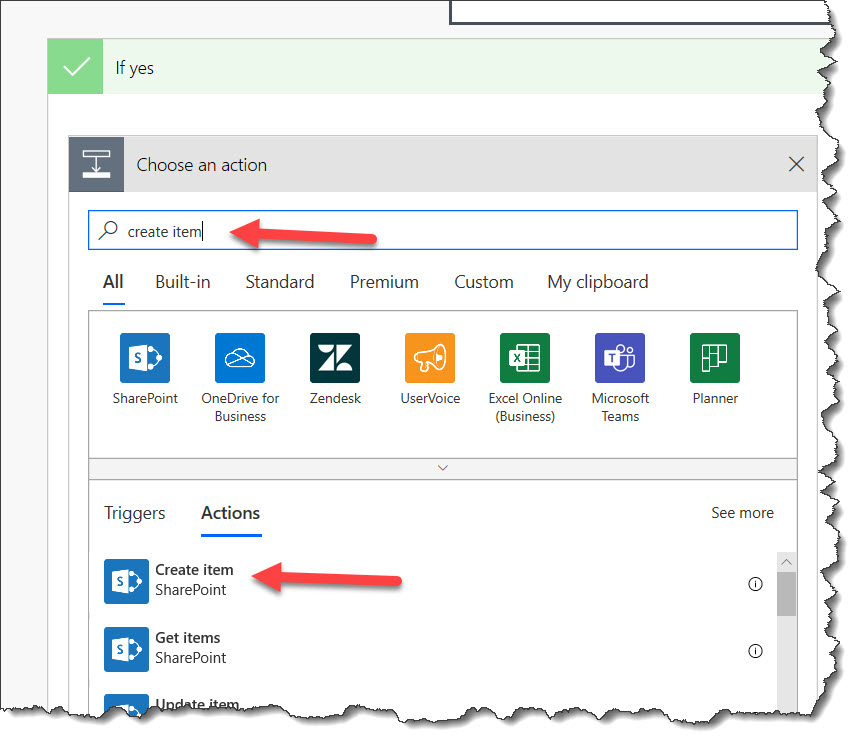

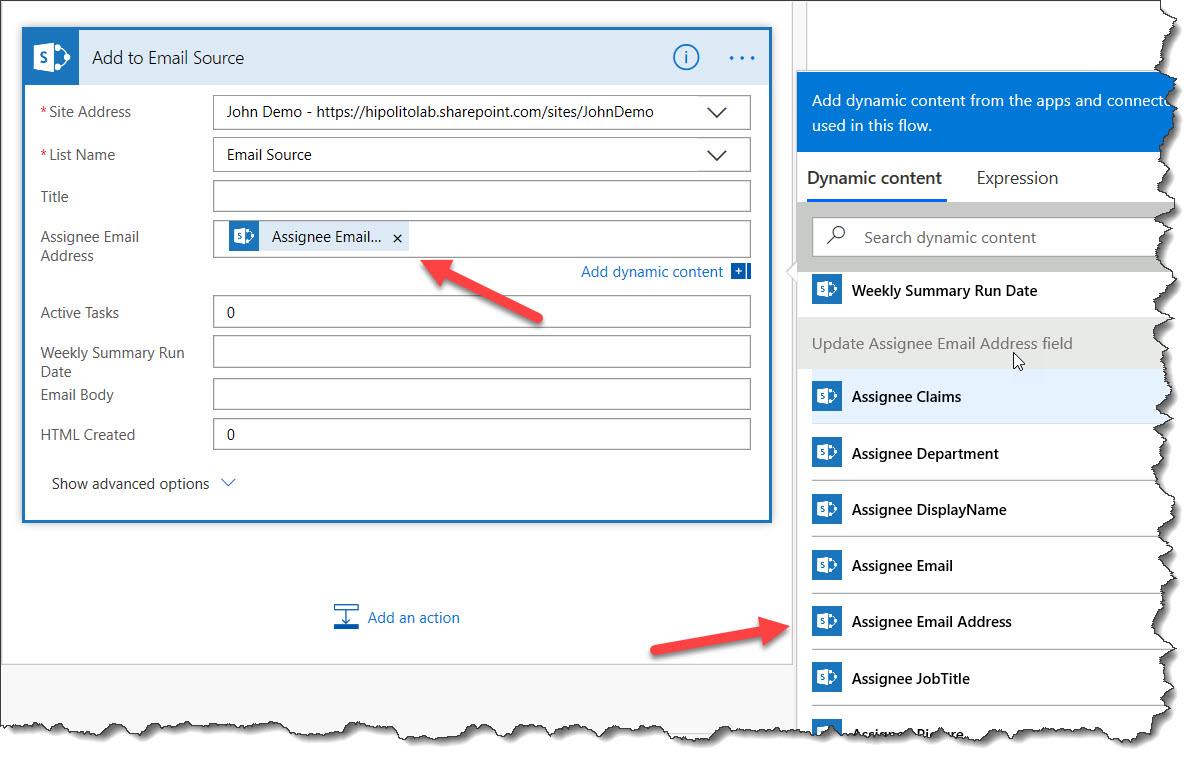
Select the Site Address and the List Name “Email Source” list. In the “Dynamic content” area to the right, make sure to select the “Assignee Email Address” field(or whatever the name of your field is if you changed it) from the “Update Assignee Email Address field” section: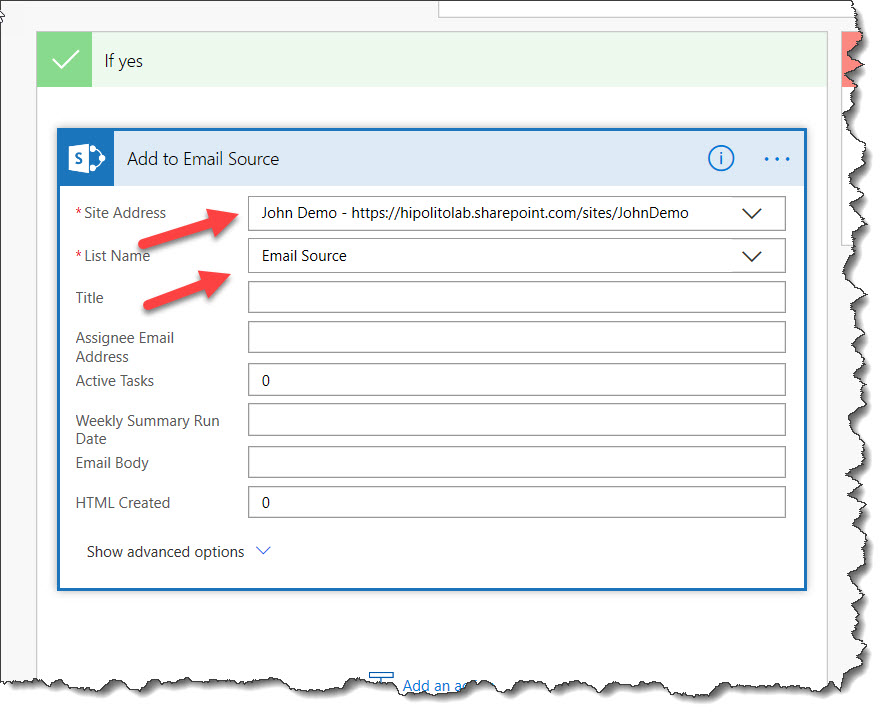
Click on the “Save” button. You can either click on the “Test” button and perform the trigger action or simply go to the lost and add an item. If all is well, you should see that the “Assignee Email Address” field should be populated in the “Project Tasks” list. Also, you will see an entry in the “Email Source” list that has the “Assignee Email Address” populated. On to the next Workflow. After you have saved your flow, click on “My flows” in the left navigation area.
Click on “New” and select “Scheduled-from blank”: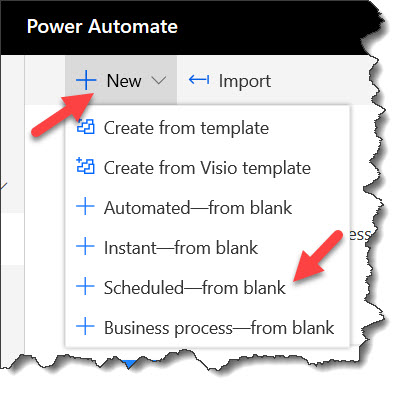
In the “Build a scheduled flow” window, enter ‘Create Email’ as the Flow name and set it to repeat every 1 week on Sunday’s as shown in the illustration. Please note that the “Starting” date shown is when you want the flow to start this schedule. To select the day/s you want it to run, simply click on the day. If the day is blue, that means it will run on that day. Click on “Create” when you have set up the schedule. If you would like, you can click the “Skip” button to ignore the schedule for now so you can make sure it tests correctly when we finish creating the flow.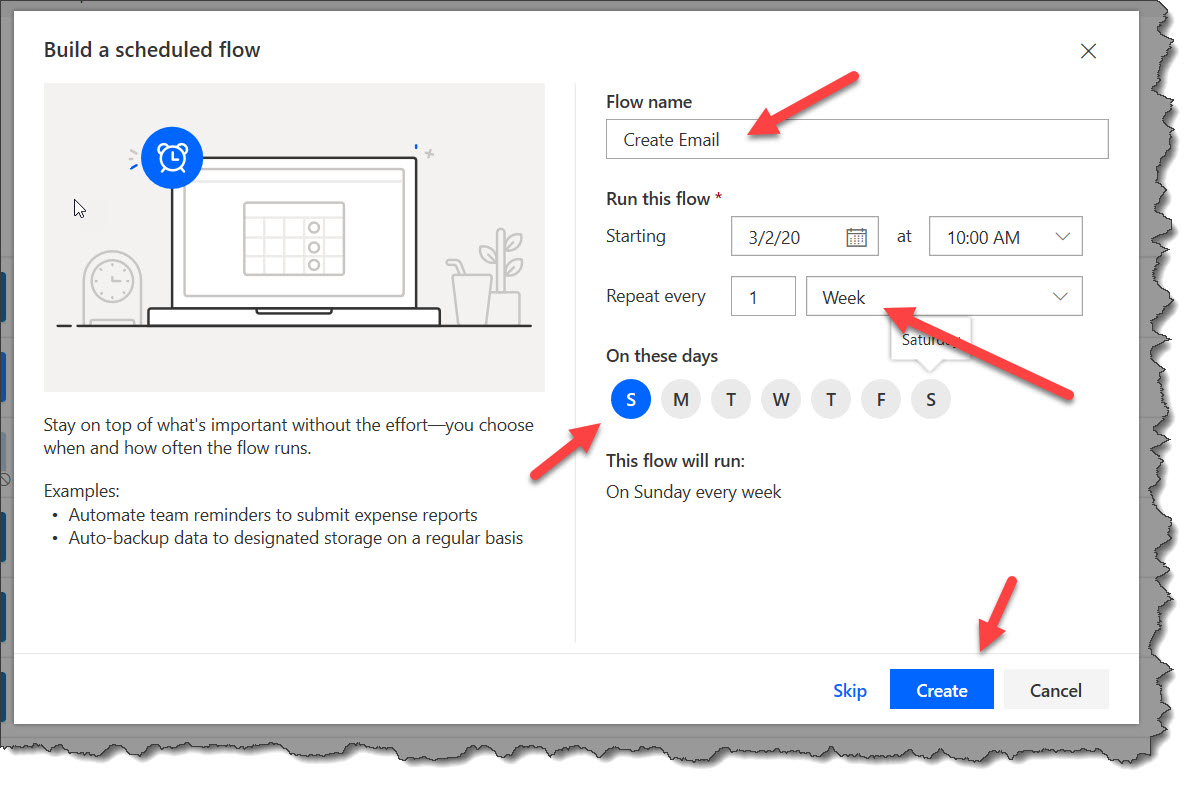
Click on the “Save” button. Click on “New step” and type “initialize variable” in the “search connectors and actions” field. Select the “Initialize variable” Variable action. Lets rename the variable “Initialize variable fltUserTasks”. If you would like detailed steps on adding new steps/actions as well as renaming them, see the above illustrations. Make the name of the variable “fltUserTasks”, the type of the variable will be “Float”, and the value will be 0: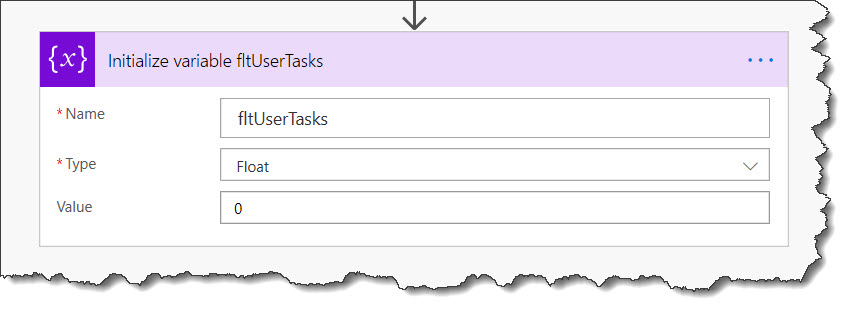
Continue the same steps above to initialize the following variables:
Action: Initialize variable
Rename action to: “Initialize variable strEmailBody”
Name: strEmailBody
Type: String
Value: Leave blank
Action: Initialize variable
Rename action to: “Initialize variable fltHTMLIterationsCreated”
Name: fltHTMLIterationsCreated
Type: Float
Value: 0
Action: Initialize variable
Rename action to: “Initialize variable fltCounter”
Name: fltCounter
Type: Float
Value: 0
Action: Initialize variable
Rename action to: “Initialize strDueDate variable”
Name: strDueDate
Type: String
Value: ""
The following three variables will be using Base64 images so the values will be long strings.
Action: Initialize variable
Rename action to: “Initialize strLowRisk variable”
Name: strLowRisk
Type: String
Value: <img src='data:image/png;base64,iVBORw0KGgoAAAANSUhEUgAAABAAAAAQCAYAAAAf8/9hAAAABmJLR0QA/wD/AP+gvaeTAAAB8ElEQVQ4jaVST0gUYRx9v/m+mf2D7o47U0620BS5yZpboLQ3k/JWeLMOwkoGduqodOgwBguevCgllZTQQiR0WPTgobqkECRRQX8uQgfTdF11pXRXZ74uJU67K0rv9vt+73u89/gB/wkqt2h/ZinBjcIbIYCcX4mPXbEKpXhSOYEmzRiqDukRQ9NPNVUZQwdyMPD6cX3MND9yxggAtm1bvJv9dranufPDvhzMLc73bxbygohARNjMF7CY+Z7cV4TOB7cac+vrF72ysrPzehRazf28kHjYe25PAUtYklrpH41HG7yyLCM1mEZqMA2Zc8RP1/vUQMWoJSzXH757CM9Ehs83h6MkEQFAdmENIAEAOBkO04kjNXWzM3PDALqLHHSN9FY6AglJkoj+dKsZKnQjBAAgEBhjcAQSHU9uBoojMHZnPpOxdzs6alaj5thhV+aFpYzj2Q70/Z0JAG48ul27Rfb79pZWn9/r+bcnFzbyeYy9fPGLQWm8f836QgDw9FN6SeFSSAuoroLGU69AIFzqaHGJLK+tii3bWb4abTvEk5P3ugy1SqcSF0FlLl0LBkk40JOTd7vZ8dYzzw1NUyt8/iJiJGYiEjNLSBB+rGTx9uvnBg6IlYnpKfP65TYAwMh4eoe219vE9BQUzrMlLR4EvwFlBZIosM5Q/wAAAABJRU5ErkJggg=='>
Action: Initialize variable
Rename action to: “Initialize strMediumRisk variable”
Name: strMediumRisk
Type: String
Value: <img src='data:image/png;base64,iVBORw0KGgoAAAANSUhEUgAAABAAAAAQCAYAAAAf8/9hAAAABmJLR0QA/wD/AP+gvaeTAAABtklEQVQ4jWNgoBAw4pJoaGhgCjR7uo2BgYFh/Slpr4aGhn/Y1DHhMsBL926hqq6Rs5q+sbOP4YMCXOqwGrBxrh+vsIRkIic3DwsHJzeLoIho2rYlnnxEGyArIdwtr6apDeMrqGmrSwpIdxBlwJFVoeqSMoq+zMwsDCu33GZYueU2AxMzM4O4tHzQkWW+2gQN4OMV7pOQVZBiYGBgePXuO8Ord98ZGBgYGCTl5cX5hWXa8Rpwcn1kgKyquh32yGFkkFXRcD61JiYMqwGrVoUy8wmIVwgIifBg8ysDAwMDv6AQF4+gUPH+BgcWDAOUWLmrFNW1THFphgFlLR0TXmPFCoS7GBgYtkzzFtQ20juhoKalhqz456+/DAwMDAzsbMwohjy4ef3ug/uXLRyjNr9hYmBgYJCSl5gop6KOopmBgYFh3uprDPPXXMdwhZyqurIgn0Q3AwMDA+Ox5RGGyrp6O8SkZMXQFT59+YWBkYGRQUqcG8OQl88evbl75ZIXCxcvT7aopAyGZgYGBgZpcZzhySAmKSvy/OG9NMYjy/2kWDkE0hj+M7DiVI0NMDL8/vnly0yS9GADAEXOY1csyqH3AAAAAElFTkSuQmCC'>
Action: Initialize variable
Rename action to: “Initialize strHighRisk variable”
Name: strHighRisk
Type: String
Value: <img src='data:image/png;base64,iVBORw0KGgoAAAANSUhEUgAAABAAAAAQCAYAAAAf8/9hAAAABmJLR0QA/wD/AP+gvaeTAAACRElEQVQ4jaWSTU8TURiFz70zczsD41BrKcFai0ghEViAEShDDXSE0J0uEBsX/gE3/ACk8gd0YTQmmmhY2KSJ6woZJCq0VtSYRiUmoGIgMSY4kvJhW2bcQNMCmqjP7rzJeT/OvcB/QorFTG+v9jOXe9kzNWW8HRhga5nMc8s0IStKe2Msln3c3W23CcLJzokJfcdDixtQ09REjhuzIhGaMYwh0en0lVVV1WdWV4esSISKHDdGTVMr8RQL3jBGLGD+RSrlAiHDHlUt96hqGYDhN7Oz1RYwzxvGyG9P2CEZCj1wNjScc3d02ABgKZnMrszNPWyLx8P7ZpDQtKgFnCbADWKaj4goPm0MhyWOMQDAVjaLd9Hoen5zs4cQcsYCLhPgiV/XL/AA8MXhuHjYMKpEy1ozRXHK3dkpcoxhVJ8GAFzRVLj9fmlpZuYuzeW6Ngm5t2y3fwUAHgDOx2JbAJYTfX2XJFmuc/h8BACWf2QAWAAAR10d+ZZOH9swjLNd4+P394T4TFUPUEqveQIBeafmVmQcqVC2jyU4GgiUU+B6MhRS9jRgsjxa4fXaylyuQkD1lQ74nAcLWqqshL221kaBqyUhTgeDx3nG0icGByVekvZ7mAL5jQ28j0bXrXy+pV3XP1AA4Bi7U93SIuw230y8wq3k65IaL0lwtbbaCGO3AYAmNa2XZ6ztUFMTv3saIft+E7iamzlOEE4lgsEQSfX3f/RqWo3i8fxx9d2sLi7i8+TkJ94Cvi/E4zV/5d6GE4SVf/GV8At+OrK/zmjUIAAAAABJRU5ErkJggg=='>
Action: Initialize variable
Rename action to: “Initialize strStatusFlag variable”
Name: strStatusFlag
Type: String
Value: Leave blank
Continue by adding the following actions:
Click “New step”
Action: Get items – SharePoint
Rename action to: “Get Email Source fields for clearing”
Site Address: The name of your site where the lists are.
List Name: Email Source
Click “New step”
Action: Update item – SharePoint
Rename action to: “Clear Email Source list”
Site Address: The name of your site where the lists are.
List Name: Email Source
Id: ID – Get Email Source fields for clearing
Active Tasks: 0
Weekly Summary Run Date: Click in field and click on the “Expression” tab. Type in “null” and then click on the “OK” button.
Email Body: Click in the field and click on the “Dynamic content” tab. Click on “strEmailBody” variable.
HTML Created: 0
After adding in the ID, the Update item action will be placed inside of a loop so that the action applies to each item in the Email Source list. Lets rename this “Apply to each” loop to “Clear each item in Email Source”: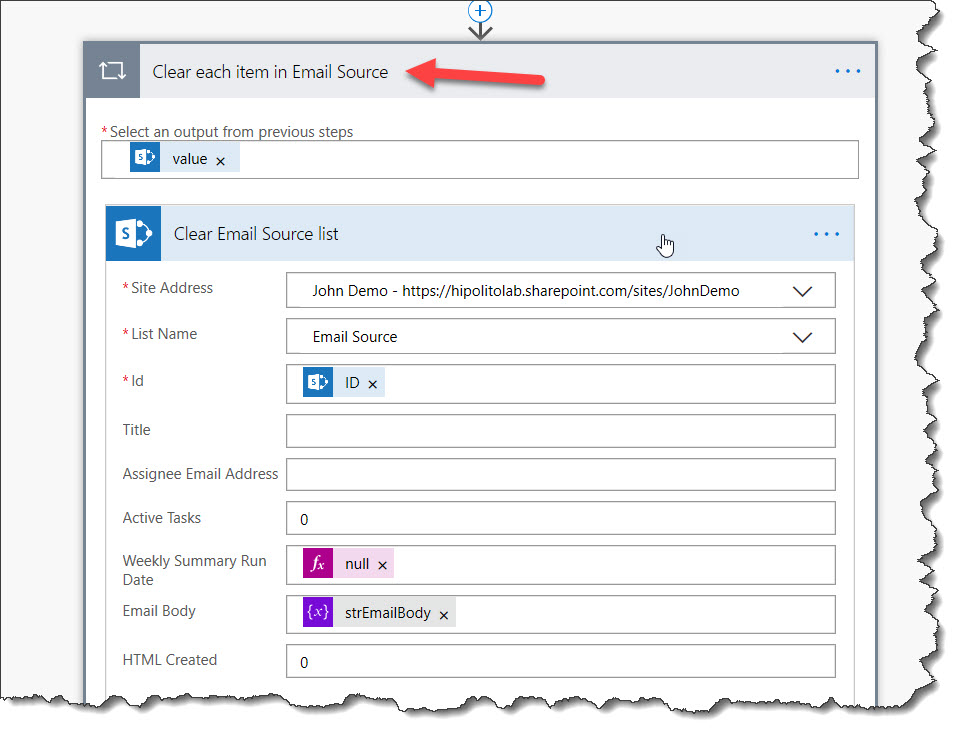
Click “New step”
Action: Get items – SharePoint
Rename action to: “Get Project Tasks”
Site Address: The name of your site where the lists are.
List Name: Project Tasks
Click on “Show advanced options”
In the Filter Query field, paste in the following:Status ne 'Completed' and Status ne 'Cancelled'
Click “New step”
Action: Get items – SharePoint
Rename action to: “Get Tasks from Email Source”
Site Address: The name of your site where the lists are.
List Name: Email Source
Click on “Show advanced options”
In the Filter Query field, paste in the following:AssigneeEmailAddress eq '
Directly after the single quote, click on the “Dynamic content” tab and click on “Assignee Email Address”(or whatever you named the field in the list) under the “Get Project Tasks” section. Directly after that, add another single quote: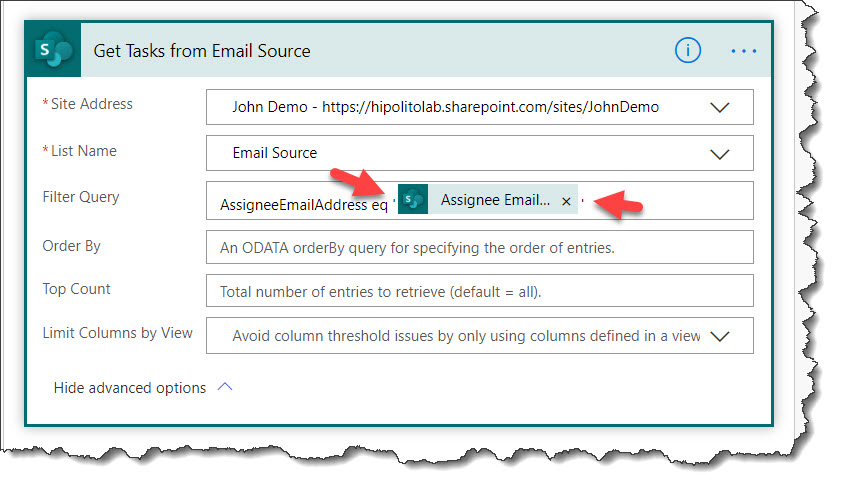
**As of 3/5/2020, it appears Microsoft made some changes so that the icons and colors have changed in SharePoint actions:
As soon as you added the “Assignee Email Address”, the “Get tasks from Email Source” action was placed inside of a loop so that the action applies to each item in the Email Source list. Lets rename this “Apply to each Project Task”: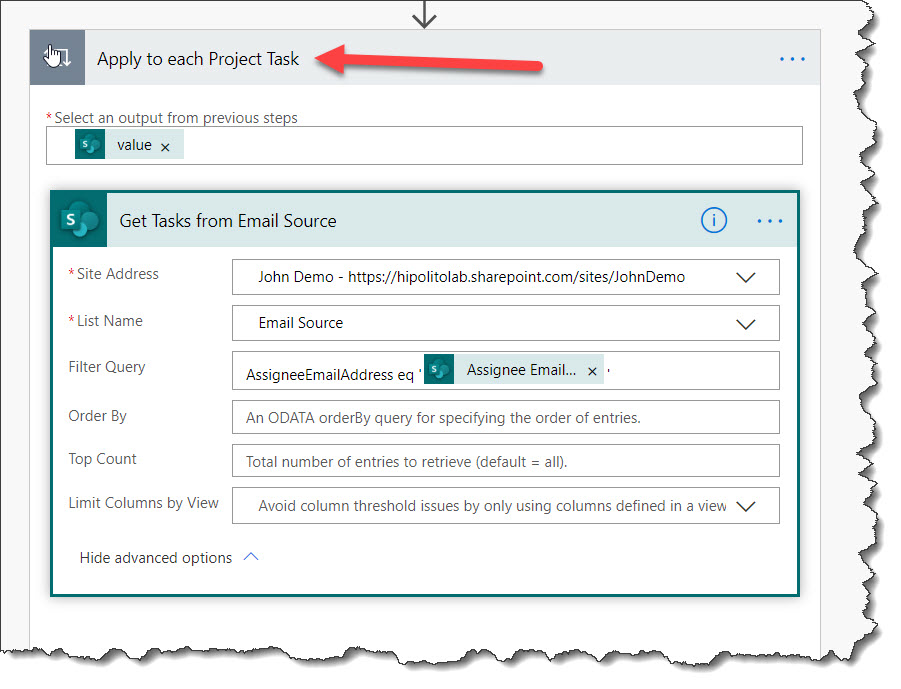
Click on “Add an action”
Action: Set variable – Variable
Rename action to: Set fltUserTasks variable
Name: fltUserTasks
Value: Click in the “Enter variable value” field and in the “Dynamic content” tab click on “ActiveTasks”(or whatever you named the field in the list) within the “Get Tasks from Email Source” section.
As soon as you do that, the “Set fltUserTasks” action will be placed inside of a loop so that the action applies to each item in the Email Source list. Lets rename this “Get the Active Users and set fltUserTasks variable”: 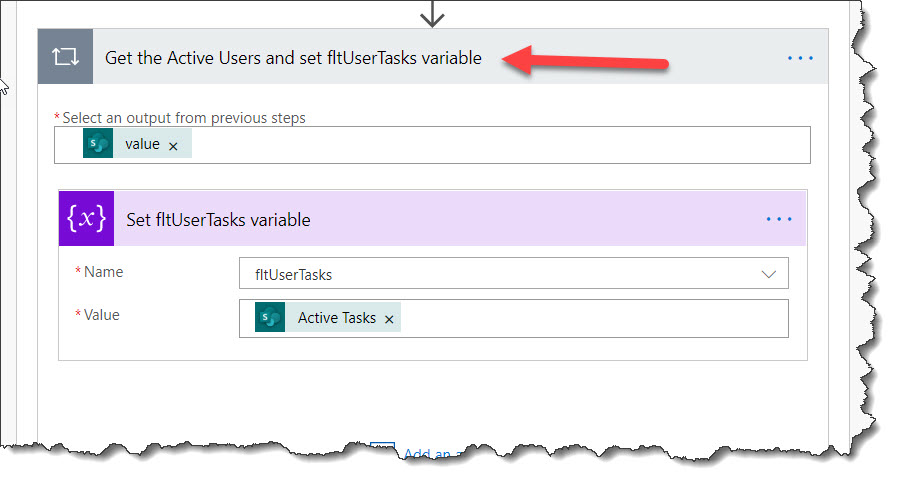
Click on “Add an action” AFTER the loop:
Action: Update item – SharePoint
Rename action to: Update Active Tasks
Site Address: The name of your site where the lists are.
List Name: Email Source
Id: Click in the “Unique identifier of item to be updated” field and in the “Dynamic content” tab click on “ID” within the “Get Tasks from Email Source” section.
As soon as you do that, the “Update Active Tasks” action will be placed inside of a loop so that the action applies to each item in the Email Source list. Lets rename this “Update the Active Tasks field for each item”.
Click in the “Active Tasks”(or whatever you named the field in the Email Source list) field and clear the 0 from the field. Click on the “Expression” tab to the right and paste in the following:
add(variables('fltUserTasks'),1)
Click on the “OK” button.
Click on “New step”
Action: Get items – SharePoint
Rename action to: Get Tasks info from Project Task list to build HTML
Site Address: The name of your site where the lists are.
List Name: Project Tasks
Click on “Show advanced options”. In the “Filter Query” field paste in the following:Status ne 'Completed' and Status ne 'Cancelled'
Click on “New step”
Action: Get items – SharePoint
Rename action to: Get items from Email Source to get values
Site Address: The name of your site where the lists are.
List Name: Email Source
Click on “Show advanced options”. In the “Filter Query” field paste in the following: AssigneeEmailAddress eq '
Directly after the single quote, click on the “Dynamic content” tab and click on “Assignee Email Address”(or whatever you named the field in the list) under the ” Get Tasks info from Project Task list to build HTML ” section. Directly after that, add another single quote: 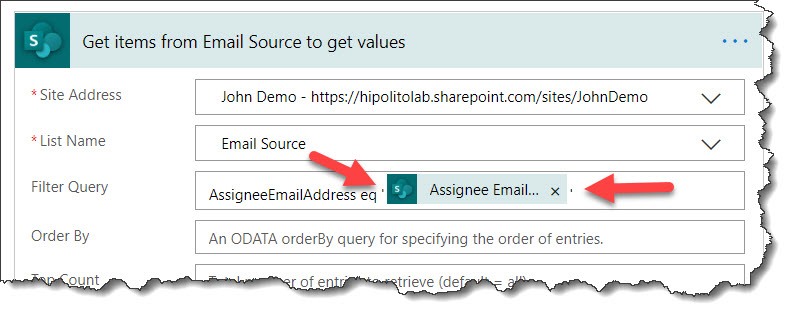
As soon as you do that, the ” Get items from Email Source to get values ” action will be placed inside of a loop so that the action applies to each item in the Email Source list. Lets rename this “Create HTML for each item in Email Sources”: 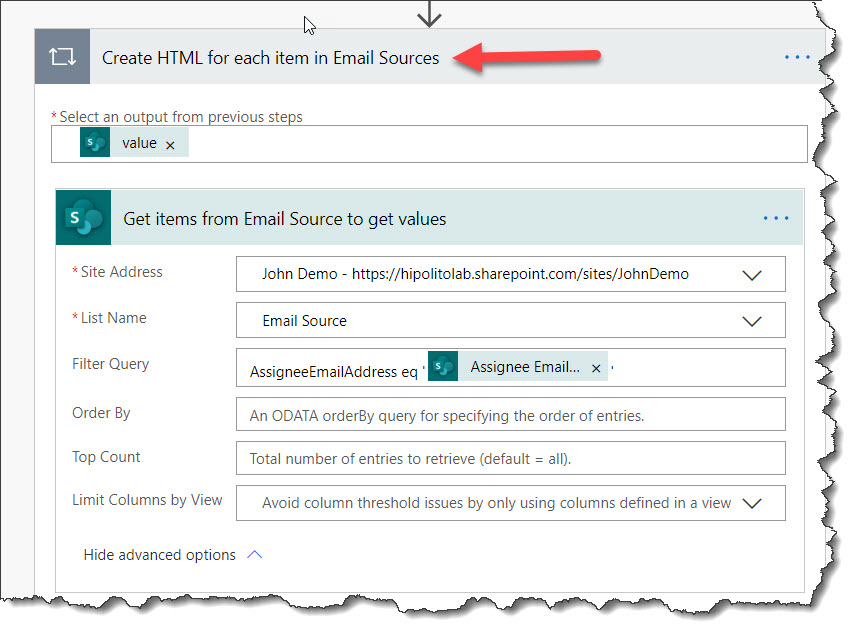
Click on “add an action”
Action: Set variable – Variable
Rename action to: Set initial value of strEmailBody variable
Name: strEmailBody
Value: Click in the “Enter variable value” field and in the “Dynamic content” tab to the right, click on “Email Body”(or whatever you have named the field in the Email Source list) within the “Get items from Email Sources to get values” section.
As soon as you do that, the “Set initial value of strEmailBody variable” action will be placed inside of a loop so that the action applies to each item in the Email Source list. Lets rename this “Compile HTML for each item”: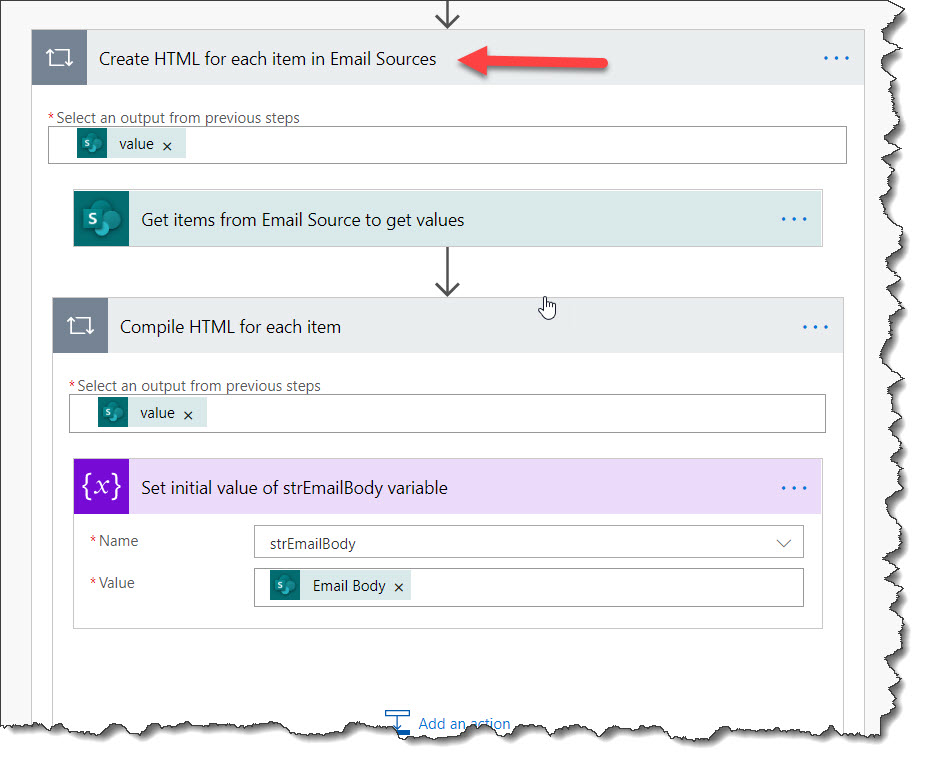
Click on “Add an action”
Action: Set variable – Variable
Rename action to: Set initial value of fltHTMLIterationsCreated variable
Name: fltHTMLIterationsCreated
Value: Click in the “Enter variable value” field and in the “Dynamic content” tab to the right, click on “HTML Created”(or whatever you have named the field in the Email Source list) within the “Get items from Email Sources to get values” section.
Click on “Add an action”
Action: Set variable – Variable
Rename action to: Set initial value of strDueDate variable
Name: strDueDate
Value: Click in the “Enter variable value” field and in the “Dynamic content” tab to the right, click on “Due Date”(or whatever you have named the field in the Project Tasks list) within the “Get Tasks info from Project Task list to build HTML” section.
Click on “Add an action”
Action: Condition – Control
Rename action to: Check if the strEmailBody variable is empty
Click in the first “Choose a value” field, select the “strEmailBody” variable within the “Dynamic content” tab in the “Variables” section.
In the condition drop down menu, select “is equal to”. In the last “Choose a value” field, paste in the following:""
In the “If yes” branch, click on “Add an action”.
Action: Set variable – Variable
Rename action to: Set strEmailBody variable
Name: strEmailBody
Value: In the “Enter variable value field, paste in the following code:
<p><h2 style="margin: auto; width: auto; text-align: center; font-family: 'Segoe UI'; font-weight: normal;">Here are your active tasks</h2></p><table style="margin: auto; max-width: 768px;" align="center"><tr><th valign="top" style="font-size: 9pt; font-family: 'Segoe UI'; border: 1px solid #ddd; background: #0078d4; padding: 3px 15px; color: #fff;">Task</th><th valign="top" style="font-size: 9pt; font-family: 'Segoe UI'; border: 1px solid #ddd; background: #0078d4; padding: 3px 15px; color: #fff;">Due Date</th></tr>Click on “Add an action”
Action: Condition – Control
Rename action to: Is the due date within five days or less
Click in the first “Choose a value” field, select the “strDueDate” variable within the “Dynamic content” tab in the “Variables” section.
In the condition drop down menu, select “is less than or equal to”. Click in the last “Choose a value” field and then click on the “Expression” tab. Paste in the following code:addDays(formatDateTime(utcNow(), 'yyyy-MM-dd'),5)
Make sure you click on the “OK” button.
In the “If yes” branch, click on “Add an action”.
Action: Set variable – Variable
Rename action to: Set strStatusFlag variable to strLowRisk
Name: strStatusFlag
Value: Click in the “Enter variable value” and in the “Dynamic content” tab select the “strLowRisk” variable within the “Variables” section.
Click on “add an action”
Action: Condition – Control
Rename action to: Is the due date within three days or less
Click in the first “Choose a value” field, select the “strDueDate” variable within the “Dynamic content” tab in the “Variables” section.
In the condition drop down menu, select “is less than or equal to”. Click in the last “Choose a value” field and then click on the “Expression” tab. Paste in the following code:addDays(formatDateTime(utcNow(), 'yyyy-MM-dd'),3)
Make sure you click on the “OK” button.
In the “If yes” branch, click on “Add an action”.
Action: Set variable – Variable
Rename action to: Set strStatusFlag variable to strMediumRisk
Name: strStatusFlag
Value: Click in the “Enter variable value” and in the “Dynamic content” tab select the “strMediumRisk” variable within the “Variables” section.
Click on “add an action”
Action: Condition – Control
Rename action to: Is the due date less than today
Click in the first “Choose a value” field, select the “strDueDate” variable within the “Dynamic content” tab in the “Variables” section.
In the condition drop down menu, select “is less than”. Click in the last “Choose a value” field and then click on the “Expression” tab. Paste in the following code:utcNow('yyyy-MM-dd')
Make sure you click on the “OK” button.
In the “If yes” branch, click on “Add an action”.
Action: Set variable – Variable
Rename action to: Set strStatusFlag variable to strHighRisk
Name: strStatusFlag
Value: Click in the “Enter variable value” and in the “Dynamic content” tab select the “strHighRisk” variable within the “Variables” section.
Click on “Add an action”
Action: Append to string variable – Variable
Rename action to: Append to string strEmailBody variable
Name: strEmailBody
Value: Paste in the following code:
<tr><td valign="top" style="font-weight: normal; font-size: 9pt; font-family: 'Segoe UI'; border: 1px solid #ccc; padding: 3px 15px;"><a style="color: #2F5496;" href="https://hipolitolab.sharepoint.com/sites/johndemo/_layouts/15/start.aspx#/Lists/project%20tasks/EditForm.aspx?ID=Place the cursor immediately after the Equal sign and in the “Dynamic content” tab, click on “ID” within the “Get Tasks info from Project Task list to build HTML” section. After “ID” Paste the following code:">
Place the cursor immediately after and now select “Task and/or Deliverable”(or whatever you may have named that field in the “Email Source” list. After you have added “Task and/or Deliverable”, paste the following code:
</a></td><td valign="middle" style="font-weight: normal; font-size: 9pt; font-family: 'Segoe UI'; border: 1px solid #ccc; padding: 3px 15px;">Make sure you place the cursor immediately after the code you have just pasted and click on the “Expression” tab. In the expression field, paste in the following:formatDateTime(variables('strDueDate'), 'MM/dd/yyyy')
Place the cursor immediately after the expression and paste in the following code:
</td><td valign="middle">With the cursor immediately after, Click on the “strStatusFlag” variable within the “Dynamic content” area under the “Variables” section. Paste the following code immediately after:
</td></tr>The value should look like the following:
Click on “Add an action”
Action: Increment variable – Variable
Rename action to: Increment fltHTMLIterationsCreated variable
Name: fltHTMLIterationsCreated
Value: 1
Click on “Add an action”
Action: Set variable – Variable
Rename action to: Set fltCounter variable
Name: fltCounter
Value: Click in the “Enter variable value” field and select the “fltHTMLIterationsCreated” variable within the “Dynamic content” area under “Variables”.
Click on “Add an action”
Action: Condition – Control
Rename action to: Check if fltCounter and Active Tasks are equal
Click in the first “Choose a value” field, select the “fltCounter” variable within the “Dynamic content” tab in the “Variables” section.
In the condition drop down menu, select “is equal to”. Select “Active Tasks” from within the “Dynamic content” area under the “Get items from Email Source to get values” section.
In the “If yes” branch, click on “Add an action”.
Action: Append to string variable – Variable
Rename action to: Append closing table tag to string variable
Name: strEmailBody
Value: Paste in the following code:
</table><table align="center" style="margin:auto; width:auto"><tr><td valign="top" style="font-weight: normal; font-size: 8pt; font-family: 'Segoe UI'; padding: 0 4px;">Place the cursor immediately after the code and in the “Dynamic content” tab, select the “strLowRisk” variable from the “Variables” section. Immediately after the “strLowRisk” variable, paste in the following code:
</td><td valign="top" style="font-weight: normal; font-size: 8pt; font-family: 'Segoe UI'; padding: 0 4px;">Indicates that the task is due in five days or less</td></tr><tr><td valign="top" style="font-weight: normal; font-size: 8pt; font-family: 'Segoe UI'; padding: 0 4px;">Place the cursor immediately after the code and in the “Dynamic content” tab, select the “strMediumRisk” variable from the “Variables” section. Immediately after the “strMediumRisk” variable, paste in the following code:
</td><td valign="top" style="font-weight: normal; font-size: 8pt; font-family: 'Segoe UI'; padding: 0 4px;">Indicates that the task is due in three days or less</td></tr><tr><td valign="top" style="font-weight: normal; font-size: 8pt; font-family: 'Segoe UI'; padding: 0 4px;">Place the cursor immediately after the code and in the “Dynamic content” tab, select the “strHighRisk” variable from the “Variables” section. Immediately after the “strHighRisk” variable, paste in the following code:
</td><td valign="top" style="font-weight: normal; font-size: 8pt; font-family: 'Segoe UI'; padding: 0 4px;">Indicates that the task is overdue</td></tr></table>The value should look like the following: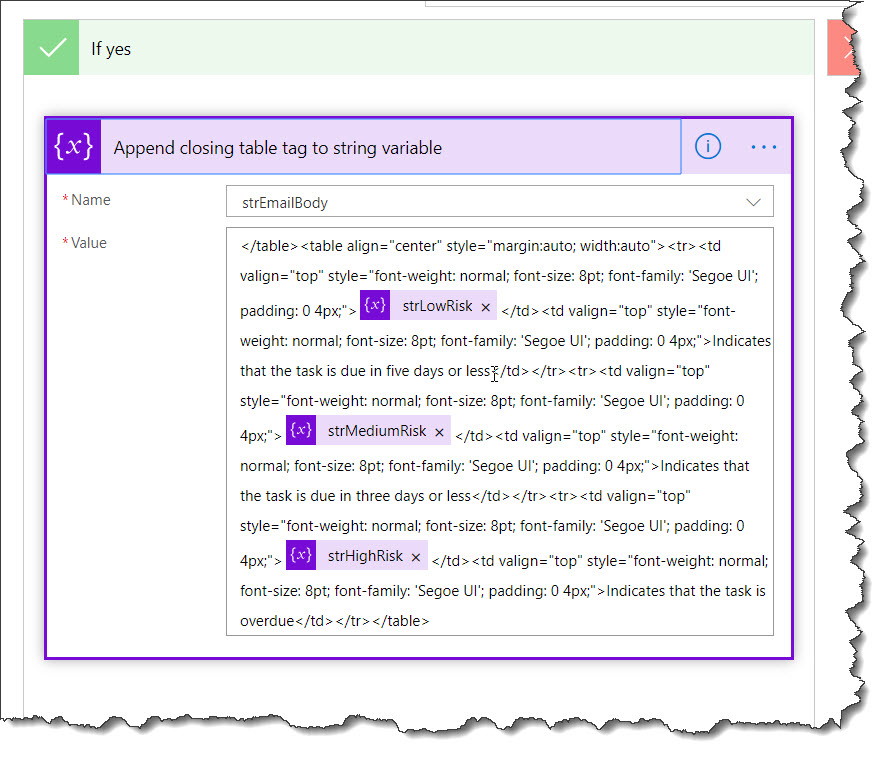
Click on “Add an action”
Action: Update item – SharePoint
Rename action to: Add all of the HTML to Email Sources
Site Address: The name of your site where the lists are.
List Name: Email Source
Id: Click in the “Unique identifier of item to be updated” field and within the “Dynamic content” area, select “ID” in the “Get items from Email Source to get values” section.
Active Tasks: Clear the value by removing the 0
Email Body: Select the “strEmailBody” variable from the “Variables” section within the “Dynamic content” area.
HTML Created: Select the “fltHTMLIterationsCreated” variable from the “Variables” section within the “Dynamic content” area.
The action will look like the following: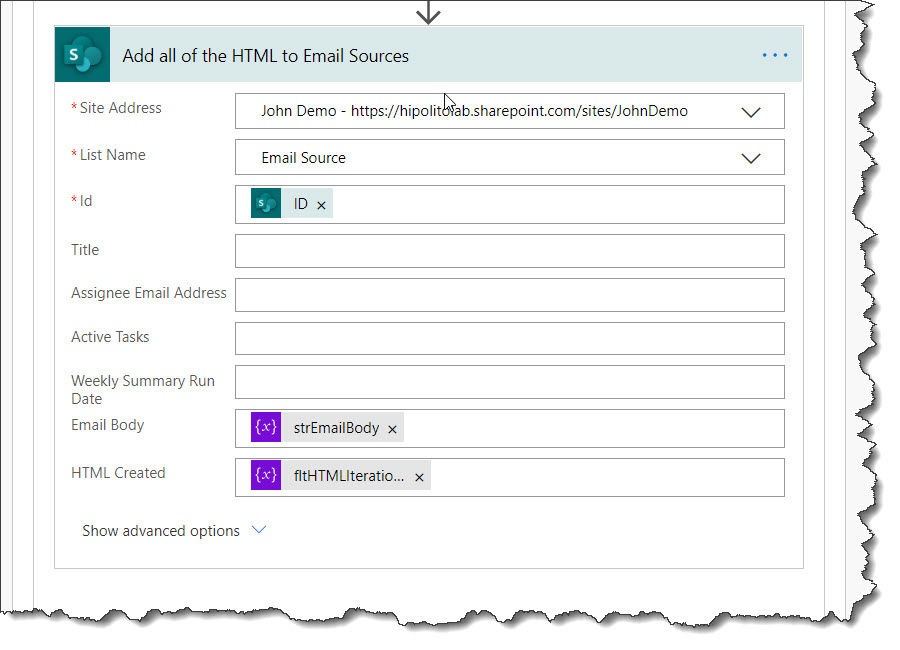
Click on “Add an action”
Action: Set variable – Variable
Rename action to: Reset strStatusFlag variable to null
Name: strStatusFlag
Value: Click in the “Enter variable value” field and click on the “Expression” tab. In the expression field, type in “null” and make sure to click on the “OK” button.
Click on the “New step” button
Action: Get items – SharePoint
Rename action to: Get items from Email Sources to send emails
Site Address: The name of your site where the lists are.
List Name: Email Source
Click on the “New step” button
Action: Condition – Control
Rename action to: Check if Active Tasks and HTML Created is equal
Click in the first “Choose a value” field, select “Active Tasks” from within the “Dynamic content” tab, under the “Get items from Email Sources to send emails” section. As soon as you do this, the “Check if Active Tasks and HTML Created is equal” action will be placed inside of a loop so that the action applies to each item in the Email Source list. Lets rename this “Check if each item needs an email sent”. Set the condition to “is greater than”. In the next “Choose a value” field, enter in 0.
Click on the “Add” button and select “Add row”. In the first “Choose a value” field in the new row, select “Active Tasks” from within the “Dynamic content” tab, under the “Get items from Email Sources to send emails” section. Make sure the condition is set to “is equal to”. In the next “Choose a value” field, select “HTML Created” from within the “Dynamic content” tab, under the “Get items from Email Sources to send emails” section.
The condition should look like the following: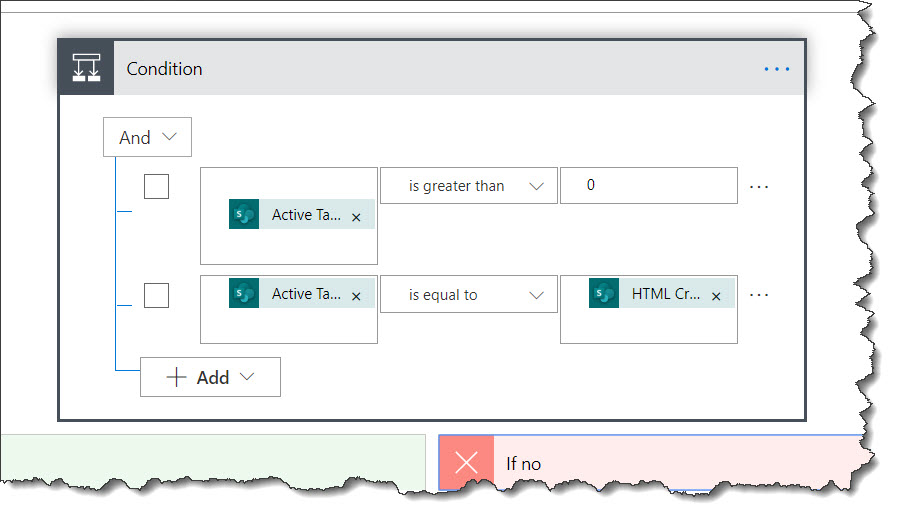
In the “If yes” branch, click on “Add an action”.
Action: Convert time zone – Date Time
Base time: Click in the “The time to convert.” field and click on the “Expression” tab. Enter in the following expression:
utcNow()
Make sure to click on the “OK” button after entering the expression.
Source time zone: Select (UTC) Coordinated Universal Time from the drop down menu
Destination time zone: Select your time zone from the drop down menu
Format string: Select Full date/time pattern (short time) from the drop down menu
**These setting may be different based on how you want your time to be displayed in your email based on your country.**
Click on “Add an action”
Action: Send an email (V2) – Office 365 Outlook
To: Select “Assignee Email Address” within the “Dynamic content” tab under the “Get items from Email Sources to send emails” section.
Subject: Enter in the following text:Tasks due as of
Make sure there is a space after the word “of”. Immediately after, click on the “Expression” tab and type in the following expression:formatDateTime(utcNow(), 'MM/dd/yyyy')
Body: Click in the “Specify the body of the email” field and select “Email Body” within the “Dynamic content” tab under the “Get items from Email Sources to send emails” section.
Click on “Add an action”
Action: Update item – SharePoint
Rename action to: Update the Email Source list and clear values
Site Address: The name of your site where the lists are.
List Name: Email Source
Id: Click in the “Unique identifier of item to be updated” field and within the “Dynamic content” area, select “ID” in the “Get items from Email Sources to send emails” section.
Active Tasks: 0
Weekly Summary Run Date: Click on “Converted time” within the “Dynamic content” area under the “Convert time zone” section.
Email Body: Click on the “Expression” tab and in the expression field, type in “null”. Make sure to click on the “OK” button.
HTML Created: 0
Step 3 – Test
Add an item to the “Project Tasks” list. The first thing you will notice is that the “Assignee Email Address” is populated:
If you check the “Email Source” list you will also see an entry that looks similar to this:
Repeat the process so that we have two items in the “Project Tasks” list. Feel free to add some late ones as well. you will only see one entry per person in the “Email Source” list.
To test the second flow, click on the “Test” button in the upper right corner of the flow edit screen: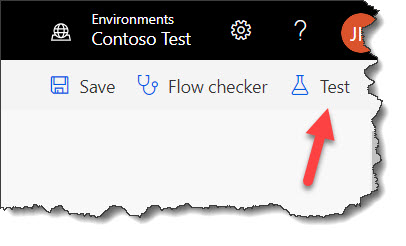
Select “I’ll perform the trigger action” and then click on the “Save & Test” button: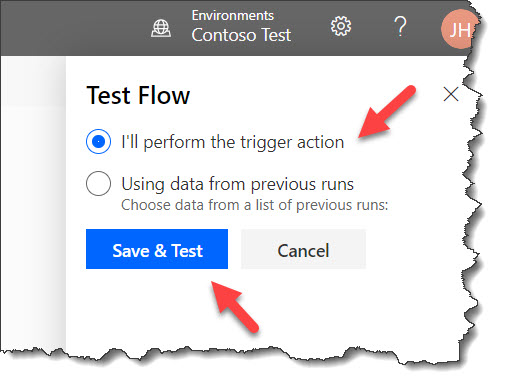
Click on “Run flow”: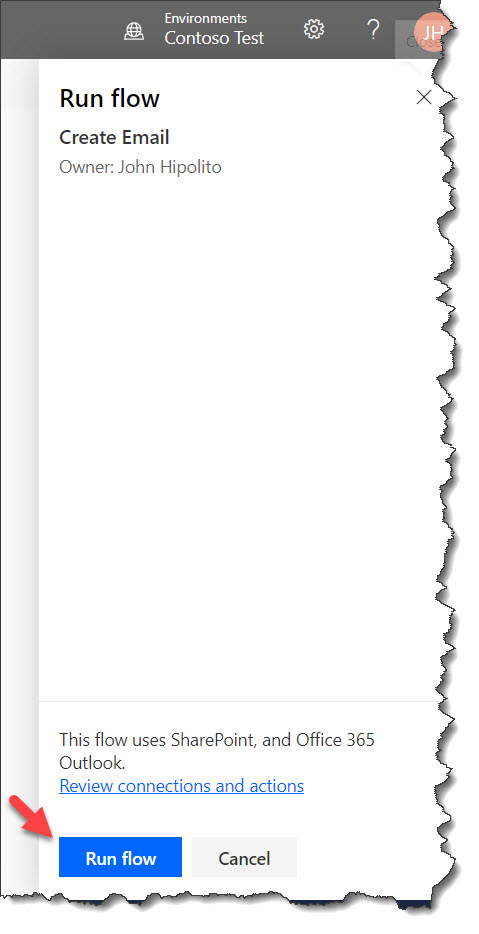
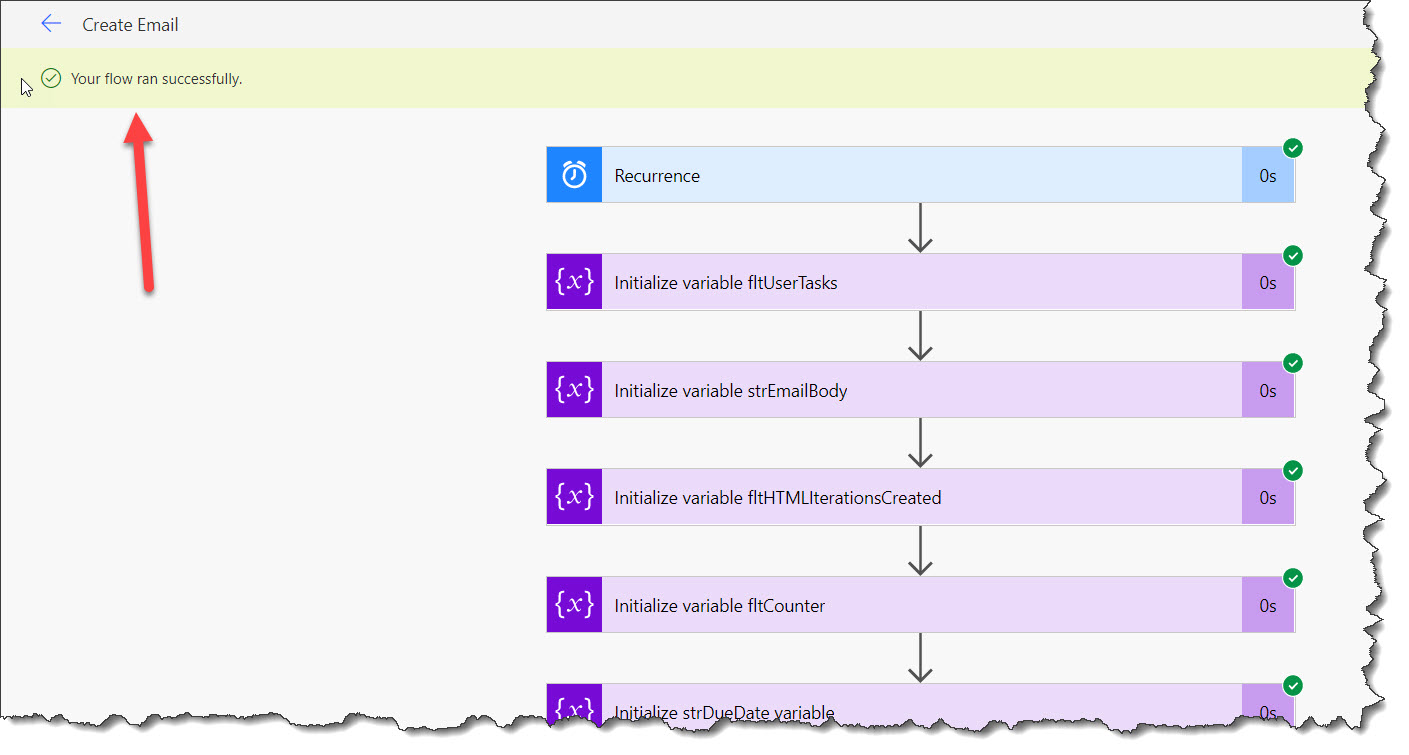
Click on the “Done” button and you will now see the flow running. After it is done running, you should see a message at the top indicating it was successful: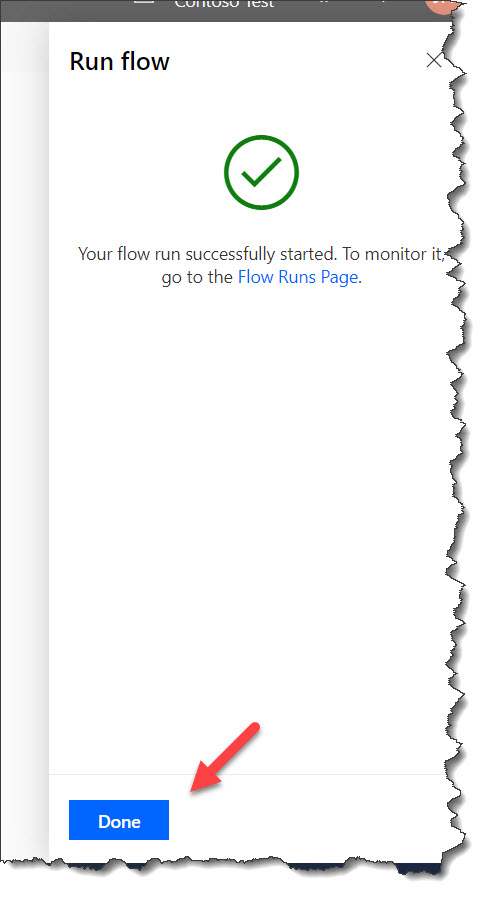
If you check your email and the flow ran successfully, your email message will look something like the following:
Happy SharePointing!
Hi John,
Thanks for the tutorial, it is very helpful. However after I ran the flow, the email is blank. I have created multiple items in the list.
While I am double checking the flow, within the “Compile HTML for each item”, do we click all “Add an action” under “Check if the StrEmailBody variable is empty” like this? image as below:
https://upload.cc/i1/2021/04/07/Cs5KfE.png
Or any other reason that could lead to the blank email? Thanks a lot
Sorry if I’m reposting, got an error when I submitted the last comment.
Thanks John for the tutorial, it is helpful. However I got a blank email after the test run while multiple items are in the list. Could I know if the flow under “Compile HTML for each item” is as below?
https://upload.cc/i1/2021/04/07/Cs5KfE.png
Or would you suggest any other reason that causes the blank email? Thank you again.
Hi Terrance,
Would you be willing to export the flow for me and I’ll crack it open and have a look?
Regards,
John
Hi John,
Thanks for helping, I have figured out the issue. All the “Add an action” should happen outside of the YES branch like below
https://upload.cc/i1/2021/04/07/Cs5KfE.png
Thanks again for the tutorial, it is very clear and helpful for the Power-Automate beginners like me ! 🙂
You bet….Power automate can handle this process in other ways that are much easier now. I’ll be cooking something up in the future.
Take care!