

Heads up! I’ve written a completely modern take on this post: How to Loop Through Multiple List Items in a SharePoint Modern Site with Power Automate. The old post below is completely intact if you need it, but if you’re doing anything on a modern SharePoint site, I recommend you check out the new article.
Recently, I was tasked with a project that consisted of a form to enter in projects and add tasks to the project. One of the requirements was to send out emails once a week to each user that has tasks assigned to them in a summary format. The first thing that came to mind was to use a SharePoint 2013 workflow which can achieve this using looping. Because my client wanted to remain OOTB for maintenance purposes, it had to be code free. Also, the client did not have any third party tools to iterate through SharePoint 2013 workflows (Harepoint, virto, etc). They did, however, have these tools to iterate through 2010 workflows. The first thought was to iterate through the 2010 workflows and I could kick off the 2013 workflows when something is updated or created. Well, I discovered that you cannot start a 2013 workflow in this way. I had to get creative and found nothing out there relevant to my situation. After thinking about this and testing different scenarios, I came up with a fairly straightforward solution to this problem. Let’s step through this process.
Requirements: SharePoint 2010/2013/O365, SharePoint Designer 2010/2013, & Some knowledge of HTML & CSS if you want to style the emails but not necessary
We will need two lists and four Workflows to get the results needed.
Step 1 – Create Lists. Leave as default unless otherwise specified.
If you prefer, you can download the list templates by clicking here (created in SharePoint 2013).
List Name: Custom Tasks (you can use the OOTB tasks list if you prefer but in my case I needed a custom list which is much more detailed than this basic one). This is the main Task list that contains all tasks and to whom they are assigned.
Column: Assignee – Person or Group
Column: Due Date – Date and Time
Column: Status – Choice (menu to choose from), Choices – New, In Process, Completed, Cancelled
Column: Task/Deliverable
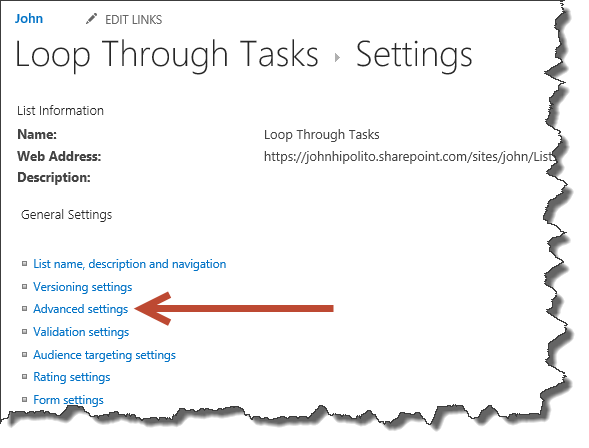
List Name: Loop Through Tasks. This list is used as a controller to loop through all the Tasks contained in the “Custom Tasks” list. It will also contain how many tasks the assignee has as well as other information to create the body of our email.
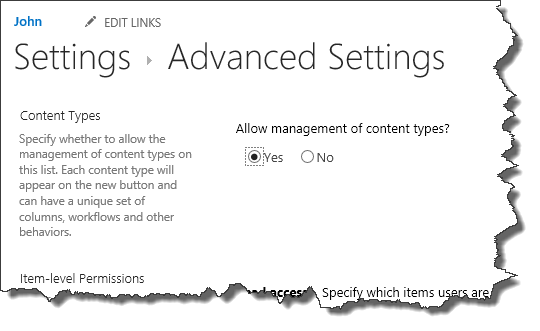
Allow management of content types in Advanced Settings:

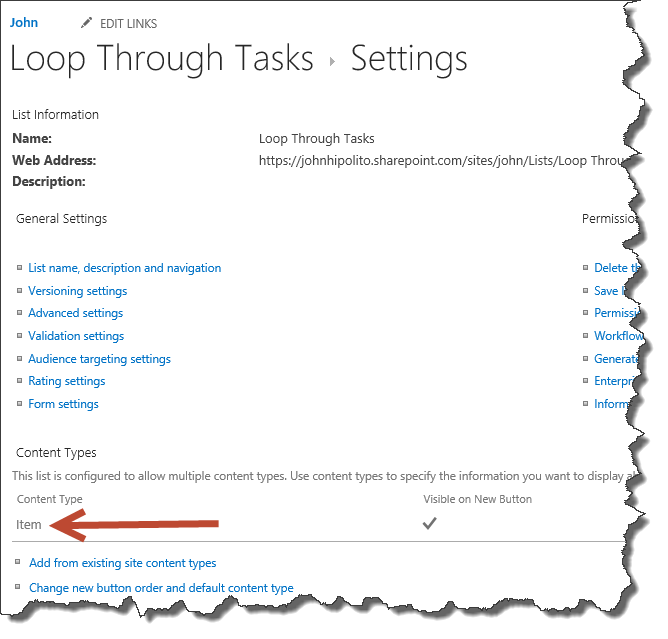
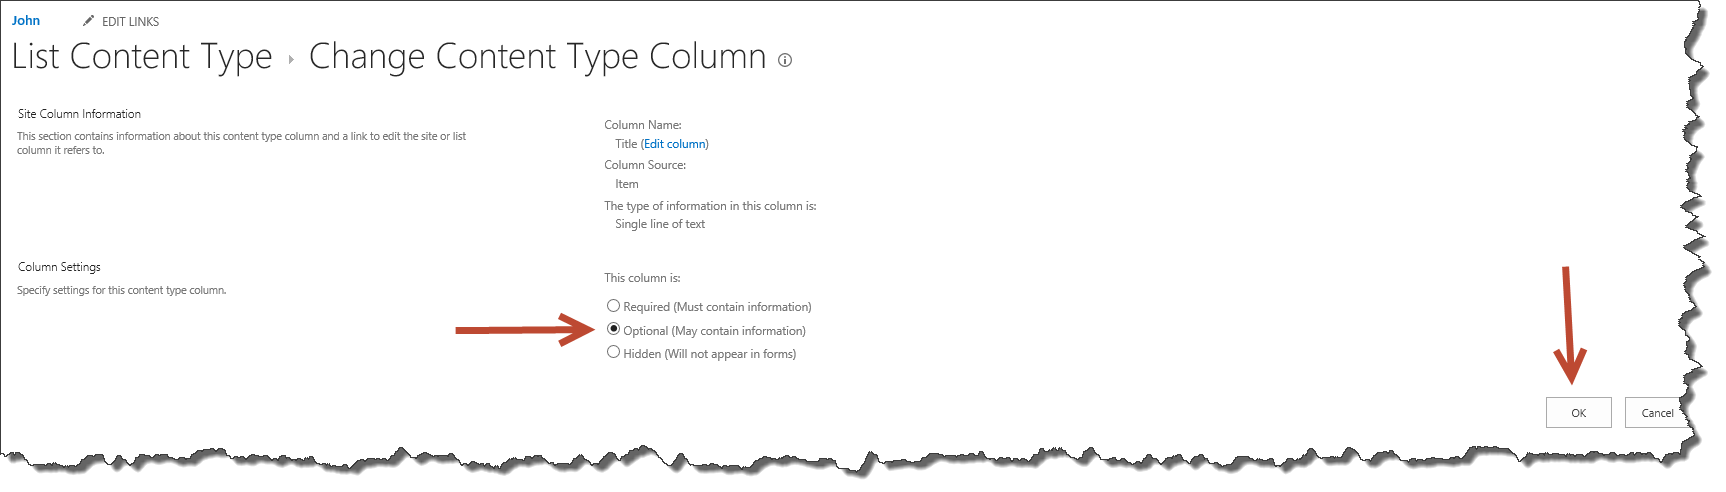
We don’t want the title field required:

Column: Active Tasks – Number, Number of decimal place = 0, Default value = 0
Column: Assignee – Person or Group
Column: Email Body – Multiple lines of text, Plain text
Column: HTML Created – Number, Number of decimal places 0, Default value = 0
Column: Weekly Summary Run Date – Single line of text
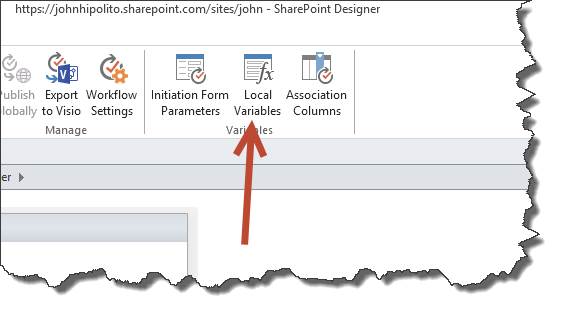
Step 2 – Create Workflows.
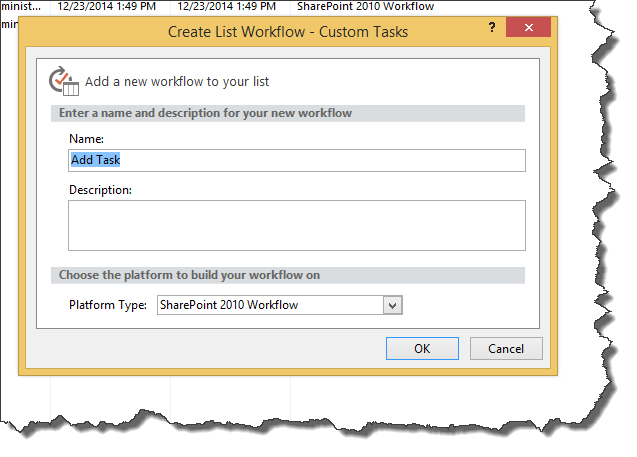
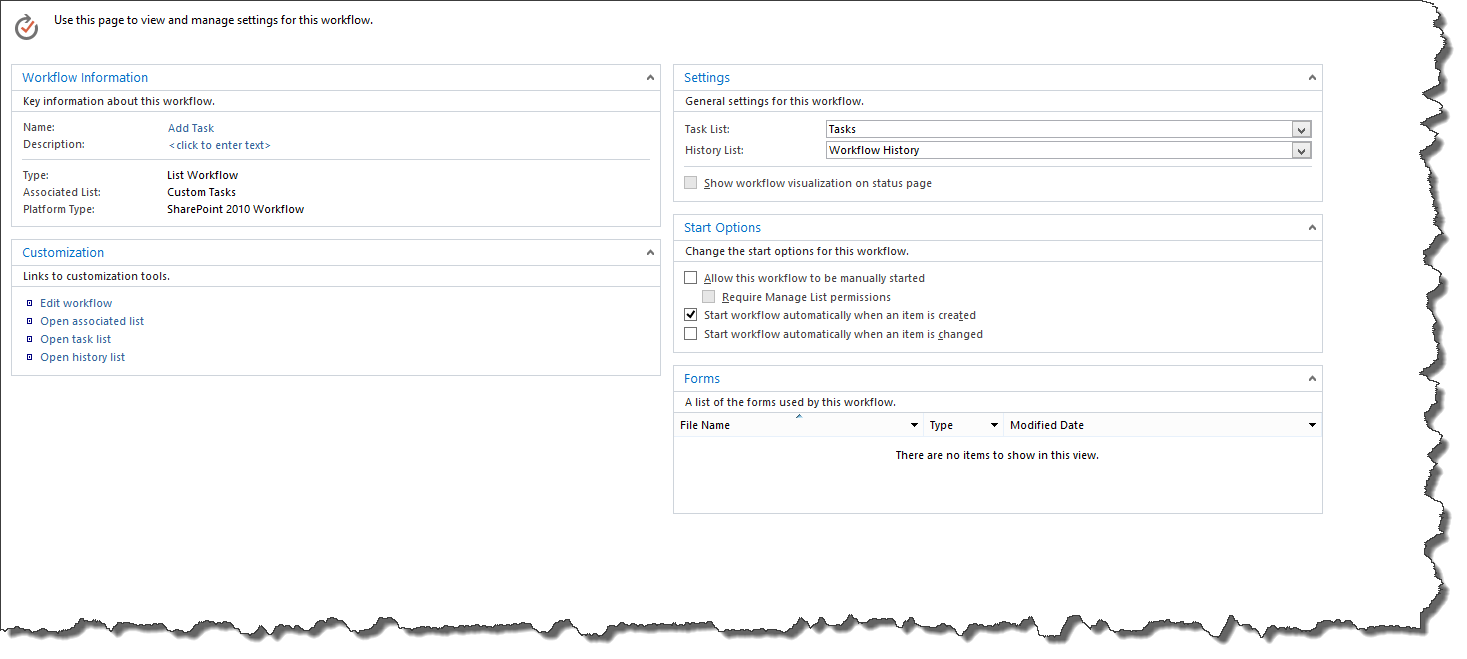
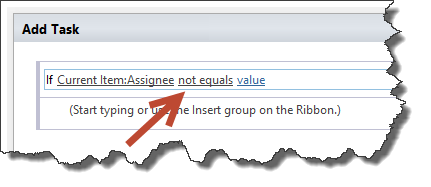
Create a Workflow on the Custom Tasks list called Add Task. This Workflow will add the assignees to the “Loop Through Tasks” list so we can use it for our looping. It will only add the assignee if they do not yet exist in the “Loop Through Tasks” list:
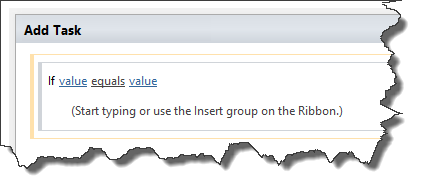
Add a condition (If any value equals value):
Set the first value and set the comparison to “not equals”:
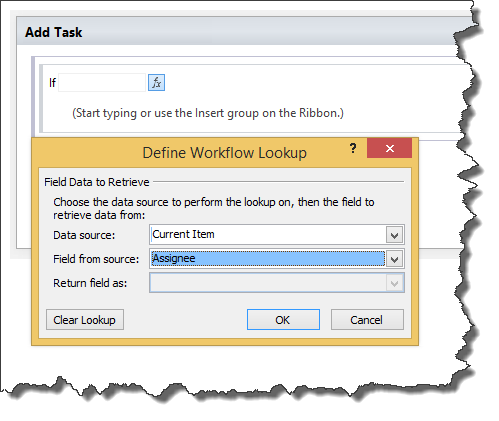
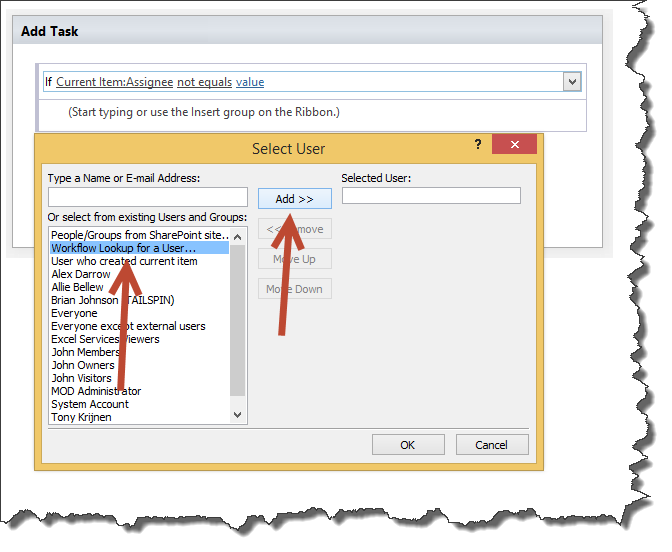
Set the last value of the condition:

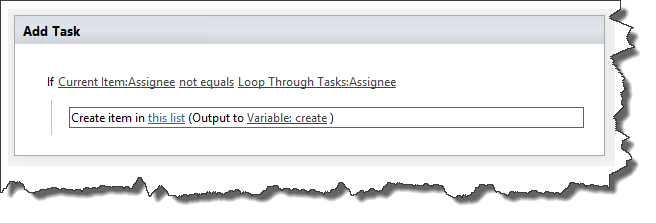
Add an action to create a list item:
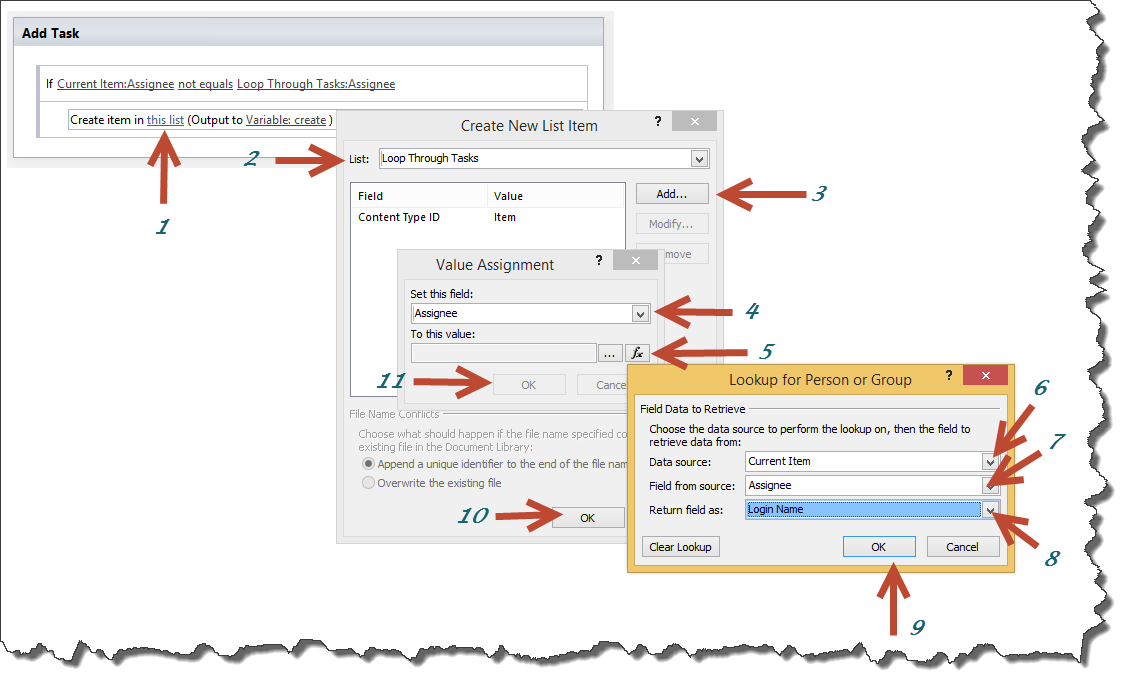
Click on “this list” to set what list to create the item in and the field we will set:
Publish the Workflow.
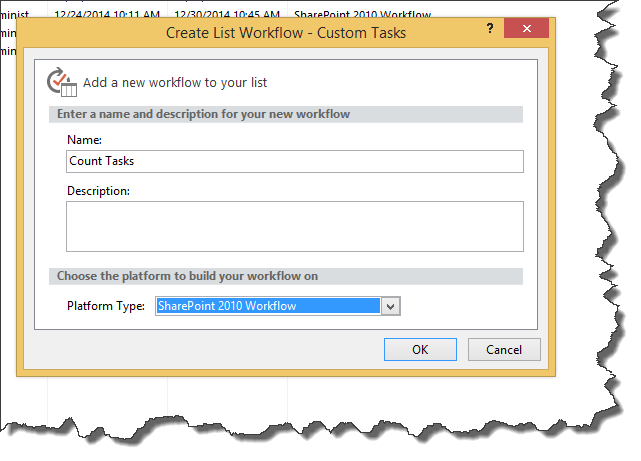
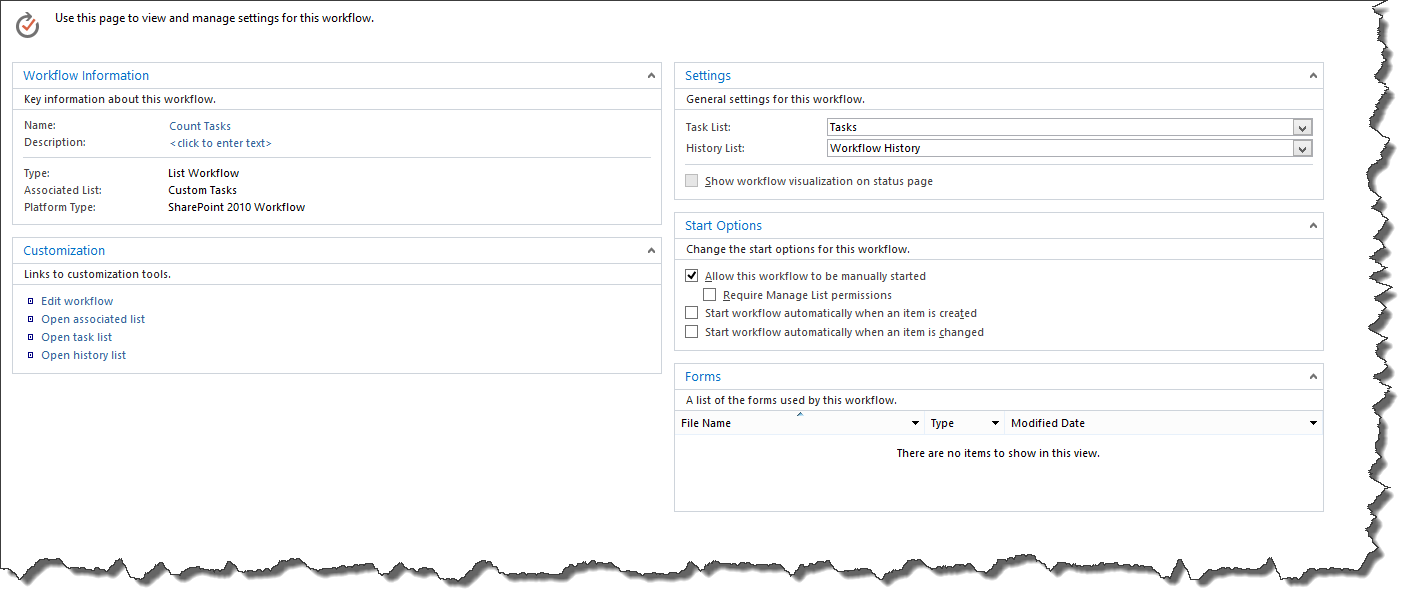
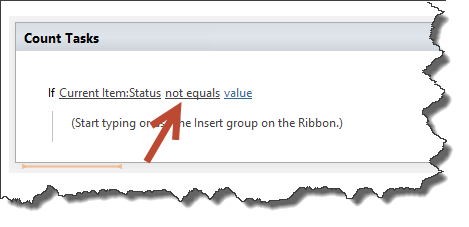
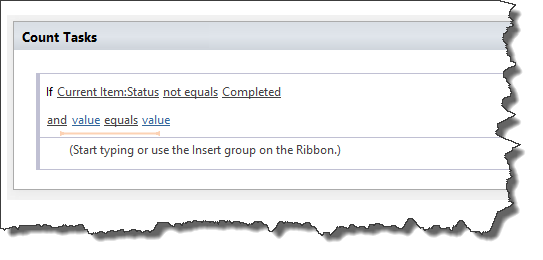
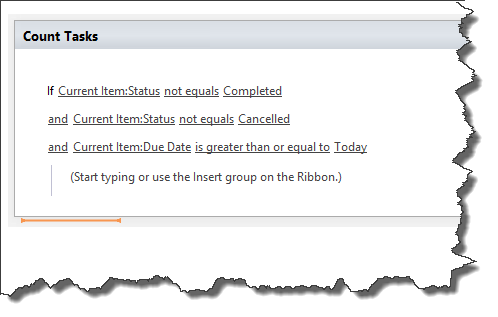
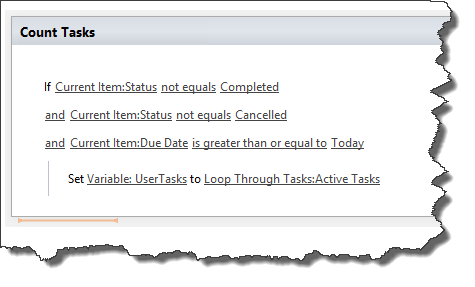
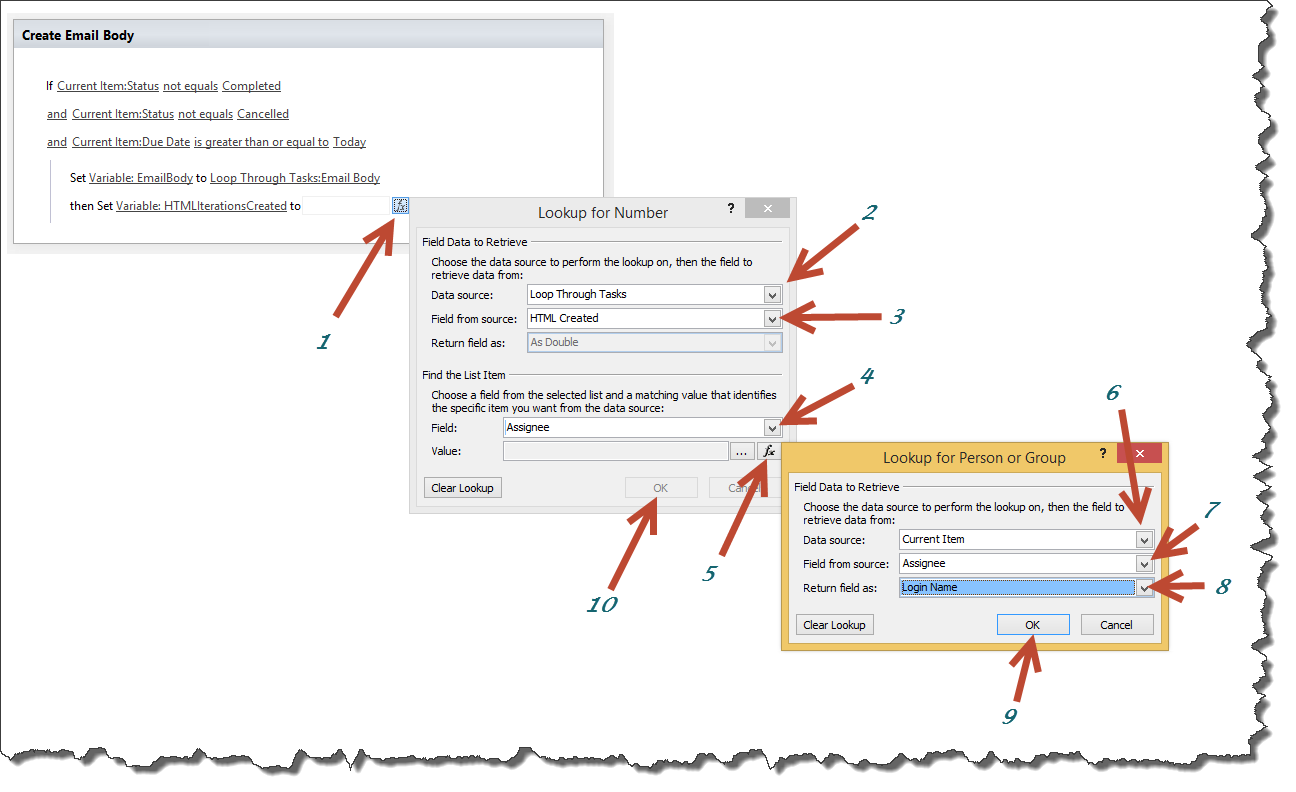
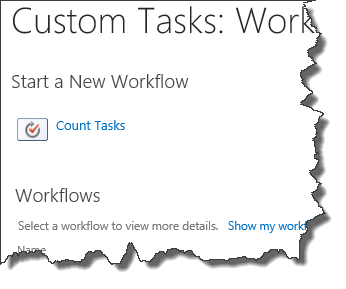
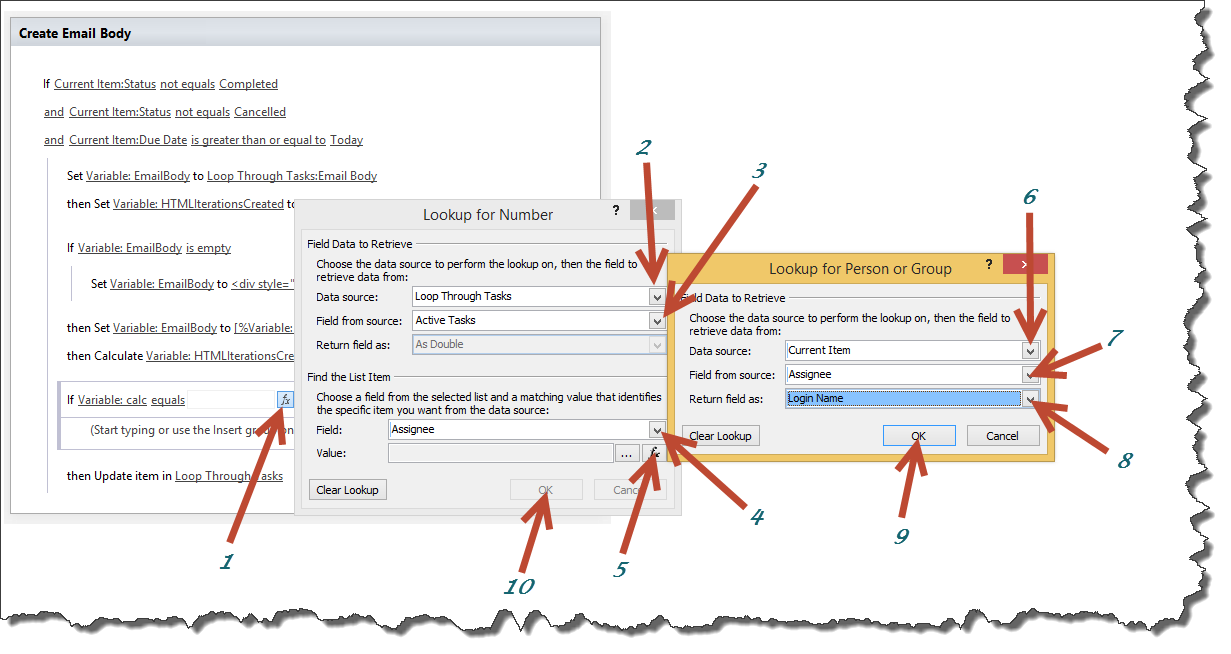
Create a Workflow on the Custom Tasks list called Count Tasks and change the settings as follows. This workflow will count how many tasks each assignee has. We can match this against how many times we add something to the email body to prevent failures as you will see:
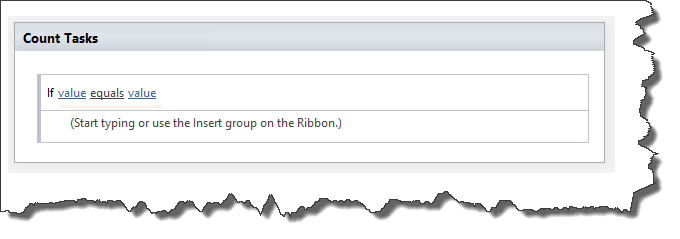
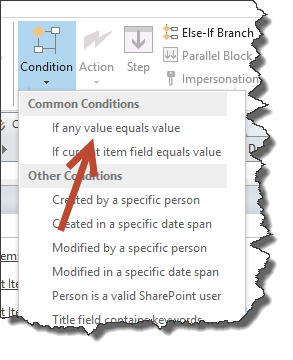
Add a condition (If any value equals value):
Set the first value and set the comparison to “not equals”:
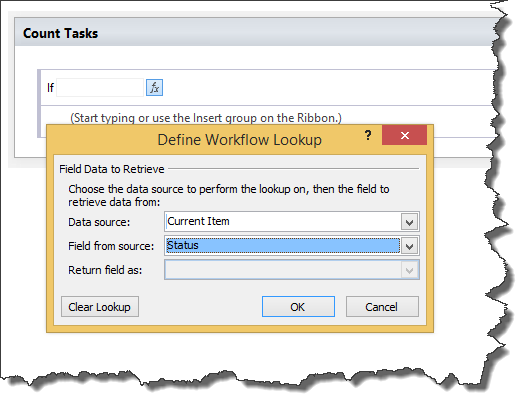
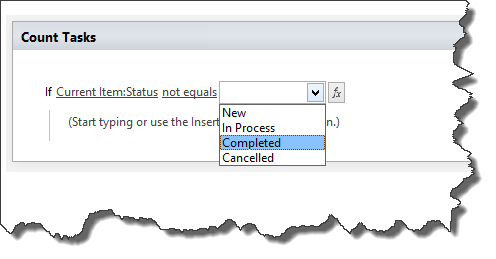
Set the last value of the condition to “Completed”:
Directly under the first condition add another condition (If any value equals value) where the status not equals “Cancelled” this time:
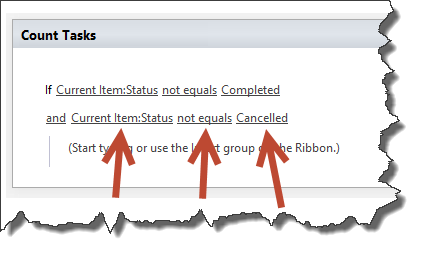
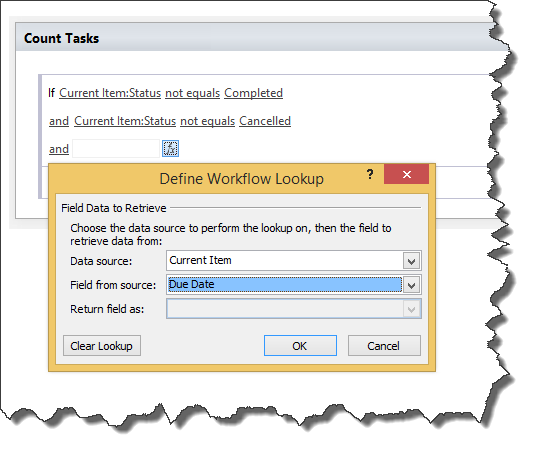
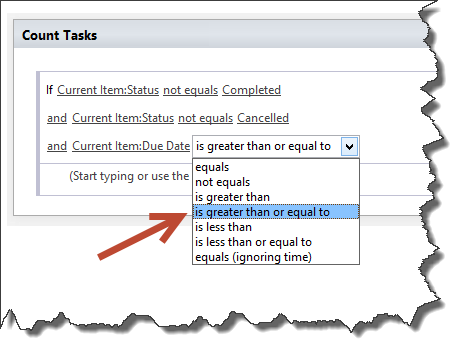
Directly under the second condition add another condition (If any value equals value) where the “Due Date” is greater than or equal to “Today”:

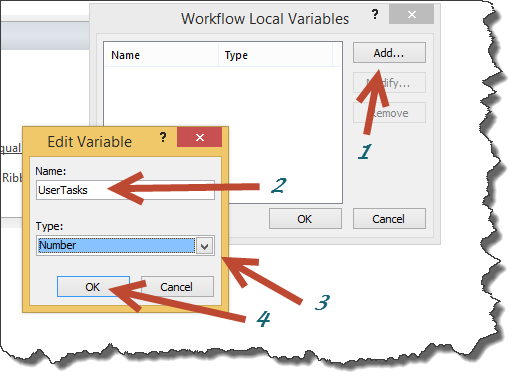
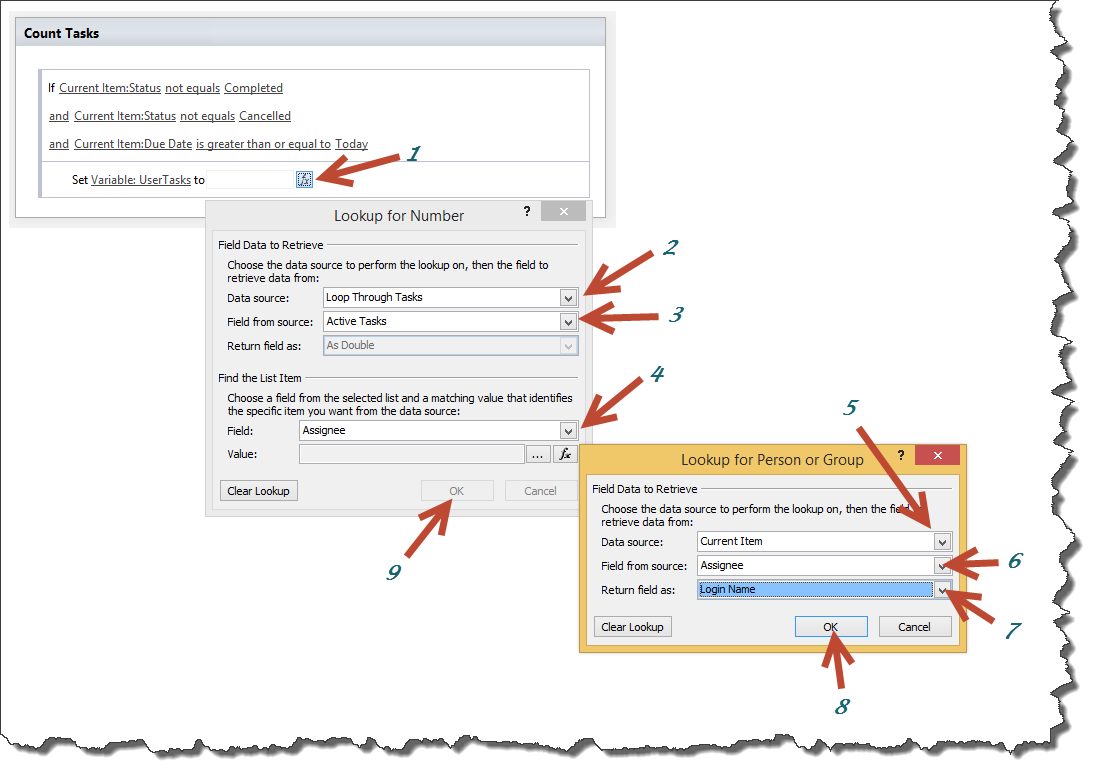
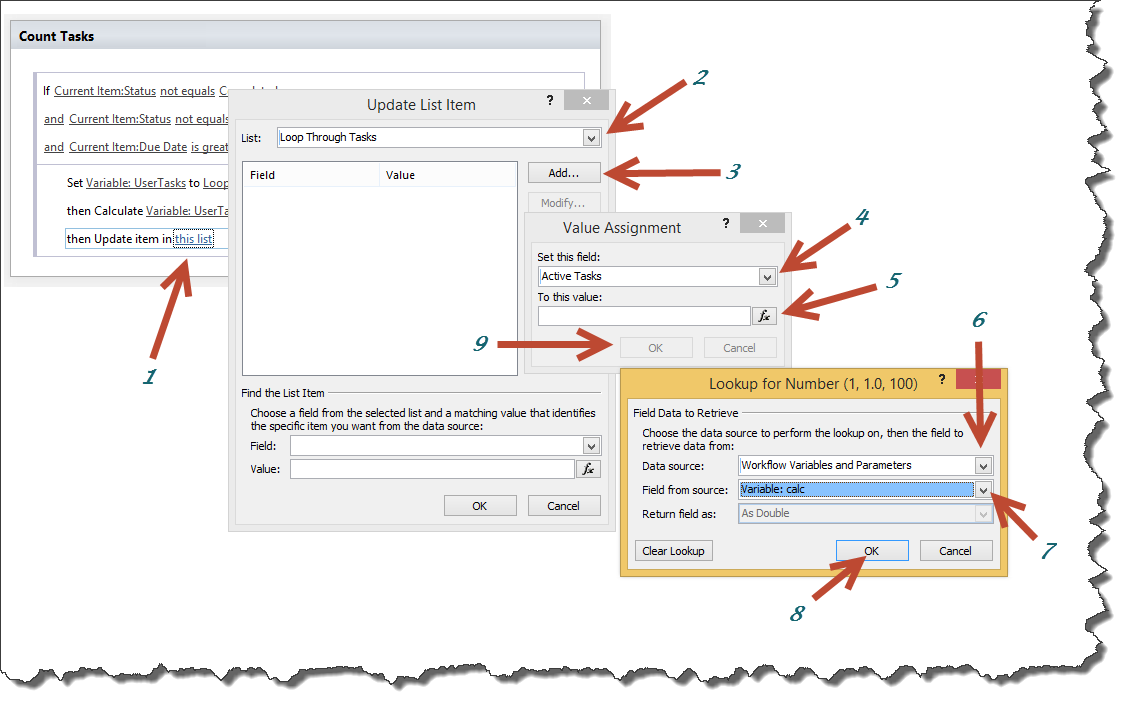
Create a Workflow variable as follows called “UserTasks”:
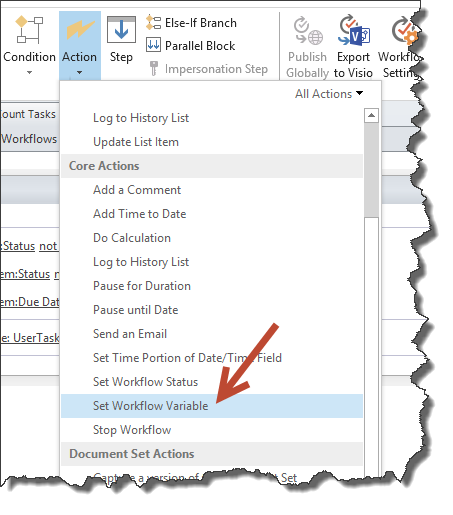
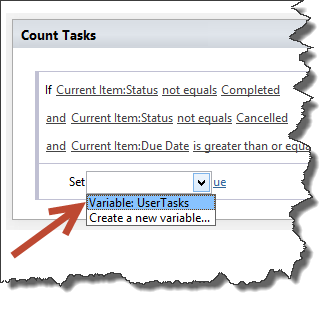
Set the value of the “UserTasks” variable we created:
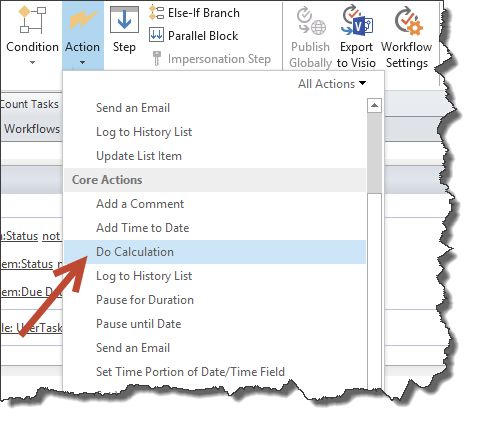
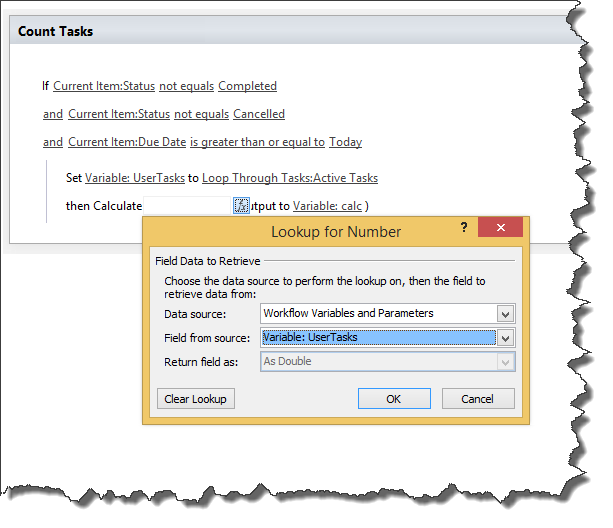
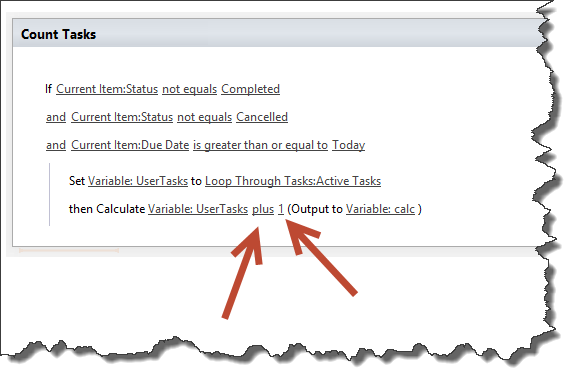
Insert a “Do Calculation” action and leave the default variable as “calc”:
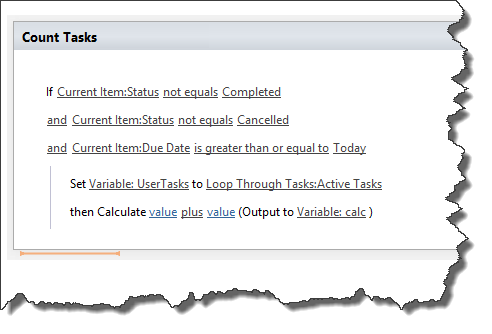
Set the calculation as follows:
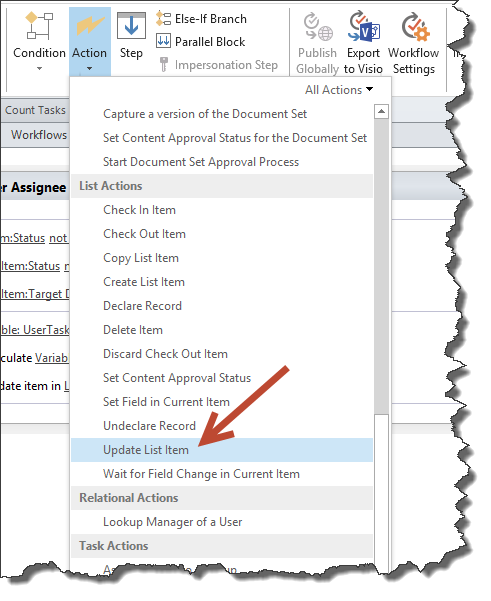
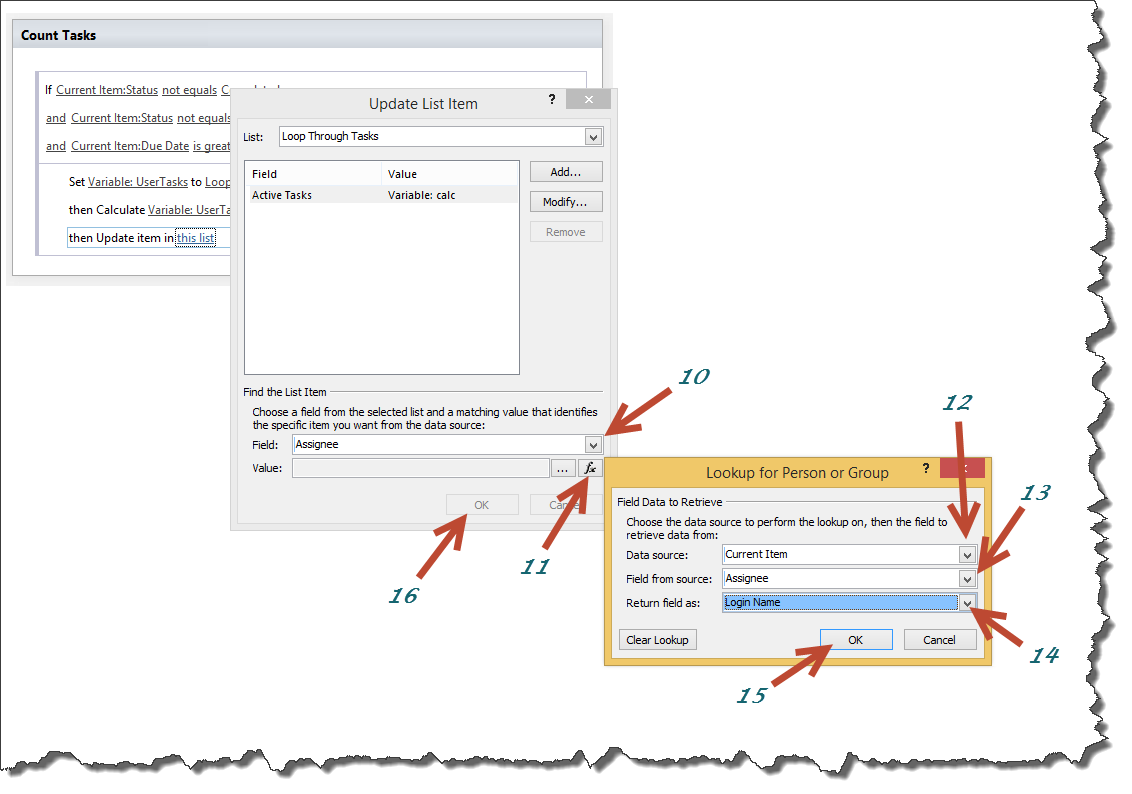
Directly under the “Do Calculation” action, insert an “Update List Item” action:
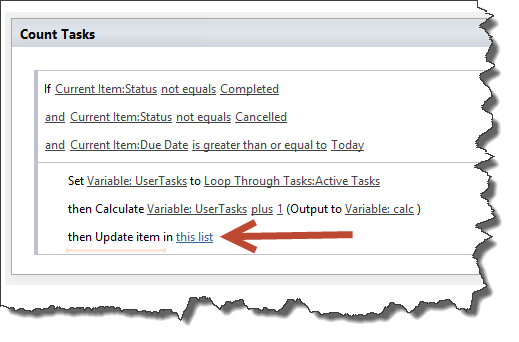
Set the list and values we need to update in the “Loop Through Tasks”:
Publish the Workflow.
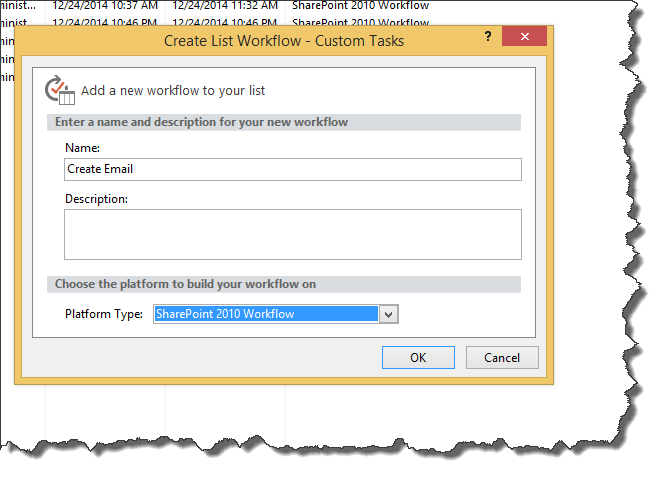
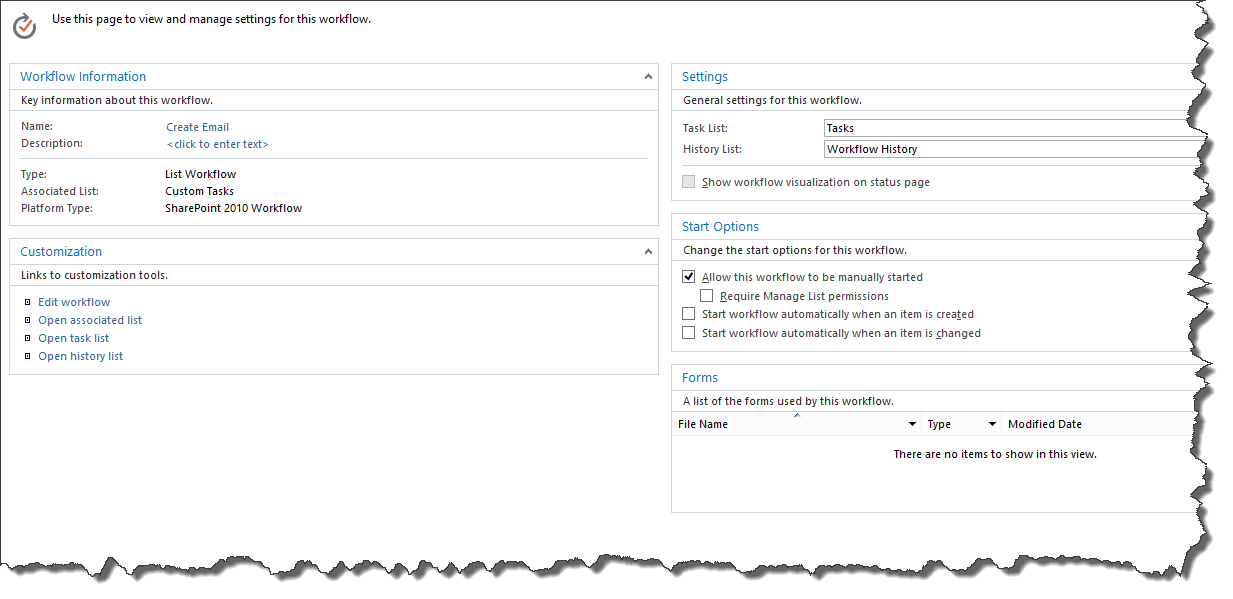
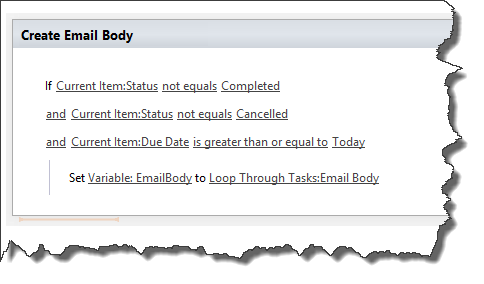
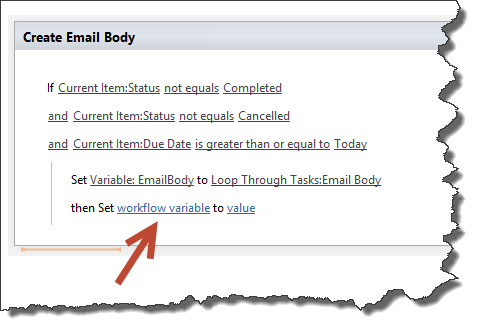
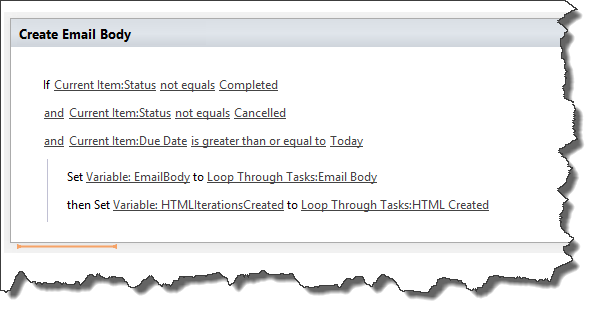
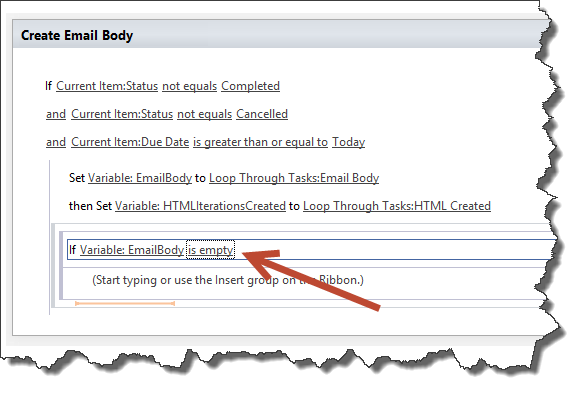
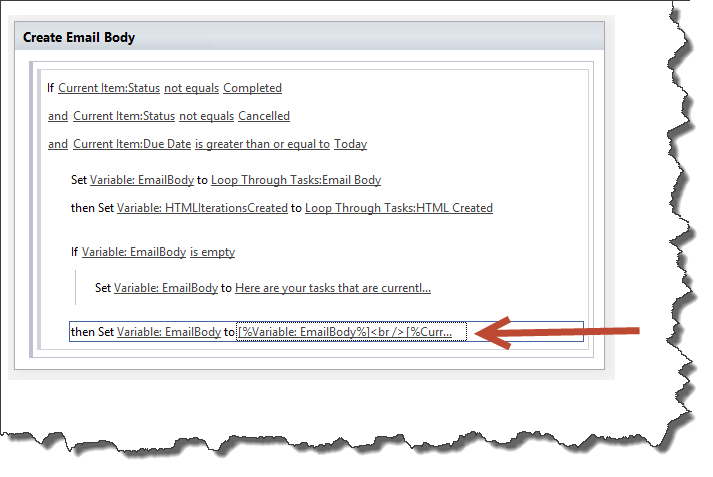
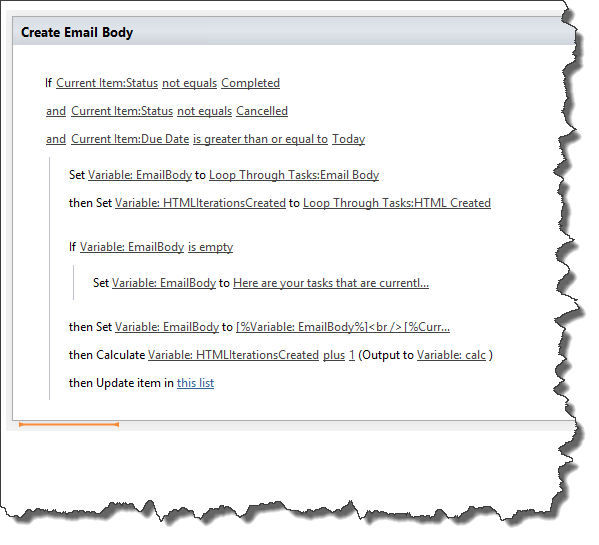
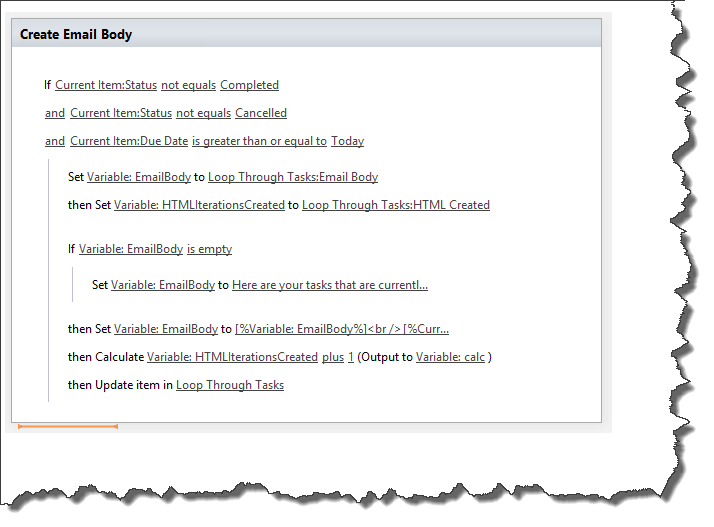
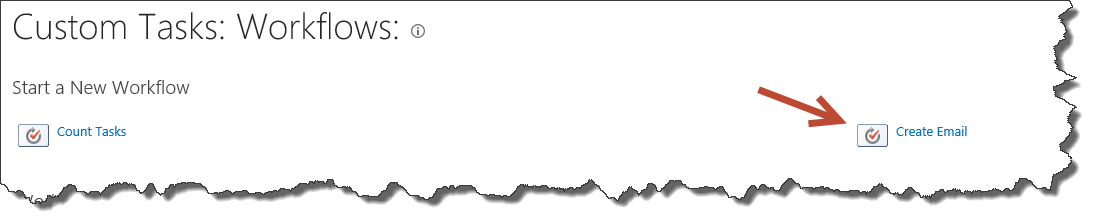
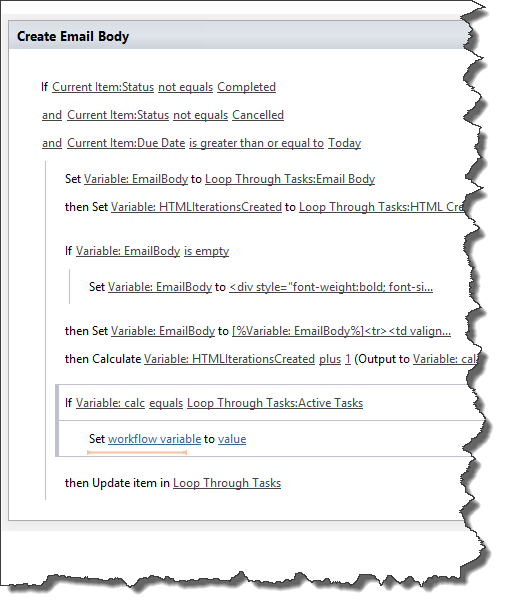
Create a Workflow on the Custom Tasks list called Create Email and change the settings as follows. This workflow will create the email body needed for our email:
Add a condition (If any value equals value). Please note that the screen shots below reflect the step name in the last Workflow we created (Count Tasks). Since these steps are identical, I am using the same screen shots:
Set the first value and set the comparison to “not equals”:
Set the last value of the condition to “Completed:”
Directly under the first condition add another condition (If any value equals value) where the status not equals “Cancelled” this time:
Directly under the second condition add another condition (If any value equals value) where the “Due Date” is greater than or equal to “Today”:
Create two Workflow variables:
Name: EmailBody – String
Name: HTMLIterationsCreated – Number
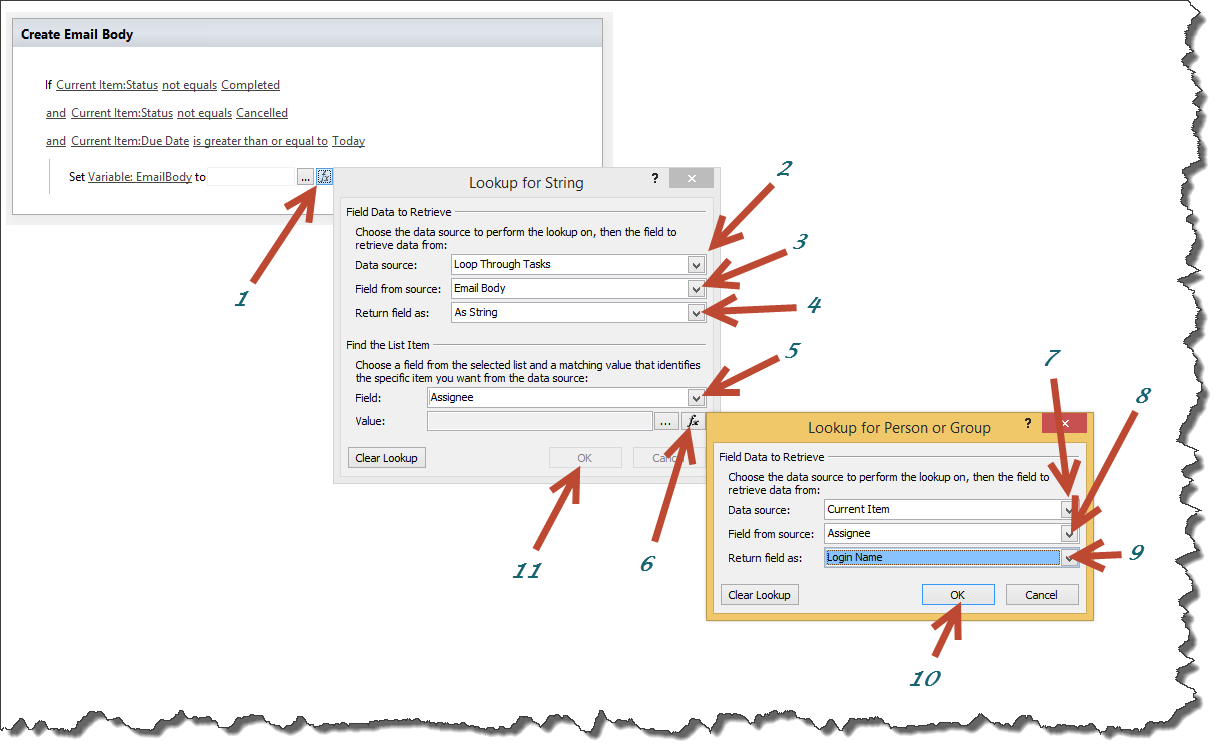
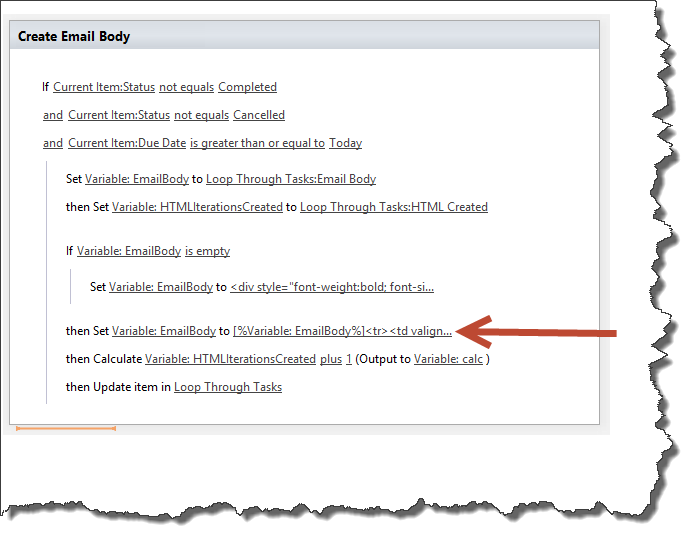
Set the EmailBody Workflow variable:
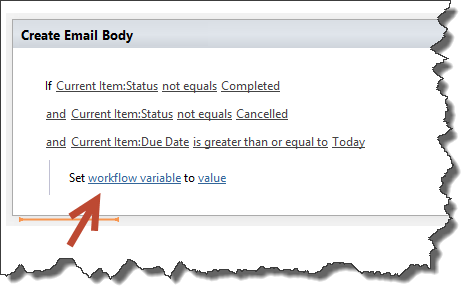
Set the HTMLIterations variable:
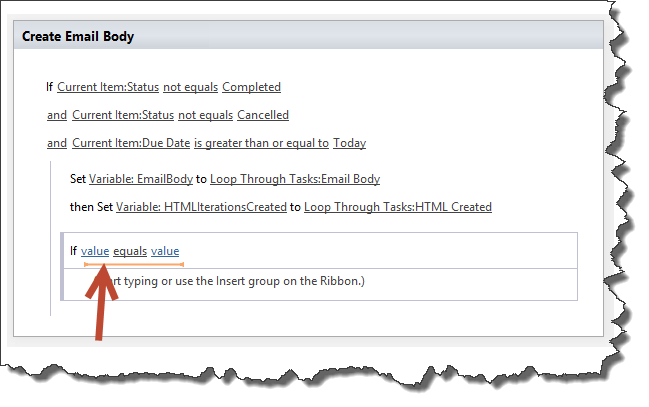
Add a condition to check if the EmailBody variable is blank:
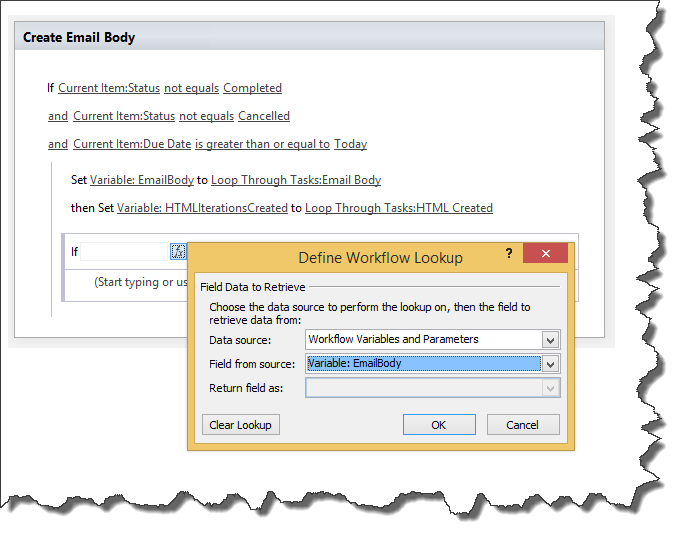
Set the EmailBody variable if it is empty:
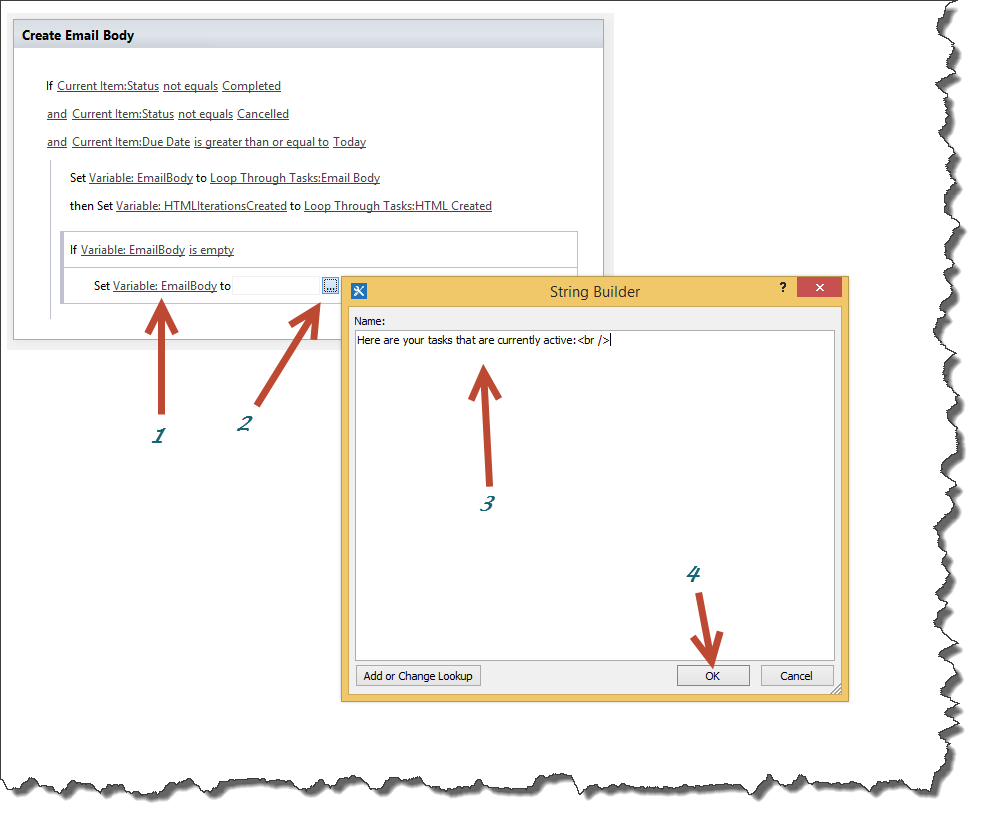
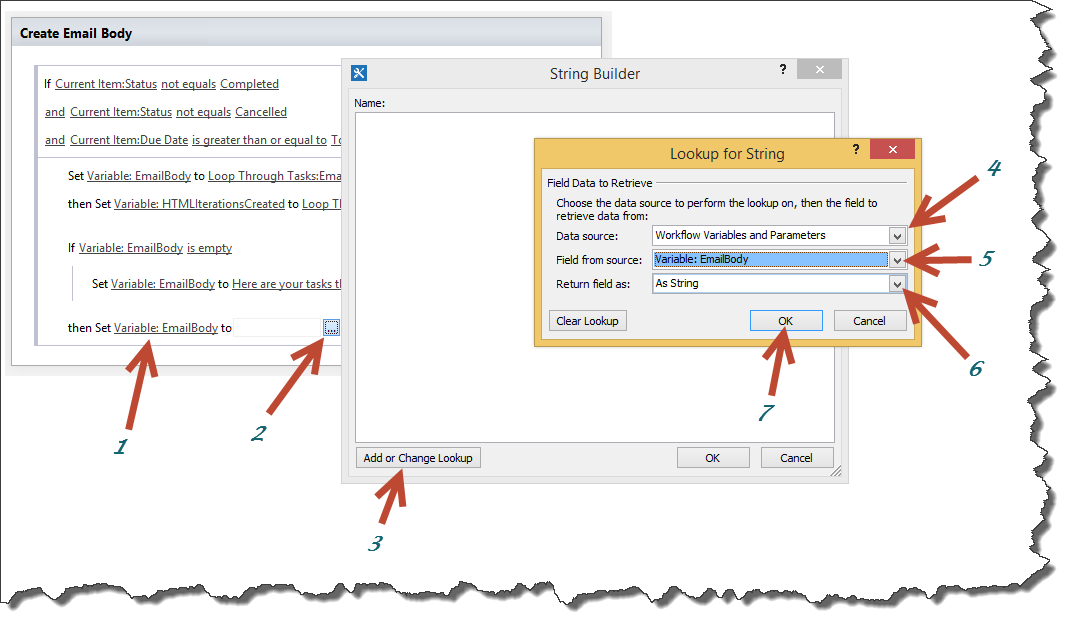
Add more to the EmailBody variable:
Directly after setting the variable, add a “Do Calculation” action:
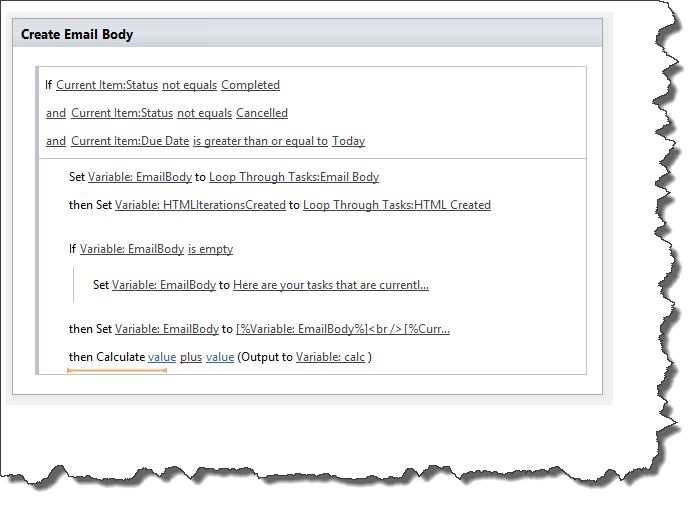
Add 1 to the HTMLIterationsCreated variable:

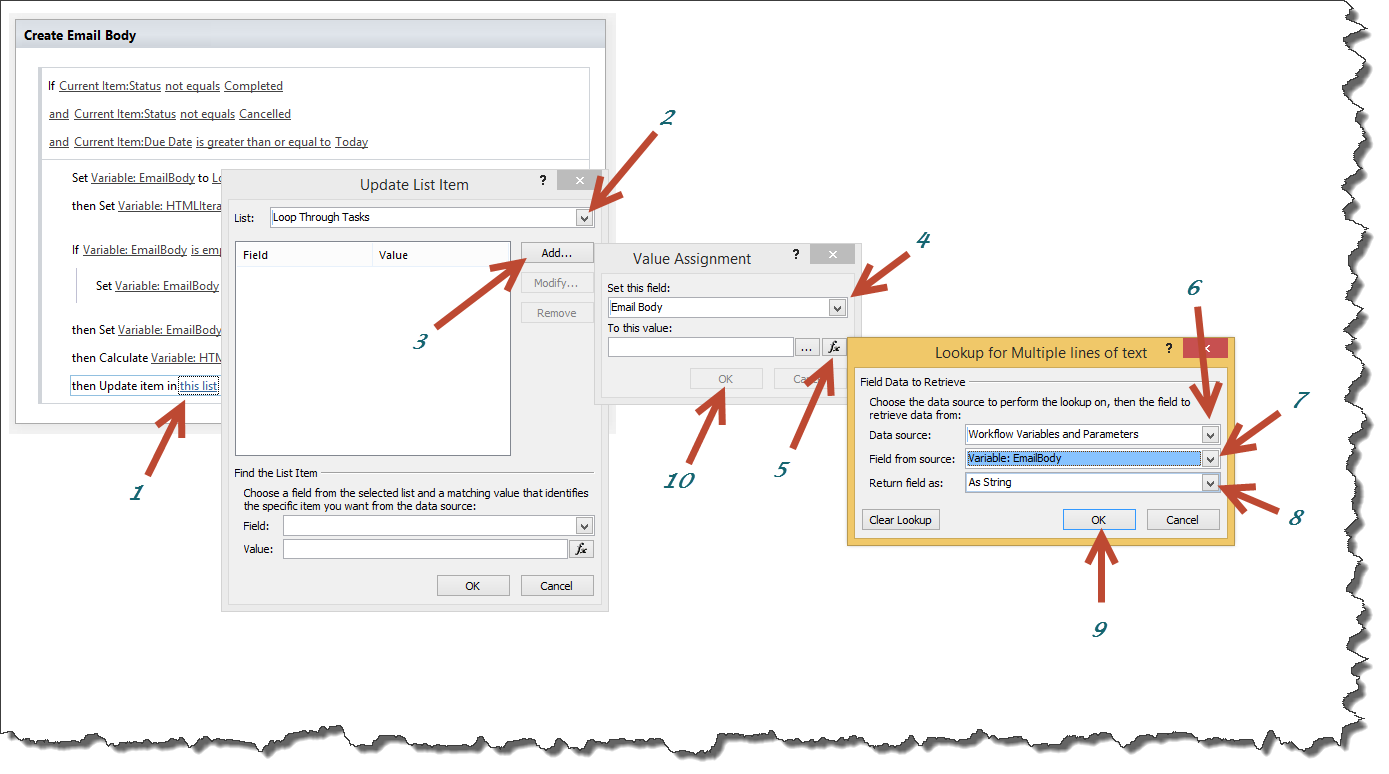
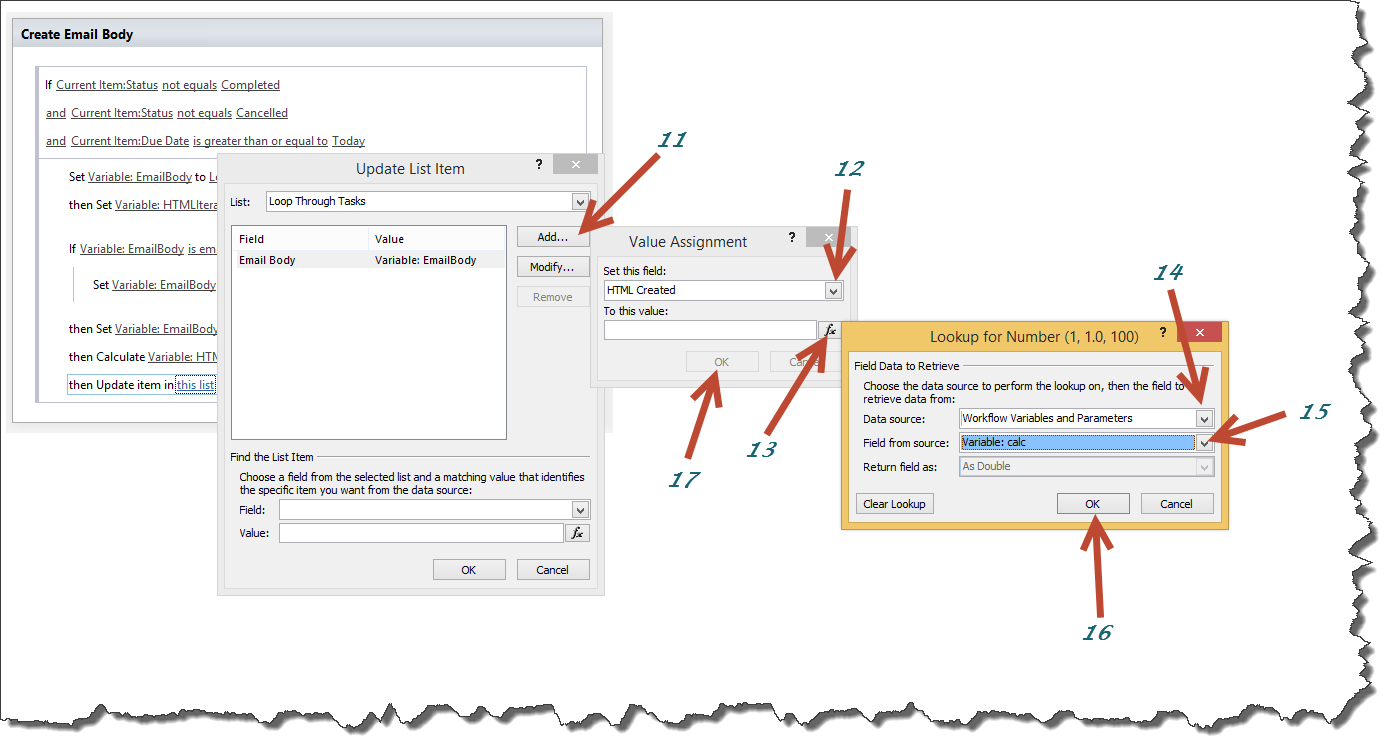
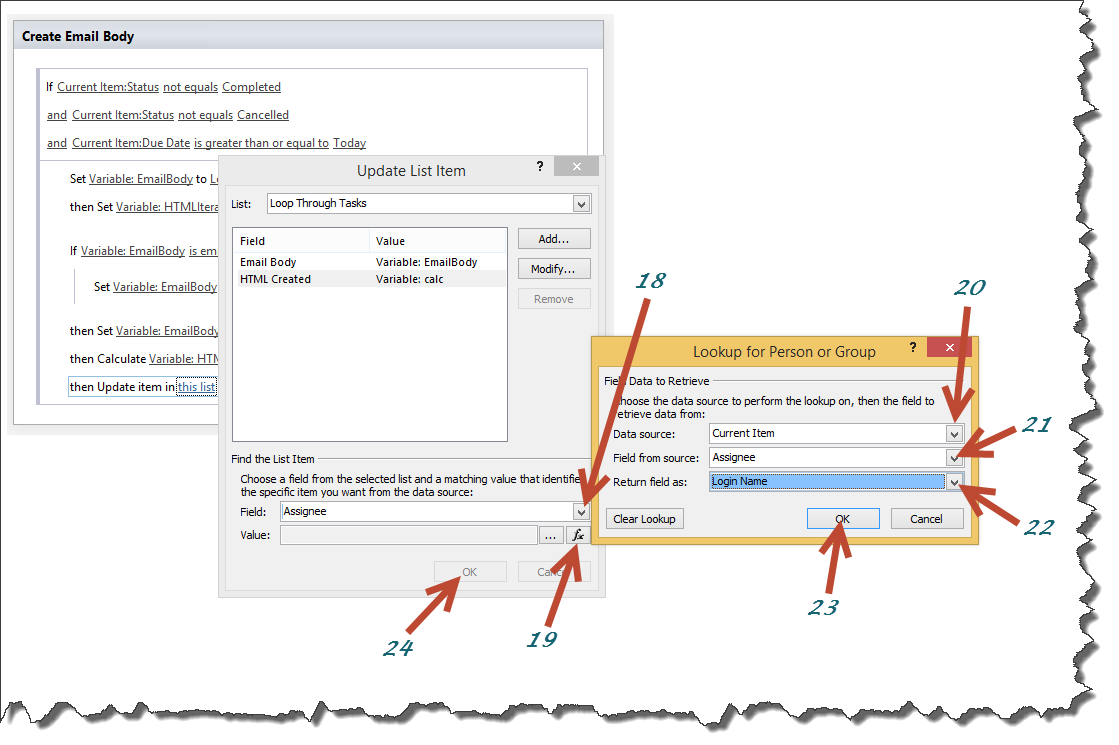
Insert an “Update List Item” action and Update the following list and fields:
Publish the Workflow.
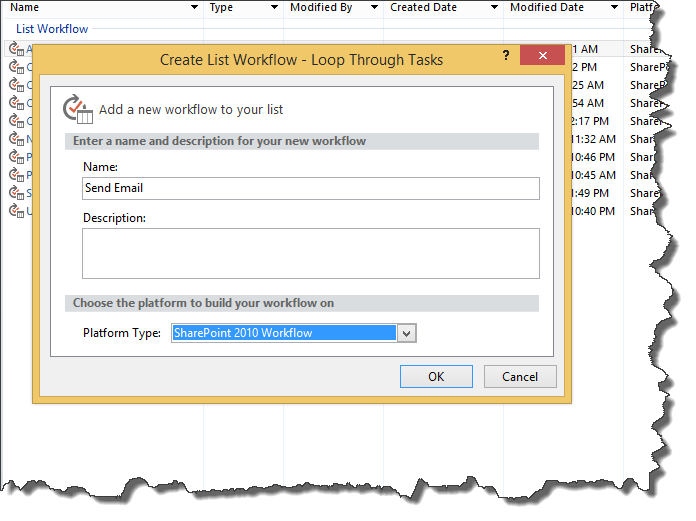
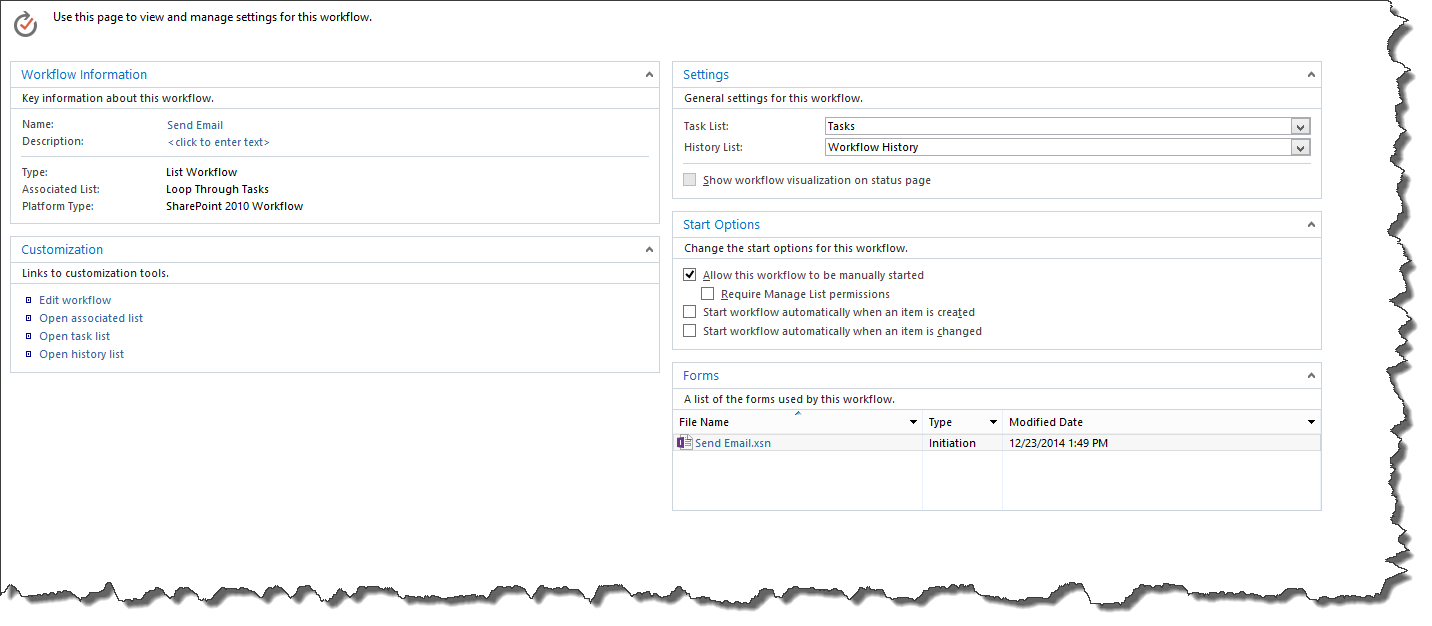
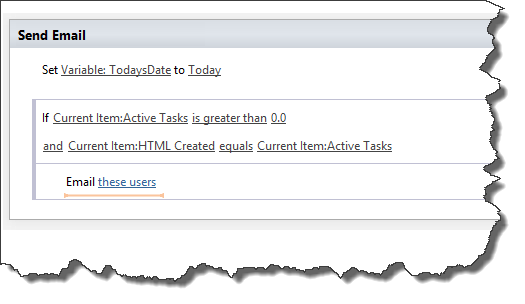
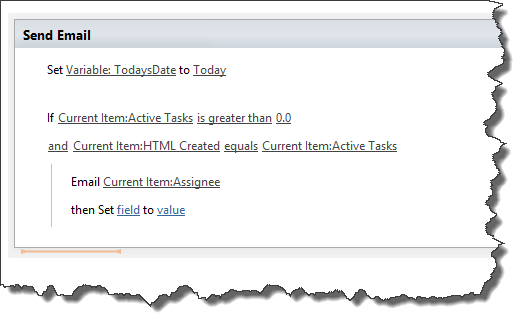
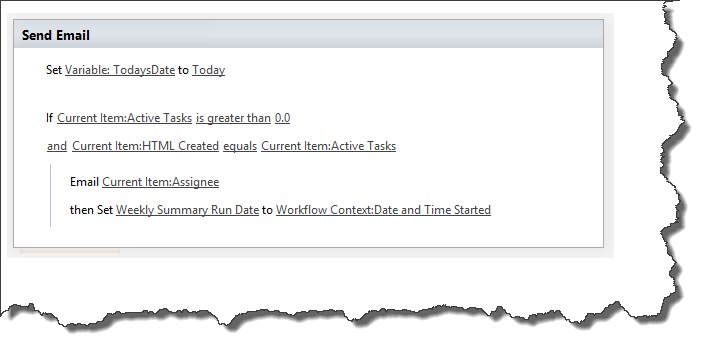
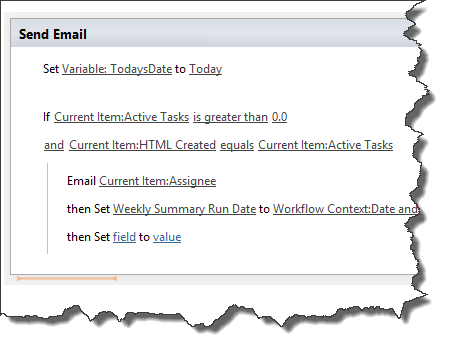
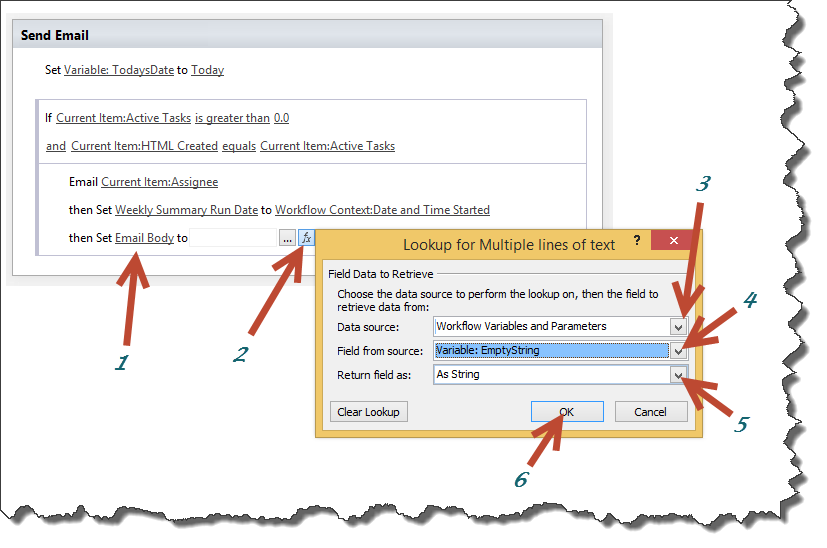
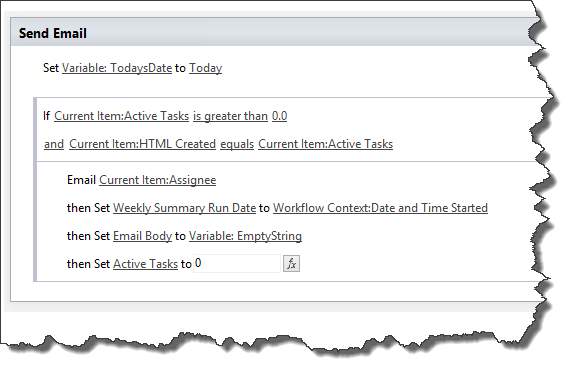
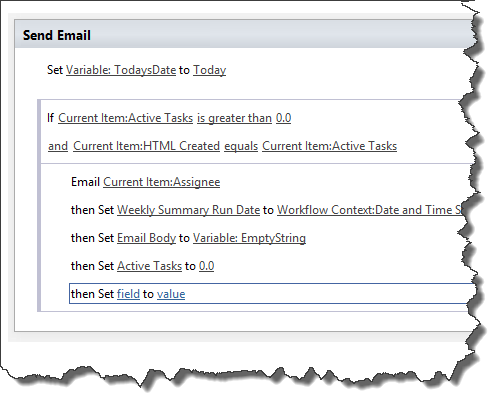
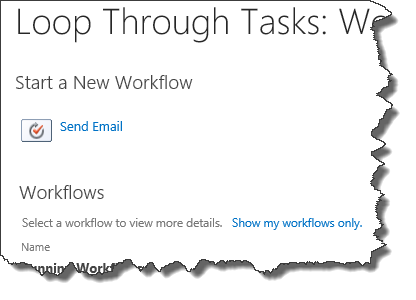
Create a Workflow on the Loop Through Tasks list called Send Email. This workflow will send the email:
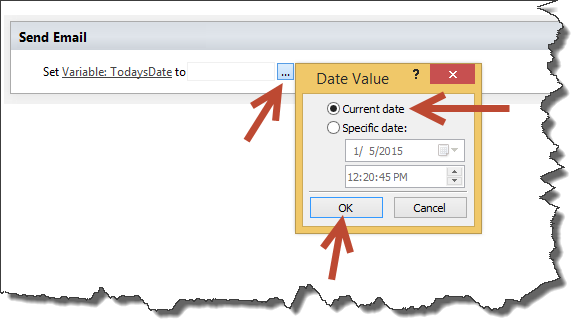
Create two Workflow variables:
Name: TodaysDate – Date/Time
Name: EmptyString – String
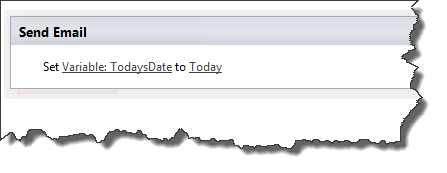
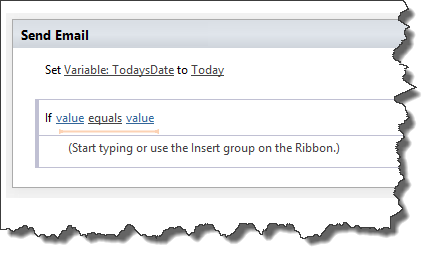
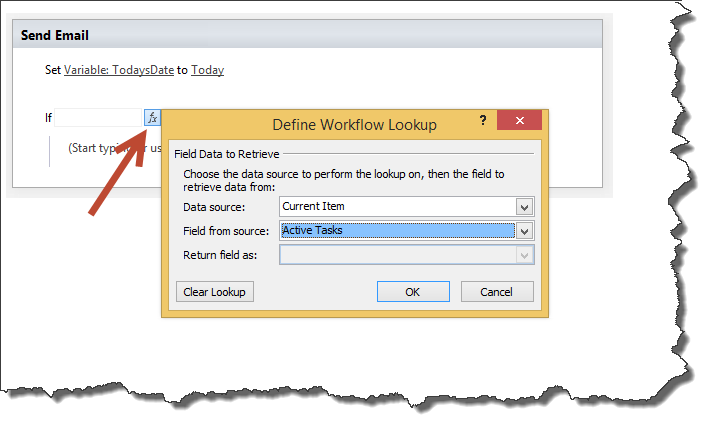
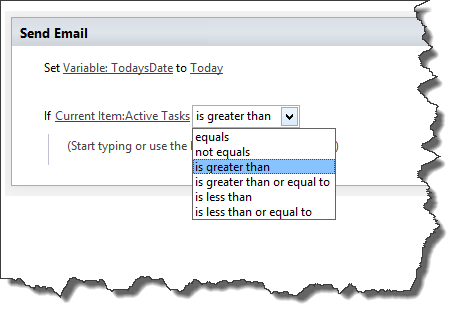
Set the TodaysDate variable:
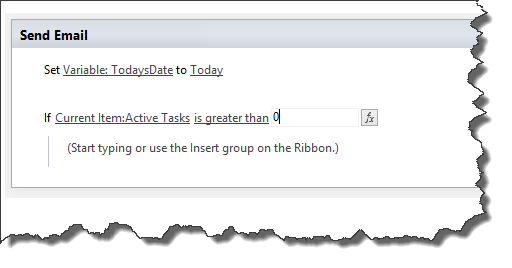
Add a condition (If any value equals value):
Set the first value to Current Item:Active Tasks, set the comparison to “is greater than,” and the value to 0 (zero):
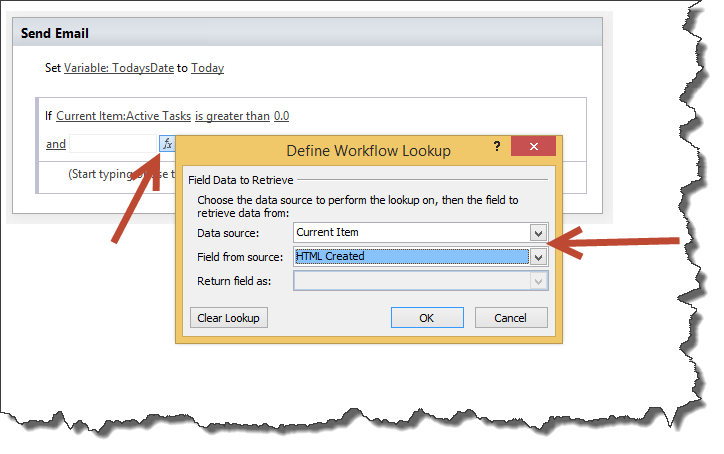
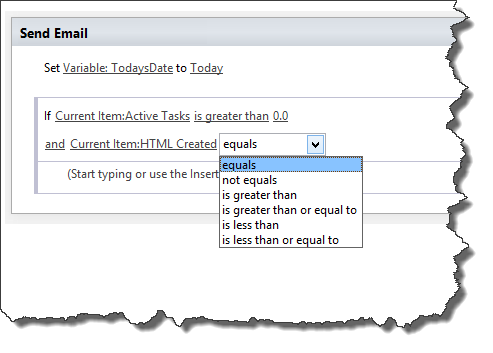
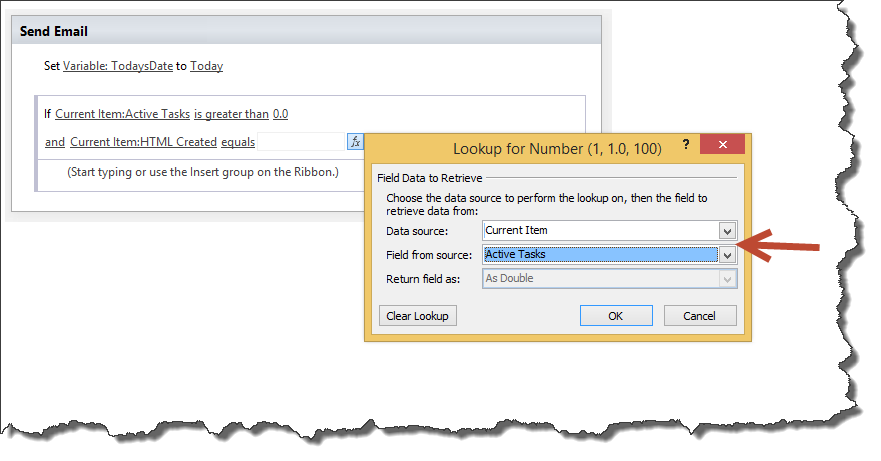
Directly under the first condition add another condition (If any value equals value) where Current Item:HTML Created equals Current Item: Active Tasks:
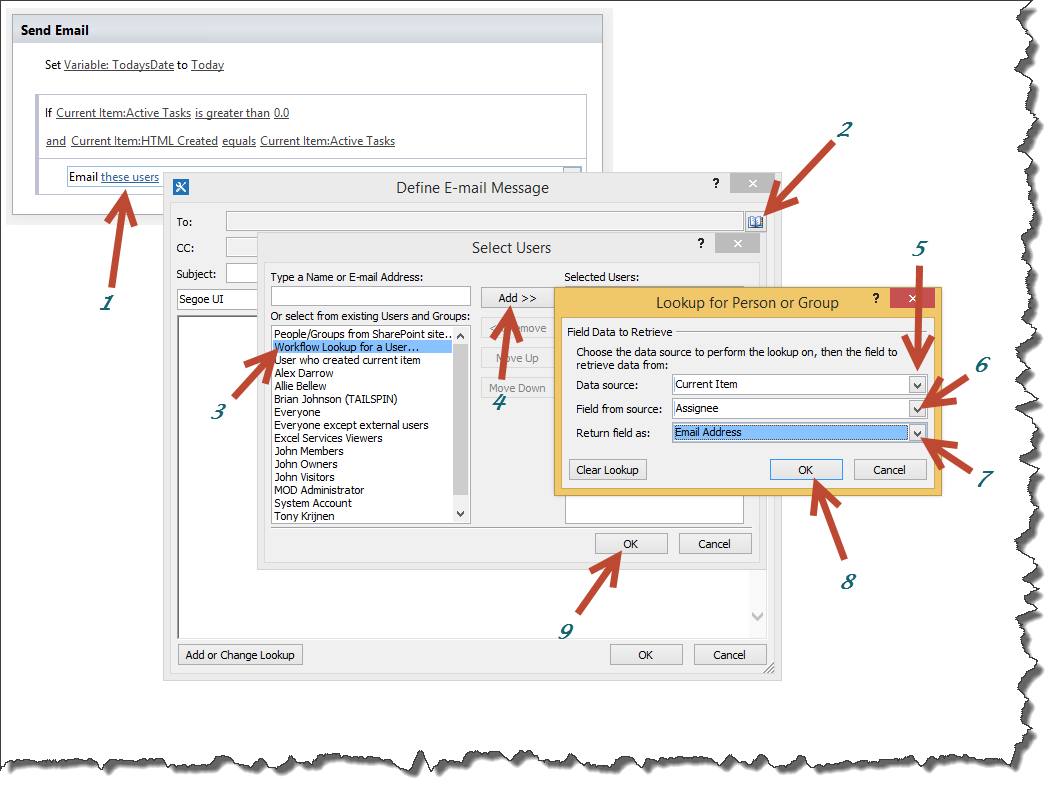
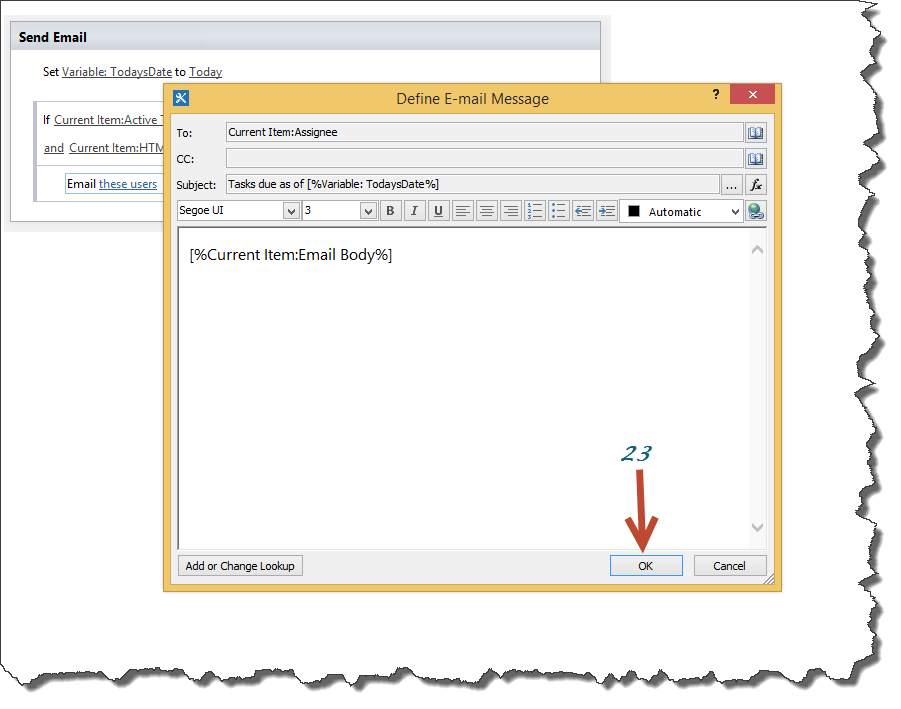
Add a “Send an Email” action:
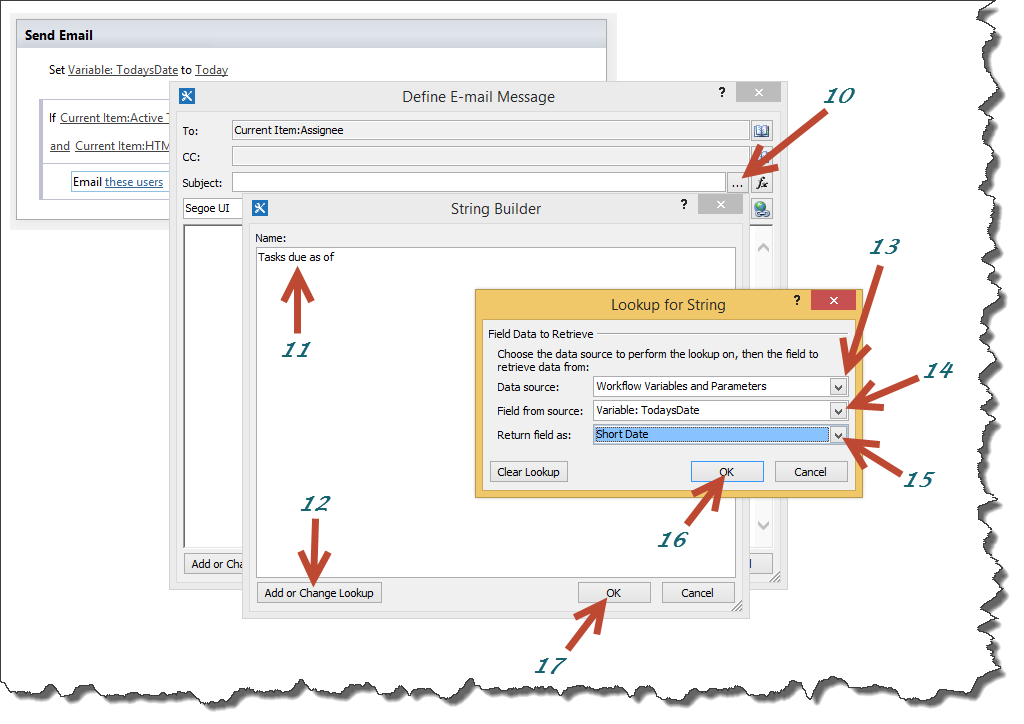
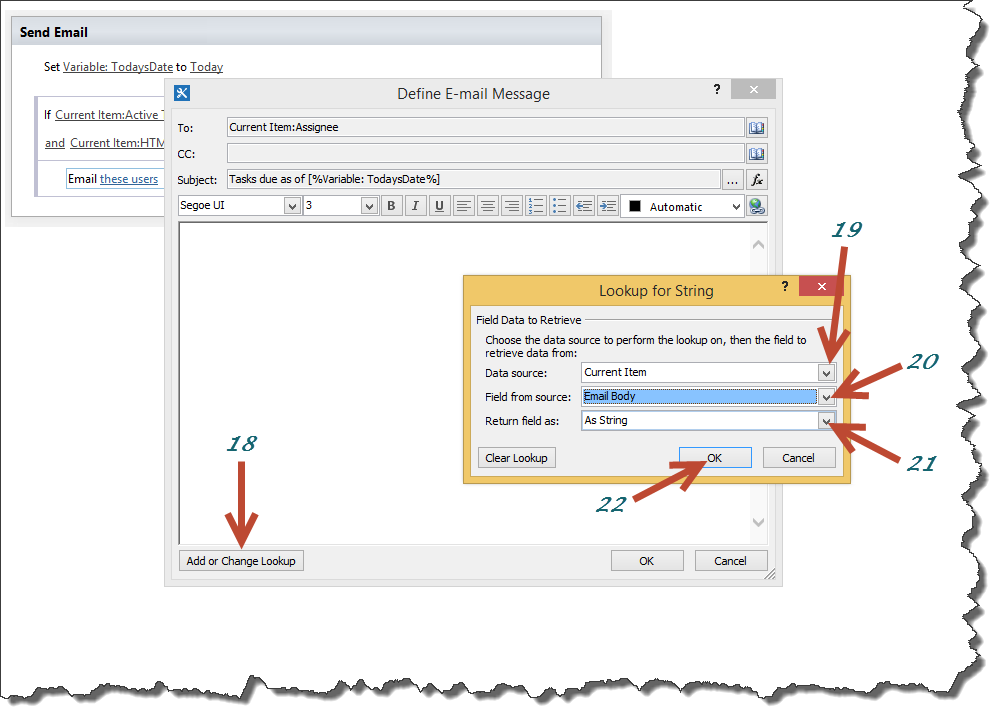
Set the “To” field in our email, a subject, then set the body text using the Email Body field:
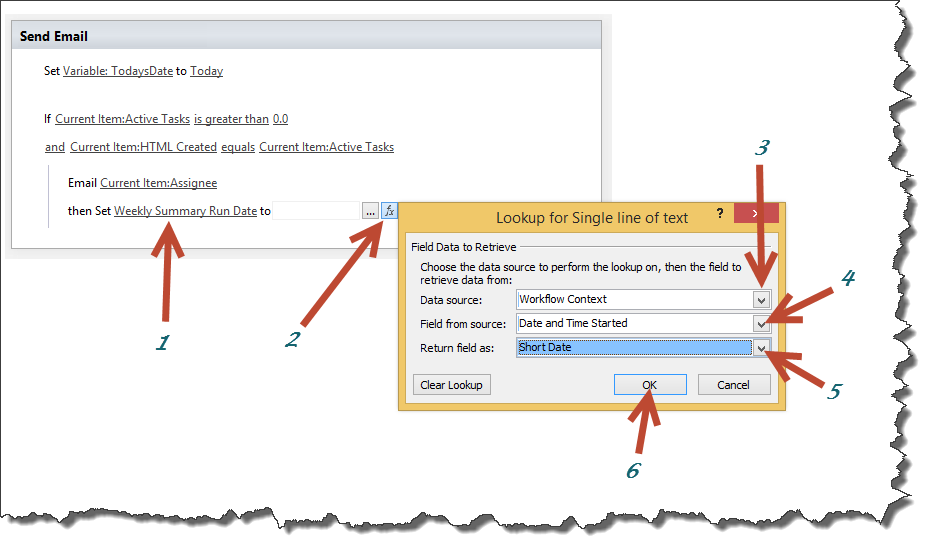
Add a “Set Field in Current Item” action and set the “Weekly Summary Run Date” field to when the workflow was started:
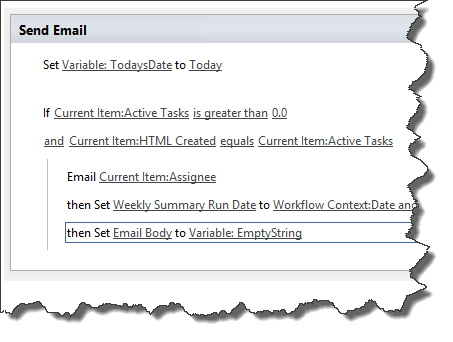
Add a “Set Field in Current Item” action and set the “Email Body” field to our EmptyString:
Add a “Set Field in Current Item” action and set the “Active Tasks” field to 0 (zero):
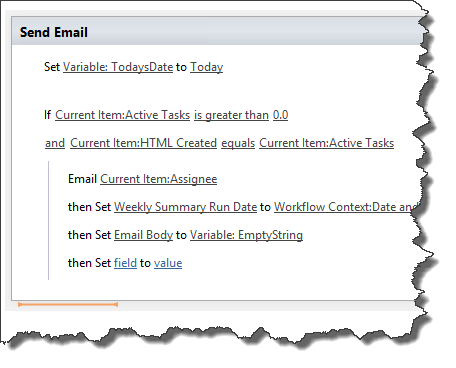
Add a “Set Field in Current Item” action and set the “HTML Created” field to 0 (zero):
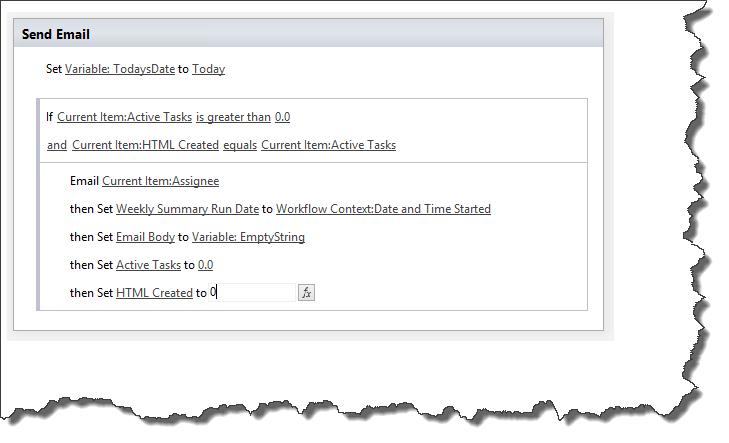
Publish the Workflow.
This completes all of our Lists and Workflows.
Step 3 – Testing
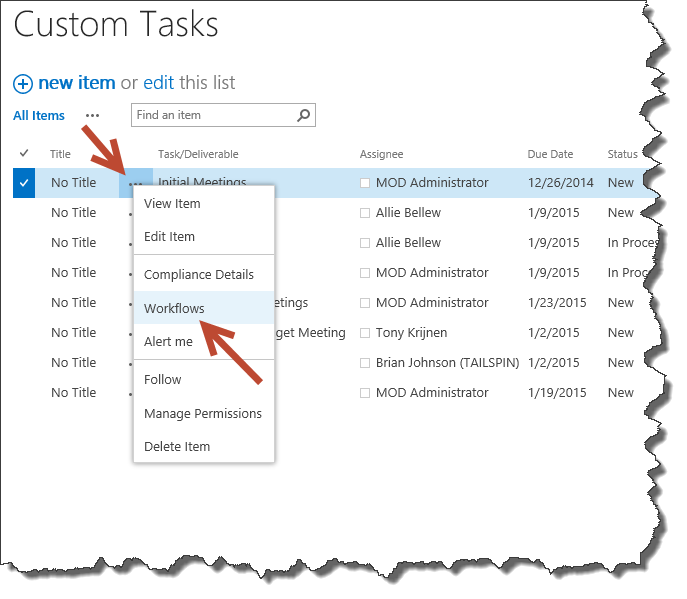
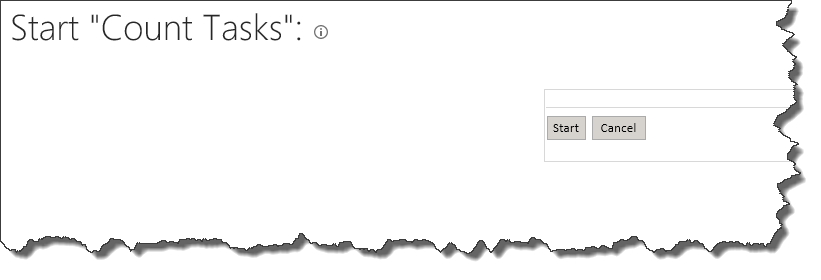
To test the process, you can first run the “Count Tasks” Workflow manually. When we are done testing, I will show you how to schedule all of these processes using a 3rd party tool. Select one of the names from the “Custom Tasks” list and run the Workflow on every instance of that name. In this example, I will only be running the Workflow on all items with the name MOD Administrator:
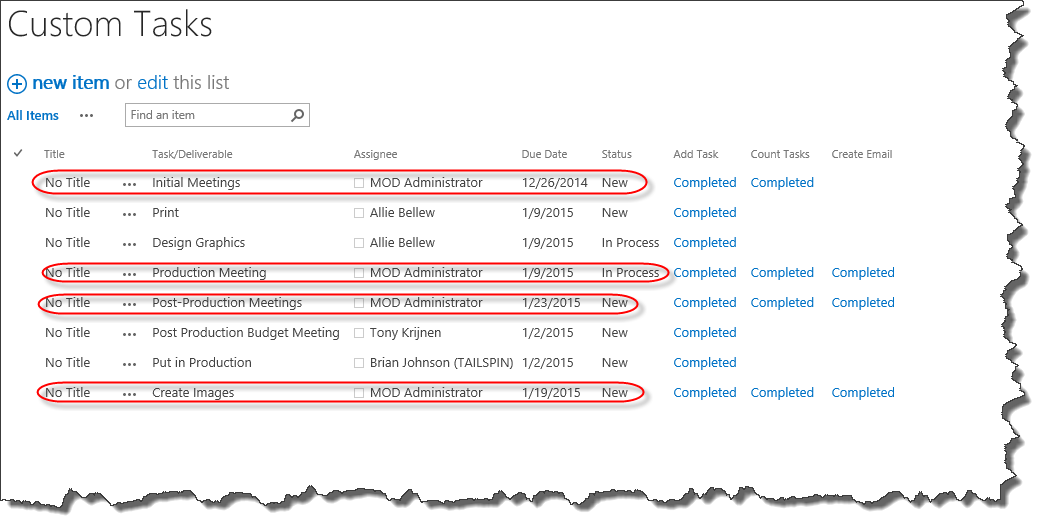
For each one, you will need to run the Workflow (make sure to repeat this for each of the four names in the above example):
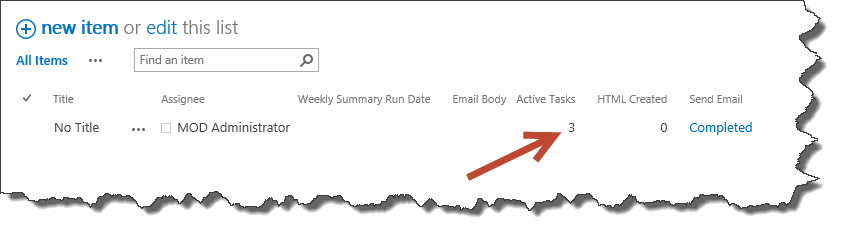
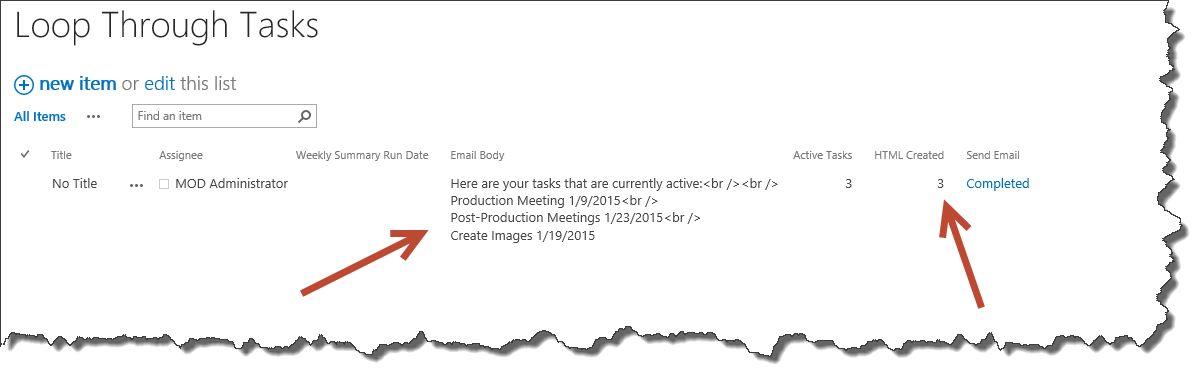
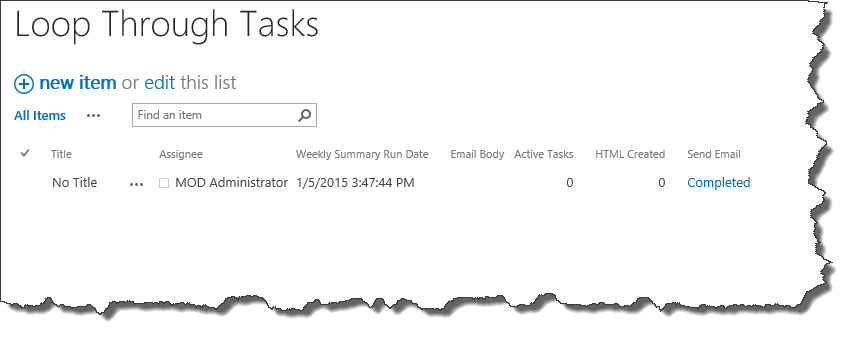
Once you have completed running the Workflows, you can see how many tasks there are in our “Loop Through Tasks” list for this name (please note that although there were four items with the name Mod Administrator, it only counted three tasks. This is because our condition only wants tasks that are not Completed, not Cancelled, and the Due Date has to be greater than or equal to today. One of the items does not meet all of the criteria):
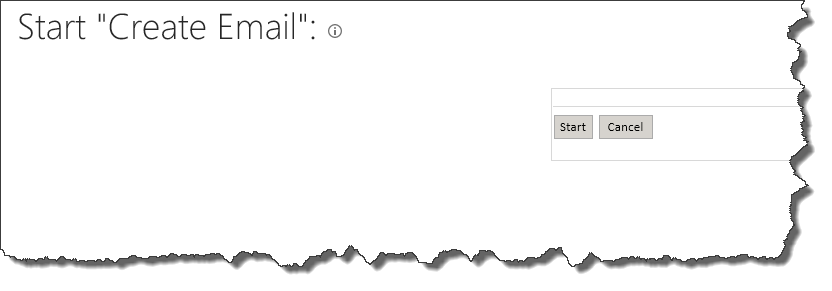
After running the “Count Tasks” Workflow, you will now run the “Create Email” Workflow on the same items. Again, I will show you how we can automate this later:
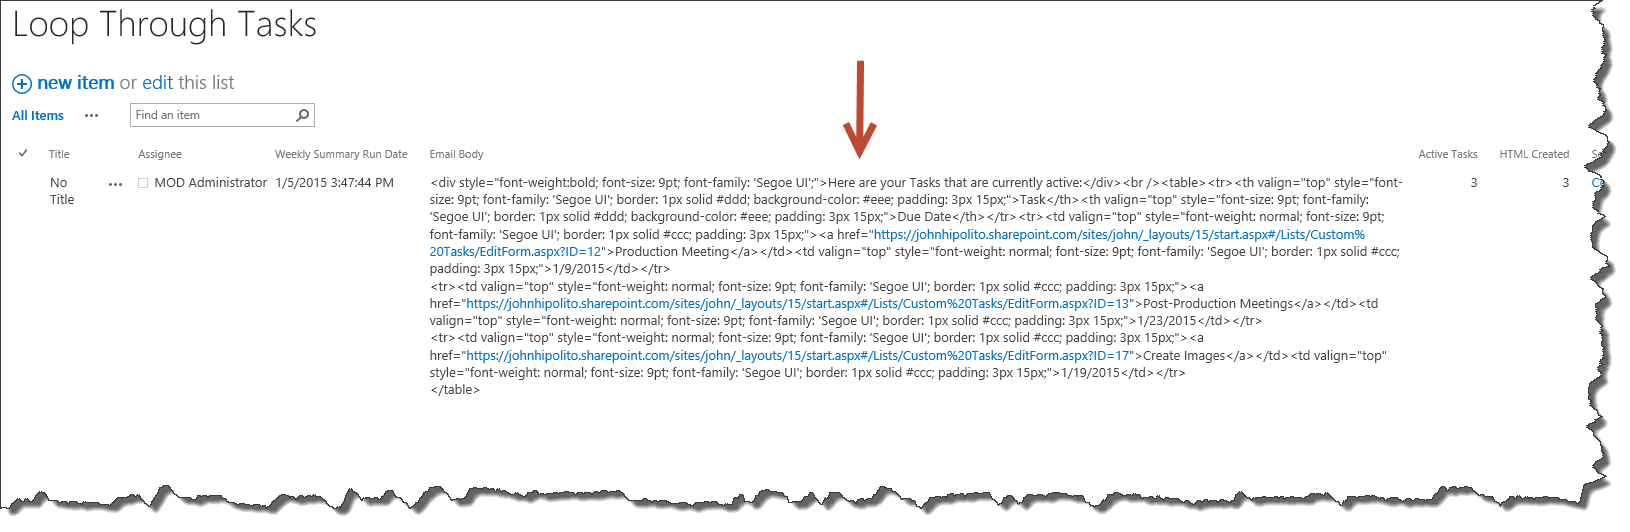
You will now see in our “Loop Through Tasks” list that we have some additional information:
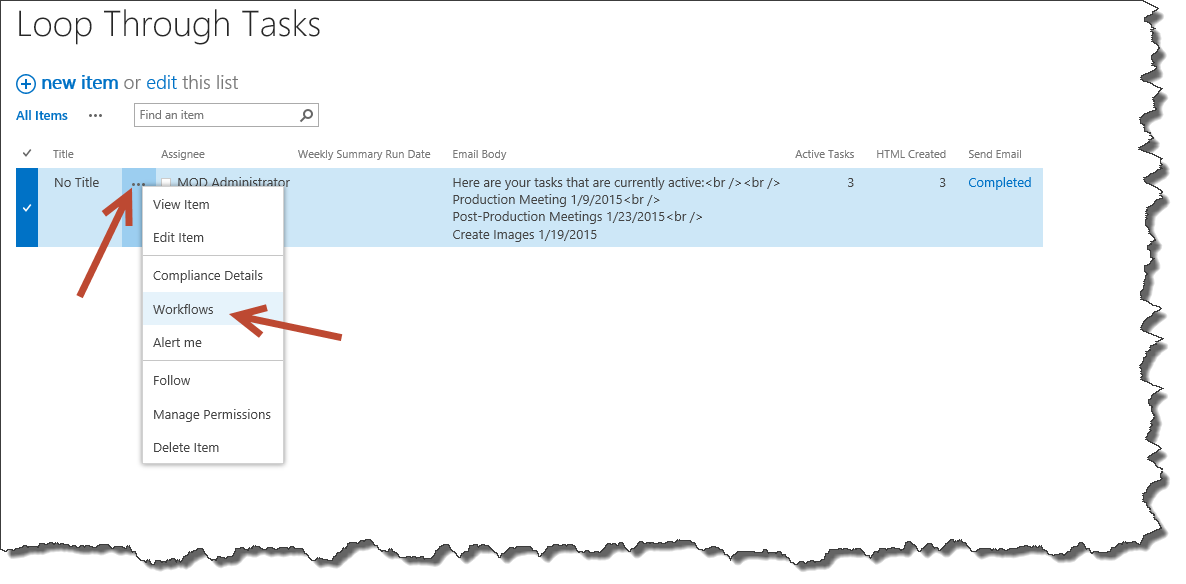
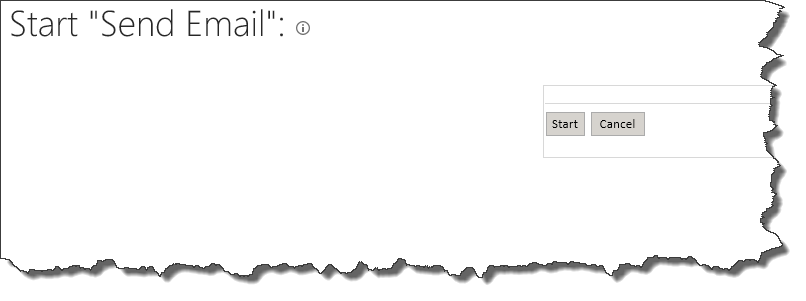
Next, we will run the “Send Email” Workflow within the “Loop Through Tasks” list. We only need to run this one time since names will be unique in this list:
Once this has completed, You can see that the item in the “Loop Through Tasks” List has been cleared and a timestamp has been placed in:
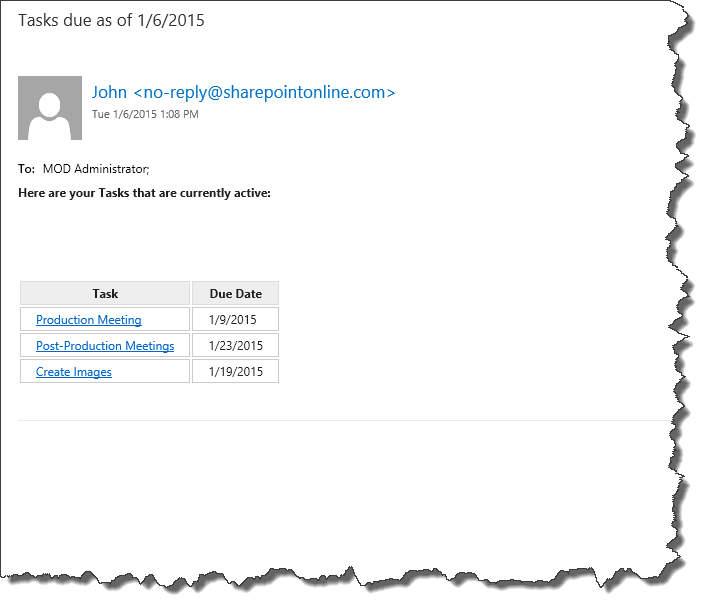
Here is the email generated:
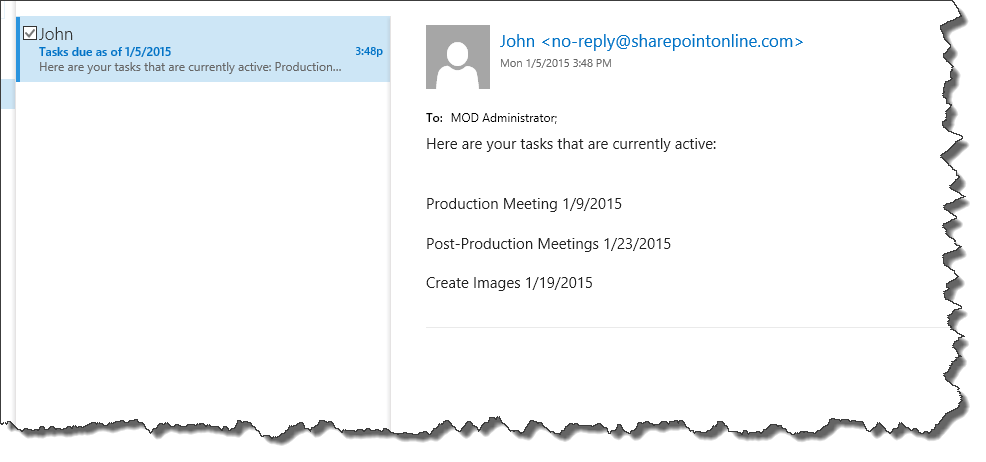
Nifty….But rather plain and boring looking….Read on…..
If you have some knowledge of HTML & CSS you can create some nicely formatted emails as opposed to the plain text emails. For example, in our “Create Email” Workflow above, there is a condition that checks if the EmailBody variable is blank and if so we set it to be fairly generic:
Instead, we can add some HTML and CSS to this section. Lets create a table by replacing what is in the string builder:
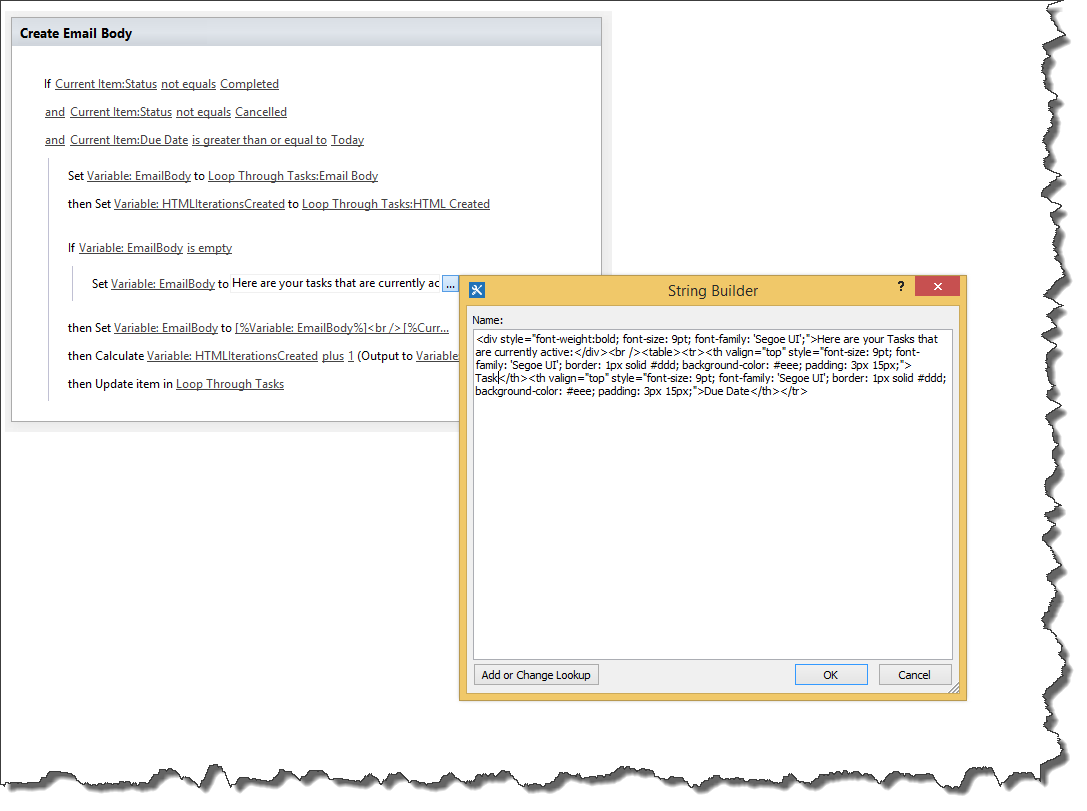
You can copy here:
<div style=”font-weight:bold; font-size: 9pt; font-family: ‘Segoe UI’;”>Here are your Tasks that are currently active:</div><br /><table><tr><th valign=”top” style=”font-size: 9pt; font-family: ‘Segoe UI’; border: 1px solid #ddd; background-color: #eee; padding: 3px 15px;”>Task</th><th valign=”top” style=”font-size: 9pt; font-family: ‘Segoe UI’; border: 1px solid #ddd; background-color: #eee; padding: 3px 15px;”>Due Date</th></tr><div style=”font-weight:bold; font-size: 9pt; font-family: ‘Segoe UI’;”>Here are your Tasks that are currently active:</div><br /><table><tr><th valign=”top” style=”font-size: 9pt; font-family: ‘Segoe UI’; border: 1px solid #ddd; background-color: #eee; padding: 3px 15px;”>Task</th><th valign=”top” style=”font-size: 9pt; font-family: ‘Segoe UI’; border: 1px solid #ddd; background-color: #eee; padding: 3px 15px;”>Due Date</th></tr>
This mark up will create the header of the email as well as create a table and the table header. Next, we will format the cells of the table.
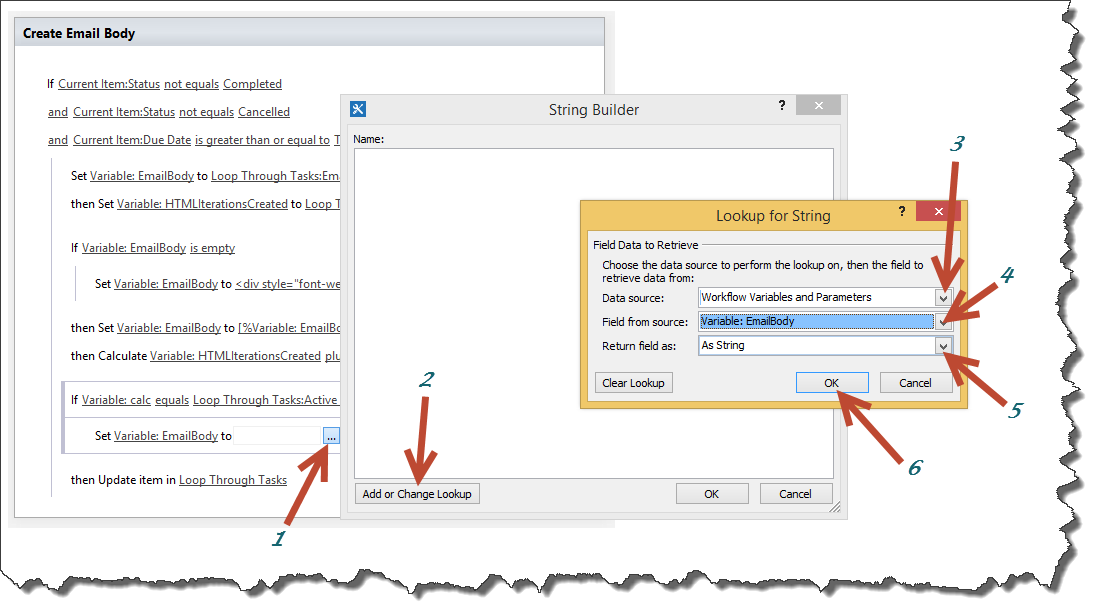
In the body of our email we currently have this in our string builder:
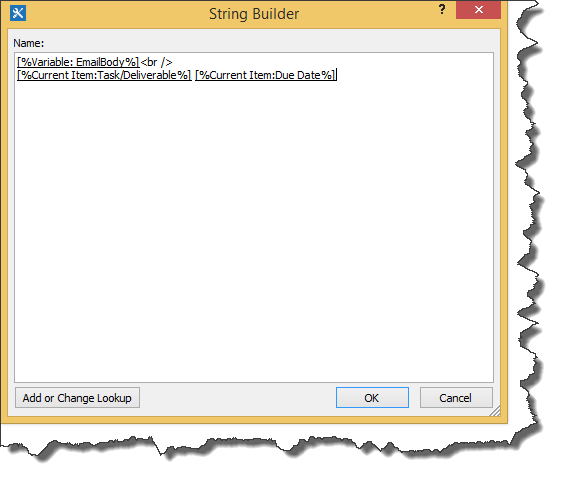
Let’s enhance the look of this as well. This is what our string builder will look like when done:
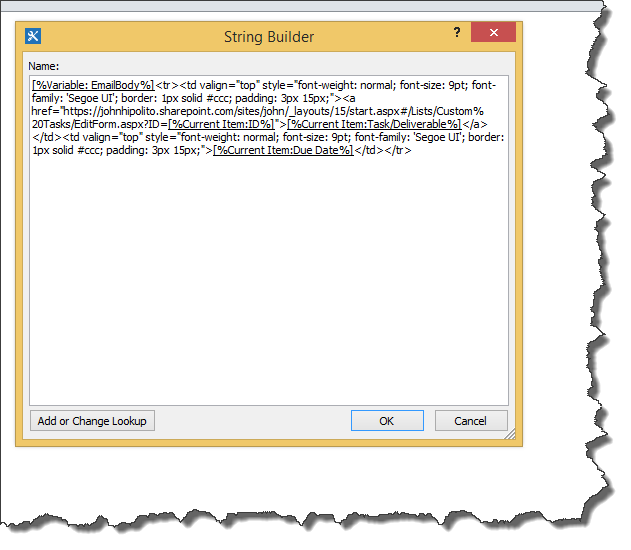
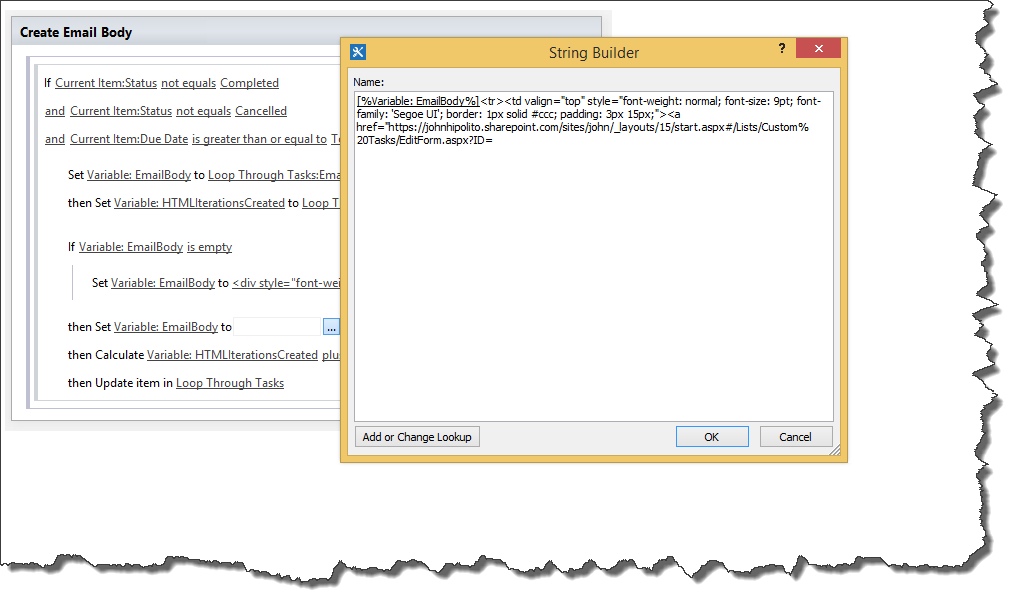
First, clear out everything in the string builder window and insert the EmailBody variable:
Next, copy the url of the “Custom Task” list. Mine looks like this:
https://johnhipolito.sharepoint.com/sites/john/_layouts/15/start.aspx#/Lists/Custom%20Tasks/AllItems.aspx
You will need to remove the /AllItems.aspx at the end and add on EditForm.aspx?ID= to make it look similar to this:
https://johnhipolito.sharepoint.com/sites/john/_layouts/15/start.aspx#/Lists/Custom%20Tasks/EditForm.aspx?ID=
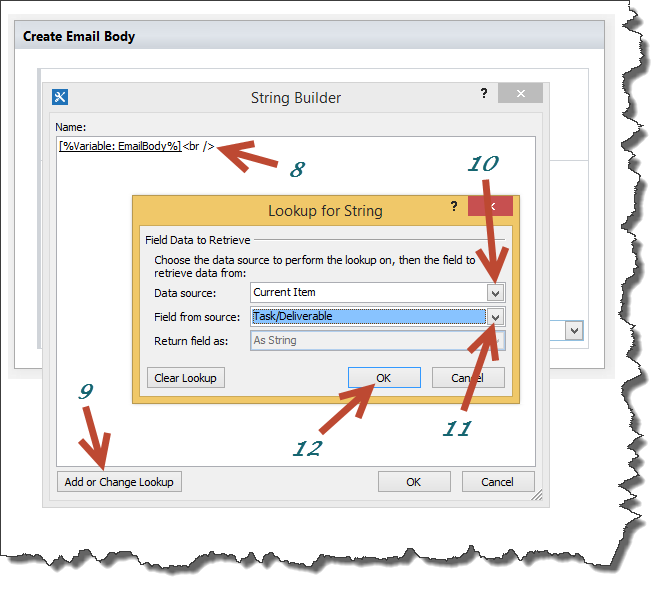
Copy the following mark up and paste it right after the EmailBody variable. Do not do any line breaks or hit return and remember, your url will be different:
<tr><td valign=”top” style=”font-weight: normal; font-size: 9pt; font-family: ‘Segoe UI’; border: 1px solid #ccc; padding: 3px 15px;”><a href=”https://johnhipolito.sharepoint.com/sites/john/_layouts/15/start.aspx#/Lists/Custom%20Tasks/EditForm.aspx?ID=
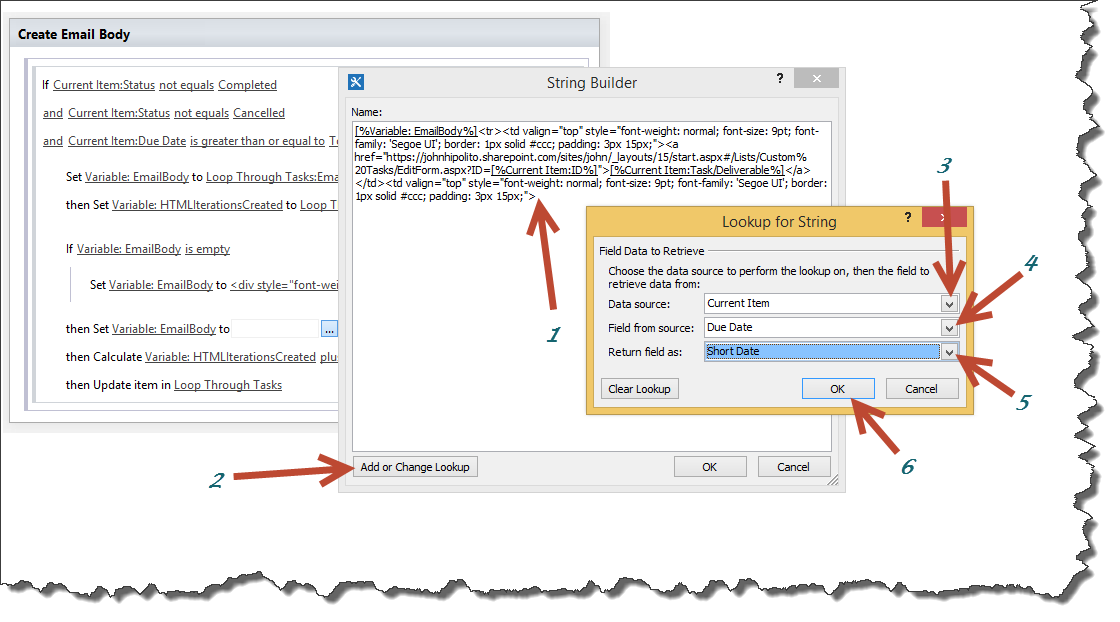
Place the cursor directly after ID= and add the Current Item ID:
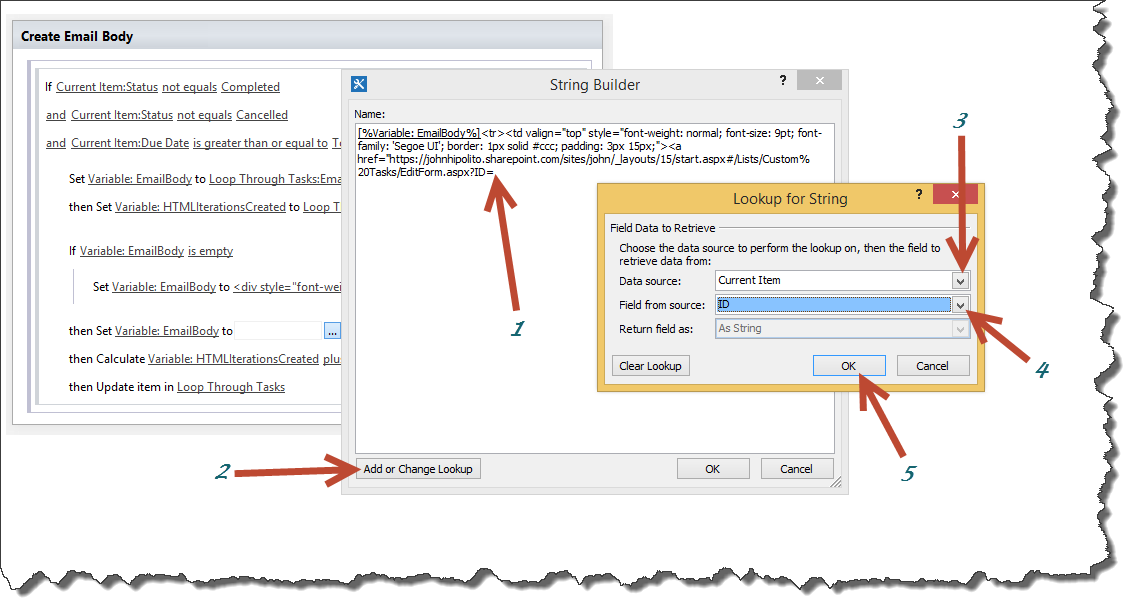
Directly after where we inserted the Current Item ID, paste in the following:
“>
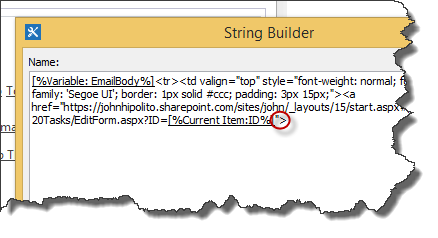
After placing in those characters, insert the Current Item Task/Deliverable:
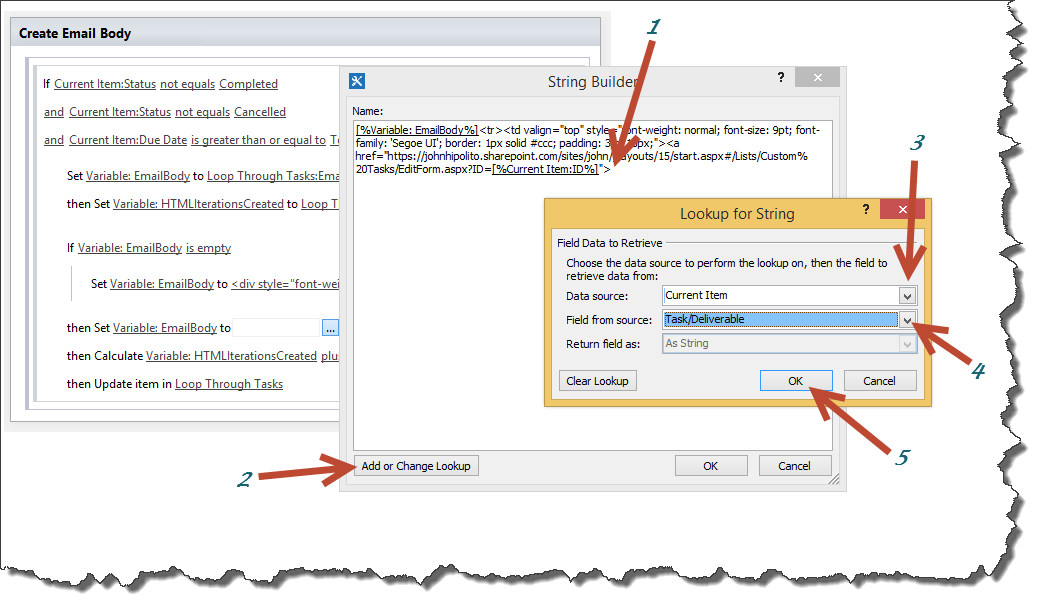
After inserting the Current Item Task/Deliverable, copy the following mark up and paste it in. Remember, no line breaks:
</a></td><td valign=”top” style=”font-weight: normal; font-size: 9pt; font-family: ‘Segoe UI’; border: 1px solid #ccc; padding: 3px 15px;”>
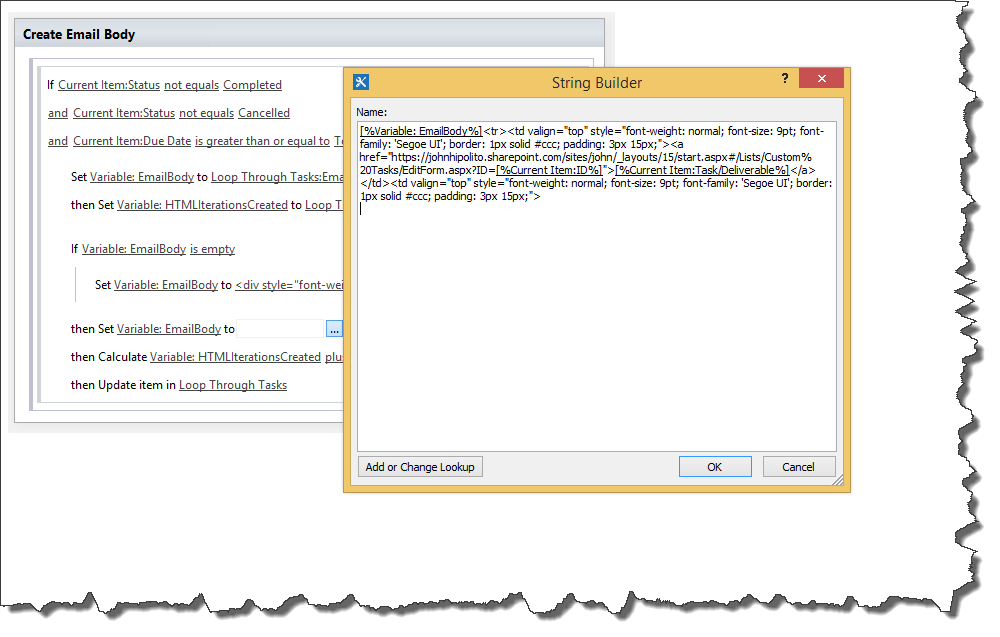
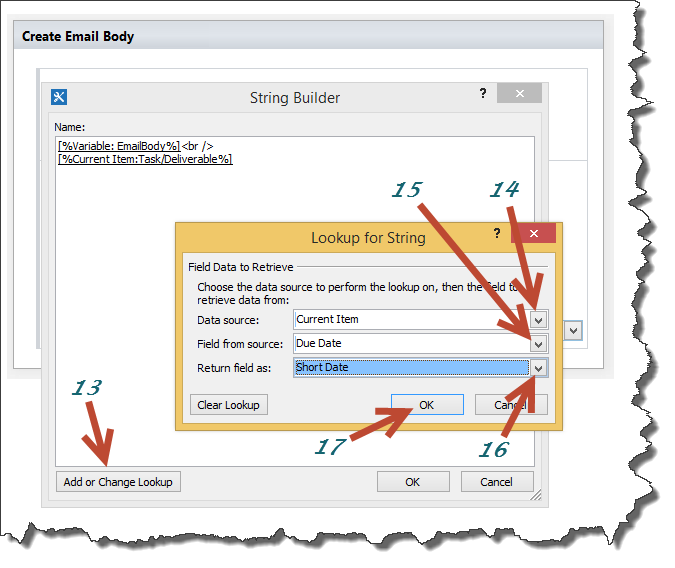
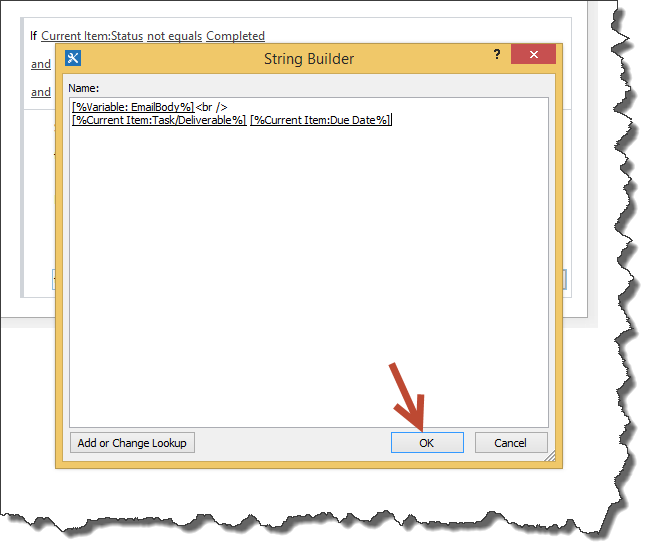
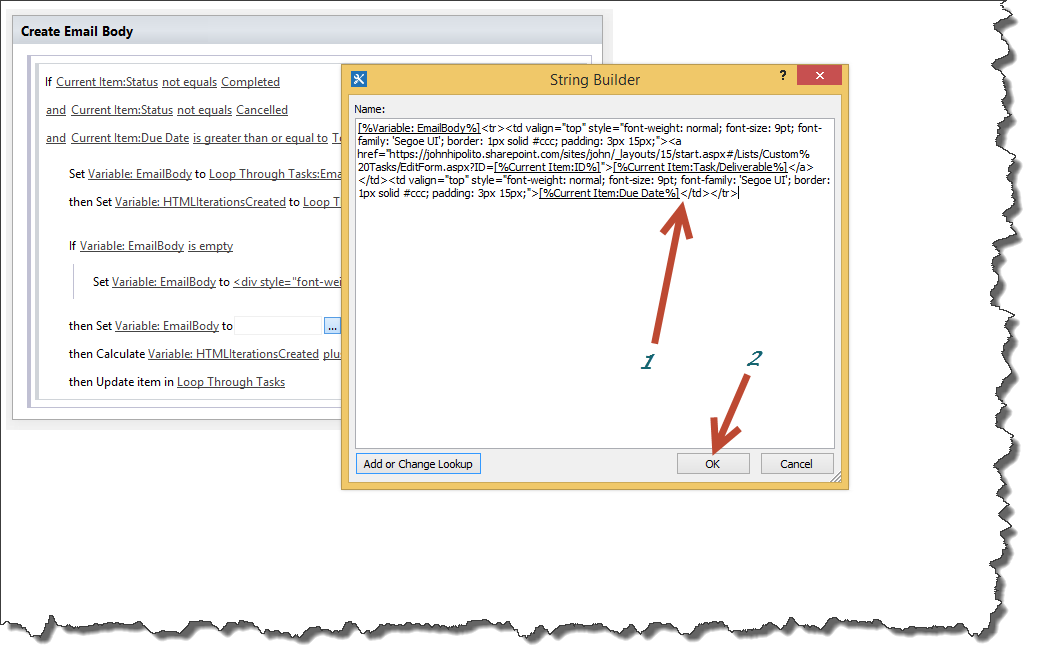
We now need to insert the Current Item Due Date directly after the last markup:
Insert the following mark up directly after the Current Item Due Date:
</td></tr>
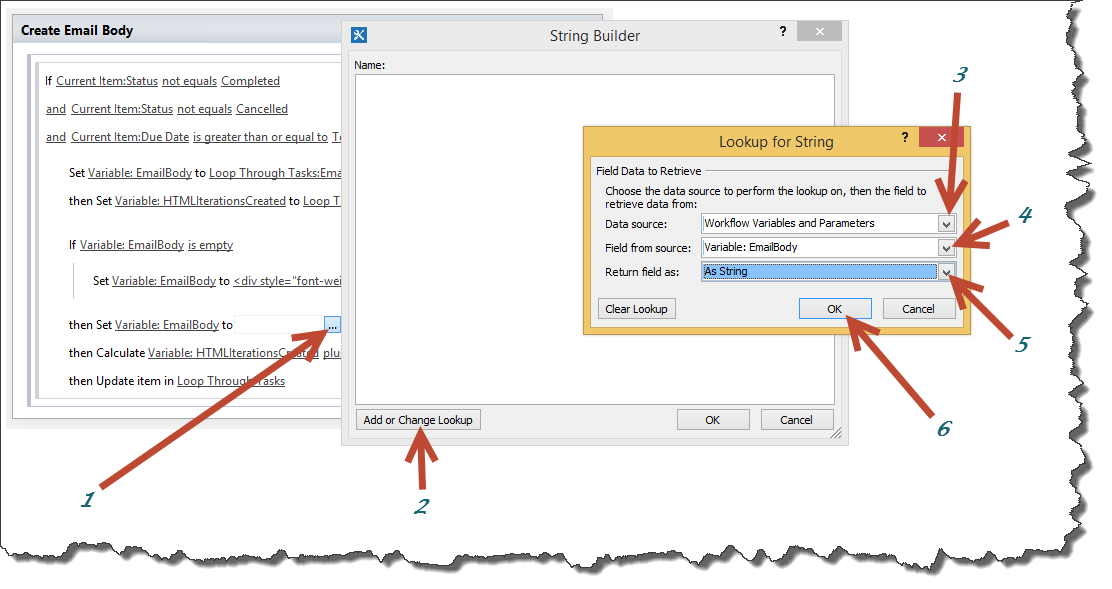
We will now have to close our table tag. We need to figure out how many items there are so we know when to close the table.
Insert a condition action (If any value equals value) between the calculation of the HTMLIterationsCreated variable and the “Loop Through Tasks” list update:
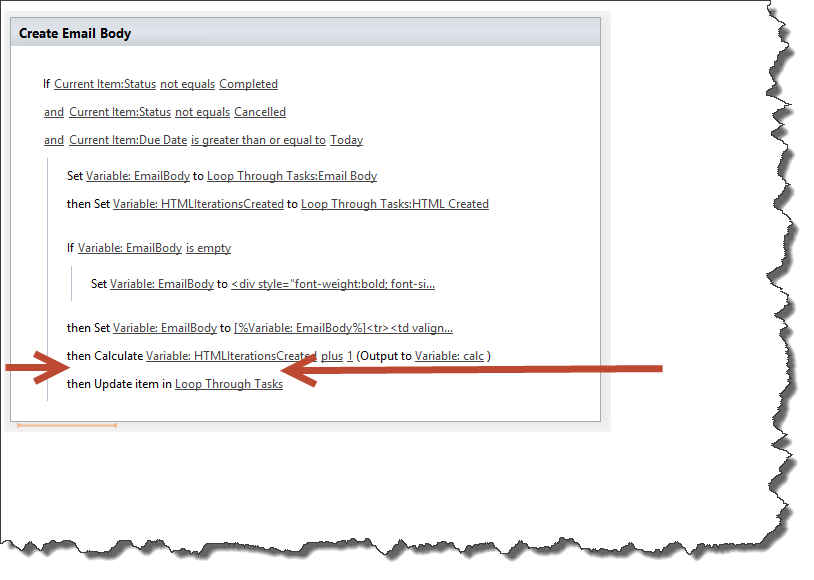
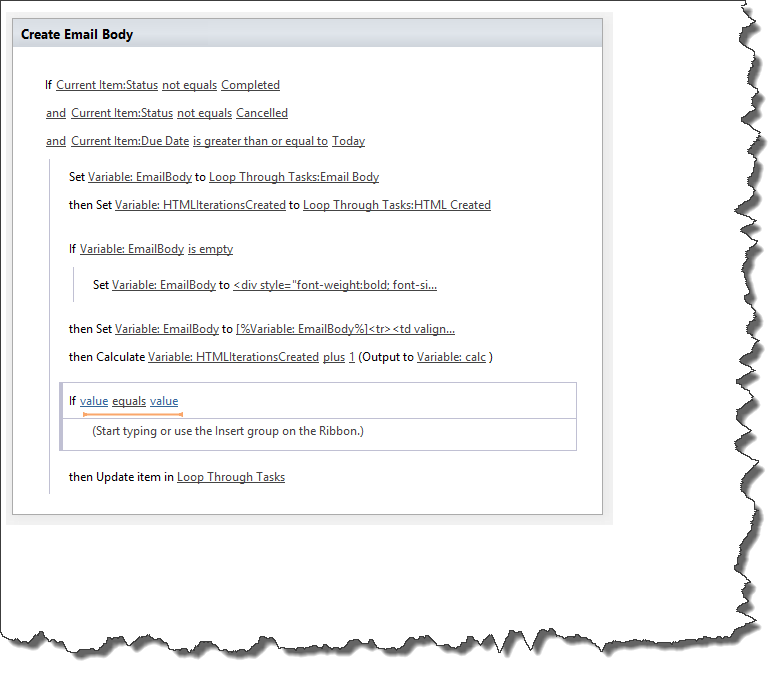
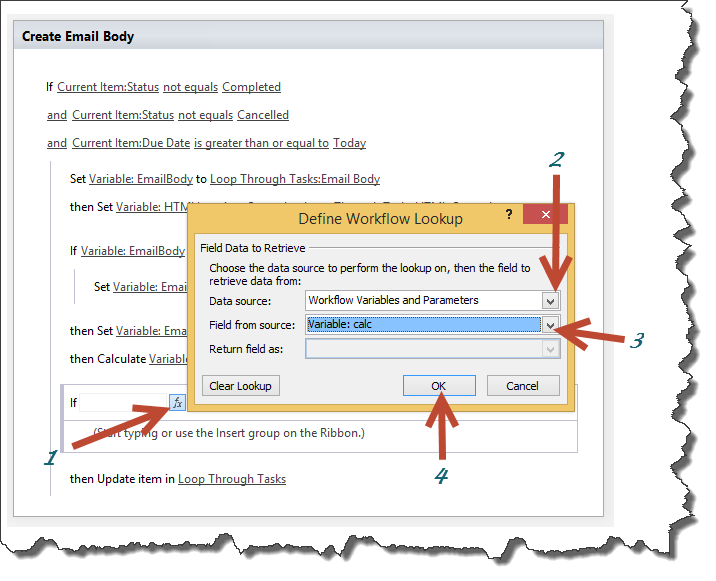
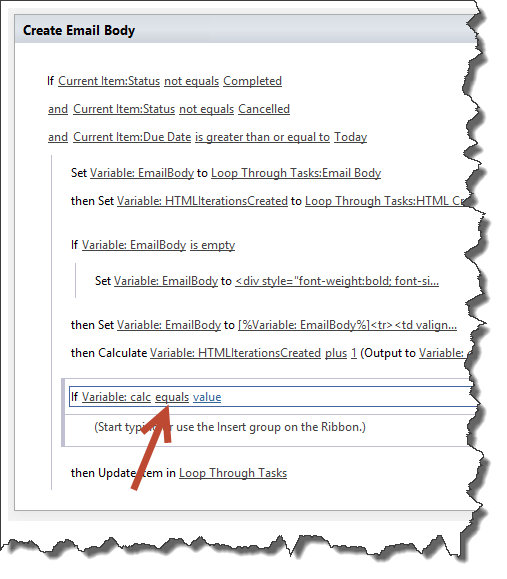
Set the values and condition:
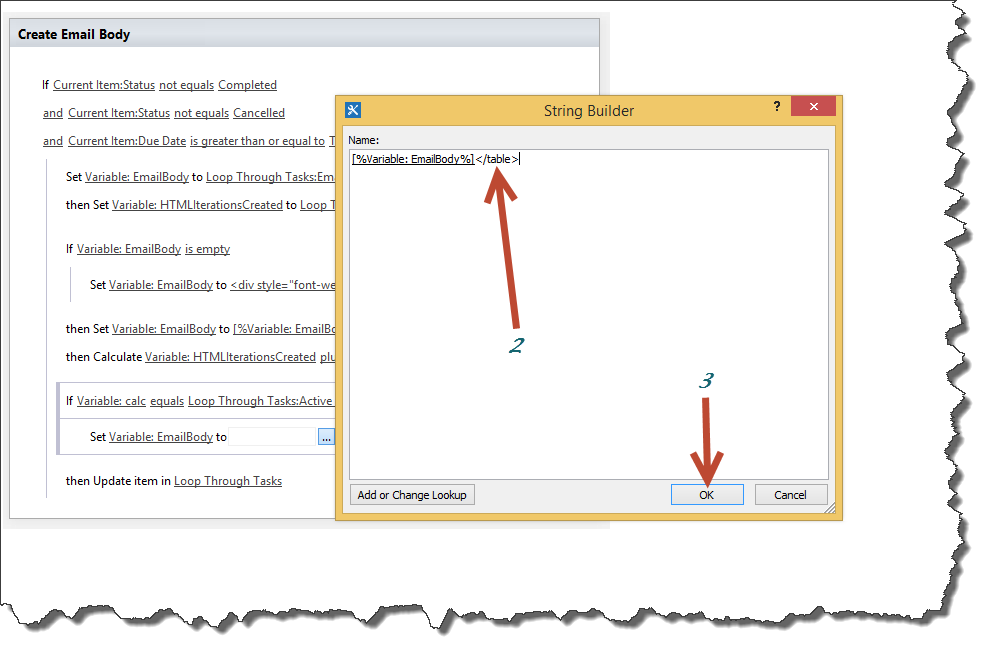
Within the condition, insert a “Set Workflow Variable” and set the EmailBody variable as follows using the string builder:
Copy and paste the following mark up directly after the EmailBody variable:
</table>
Test the Workflows again, but before you run the final “Send Email” Workflow, you will see our mark up in the Email Body field within the “Loop Through Tasks” list:
Run the final “Send Email” Workflow and you will get the following results or similar:
To make this automated you can install a free third-party add-on called HarePoint http://www.harepoint.com/Products/HarePointWorkflowScheduler/Default.aspx. There are other tools out there you can use as well. Simply set up a schedule to run the three Workflows in the following order:
1) Count Tasks
2) Create Email
3) Send Email
In my environment, I have the “Count Tasks” Workflow run Saturday nights, the “Create Email” Workflow run Sunday mornings, and I have the “Send Email” Workflow run early Monday Mornings.
As you can see, what most think is not doable utilizing SharePoint 2010 Workflows is in fact possible with a bit of creativity and patience. It is true that it is more work than using a 2013 Workflow, but there are cases where we cannot use 2013 Workflows. At least we have the ability to use both in SharePoint 2013!
Happy SharePointing…
Thank you for this great post. I am a sharepoint novice and have followed all the steps described, when I test I don’t get any results and I think it’s because I need to run the Add Task workflow before count tasks? Right now my loop through list is blank and when I run Count Task it is still blank… any advice?
Hi Cecilia,
Make sure you have items in the Custom Tasks list before running the workflows in the order specified, this will start the ‘Add Task’ workflow and populate the ‘Loop Through Tasks’ list.
Regards,
John
This works exactly as advertised, thanks for it ! It will help me with my own sharepoint tasks.
This has been the most comprehensive and thorough explanation of SP and SPD workflows. Your instructions and images were detailed and in a easy to follow format. I have learned so much about how to write and approach SPD workflows by simply following your instructions. Thank you!
Anytime!