
Configuring Google Analytics
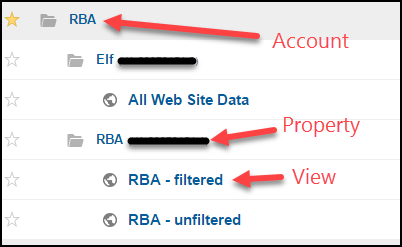
I assume you have a Google Analytics account and property already set up. If you don’t, no problem. You can do that now at Google Analytics – I need to grab a cup of coffee anyway. The only thing I’ll say about Google Analytics is the hierarchy: Google Analytics is organized by Accounts, Properties, and Views. I use these terms occasionally in this tutorial, so I wanted to mention this. Data flows into Google Analytics at the Property level; you’ll need to know your Property ID in the next step of this tutorial.
Configuring Google Tag Manager
If you aren’t currently using Google Tag Manager, or another tag management system, you really should. It allows you to house all of your Web tracking tags in one place – and not just your Google Analytics tags. You can store almost any tag in Google Tag Manager. It allows marketing teams to deploy custom tags without having to wait for development to implement them. You install the Google Tag Manager container code on your website once, and you never need to touch it again. From then on, you manage your tags from a Web-based interface.
This demo assumes you have a Google Tag Manager container set up. If you don’t, it’s free and easy to get one going. Head over to Google Tag Manager and set up your account and container. Don’t worry – I’ll wait.
This part of the tutorial leans heavily on Andy Gibson’s blog post. Since Google Tag Manager’s interface looks a little different now than it did in his blog post, I have decided to re-create this section in my blog post. I’ve also tweaked something slightly to make our lives easier in Power BI.
Google Tag Manager basics
I already gave a quick Tag Manager overview in Part 1, but just know that Google Tag Manager is based primarily on three things:
- Tags, or code snippets that contain tracking information
- Triggers, or firing conditions. These tell tags when to fire.
- Variables. I like to think of these as helpers that can store or retrieve values.
I’m assuming a very basic familiarity with Google Tag Manager. For this tutorial, we’ll almost always need to be in the Container menu. So make sure you’re signed into your Google Tag Manager account and are viewing the appropriate container for your website.
Create a variable for your Google Analytics property ID
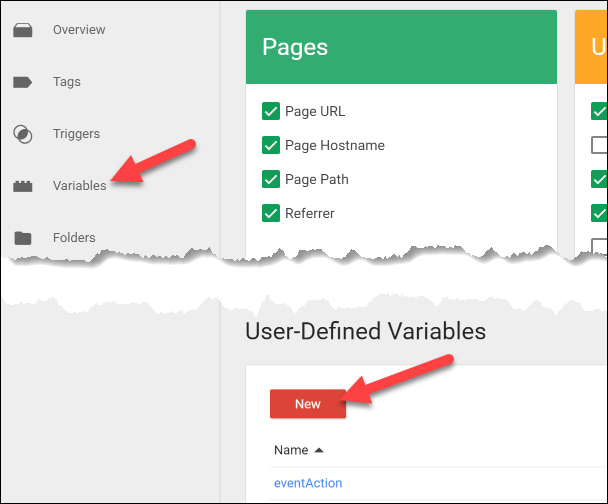
I always like to create my Google Analytics ID as a variable. That way, if I need to change it, I can edit the variable once rather than having to potentially edit a bunch of tags. To do so, click Variables on the left-hand side, then click New underneath User-Defined Variables.
Configure your new variable like this:
- Variable name: gaProperty
- Choose Type: Constant
- Value: Paste your Google Analytics property ID here*

*To retrieve your Google Analytics property ID, log in to Google Analytics, and go to Admin > Property > Tracking Info > Tracking Code (make sure you’re in the right property, if you have multiple properties in your Analytics account). Copy what it says underneath Tracking ID, and paste that into your Google Tag Manager variable. See this link if you need a visual.
Create a tag to fire Google Analytics tracking on all your pages
You may have already done this. If so, you can skip to the next part. If not, you’re going to first need to create a general Google Analytics tracking tag before you create the scroll tracker items. Here’s how.
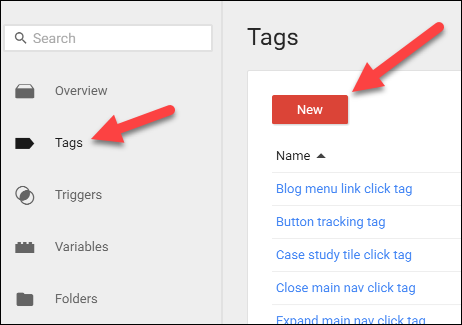
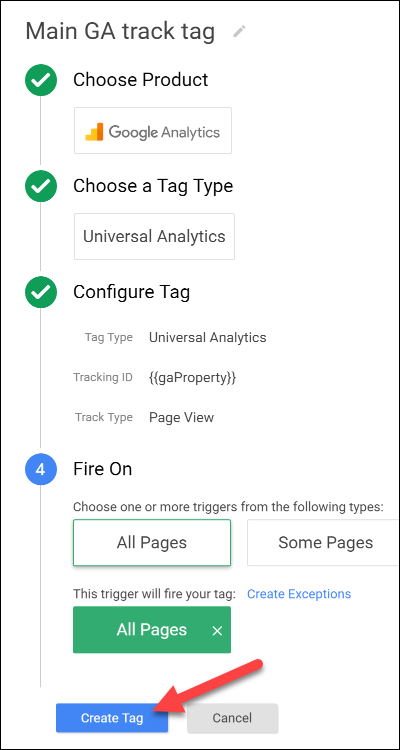
- On the left-hand menu, click Tags, then New
- Tag name: Main GA Track Tag
- Choose a Product: Google Analytics
- Choose a Tag Type: Universal Analytics
- Tracking ID: This is where we choose our variable we entered on the last step. Type two left curly brackets {{ and Google will start to show you the list of available variables. Choose {{gaProperty}}.
- Track Type: Page View
- Fire on: All Pages
- Click Create Tag
Create your scroll tracking tag and trigger
[Update] Since this post was written, Google added native support for scroll tracking to Google Tag Manager. Configuring it is a breeze, so do not follow the steps below. Head over to Simo Ahava’s blog, who has already written an excellent tutorial on configuring scroll depth in Tag Manager. After reading Simo’s post, head down to the end of this post.
We’re now going to create a custom tag using the scroll tracking script. Ready? On the left-hand menu, click Tags, then the New button.
Configure the tag with the following information:
Choose Product: Custom HTML TagConfigure Tag: Paste the scroll tracker JavaScript in the HTML boxUnder Fire On, click More, then the New button
![]()
![]()
![]()
For the trigger, use the following information:
Trigger name: Event equals gtm.domChoose Event: Custom EventFire On – Event name: gtm.dom
Then click Create Trigger. You’ll be returned to the tag creation screen. Click Create Tag.
![]()
Create three variables needed for the scroll tracker
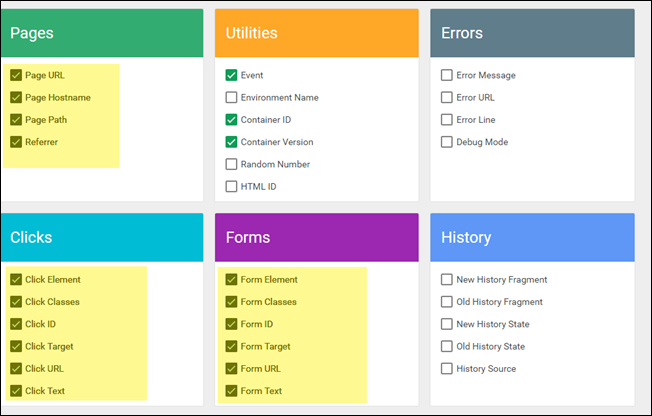
Important note: I differ from the main tutorial here. I do NOT create a variable called eventAction. Rather, in the tag to send the info to Google Analytics, I set the Action to Tag Manager’s built in variable of {{Page Path}}. That way, we can break down our data in Power BI by page more easily. Make sure you’ve activated Tag Manager’s built-in variables by checking them. Go to the left-hand Variables menu, and check the variables you want to turn on (it auto-saves each time you check). I recommend checking everything underneath Pages, Clicks, and Forms. At the very least, you need Page Path for this tutorial.
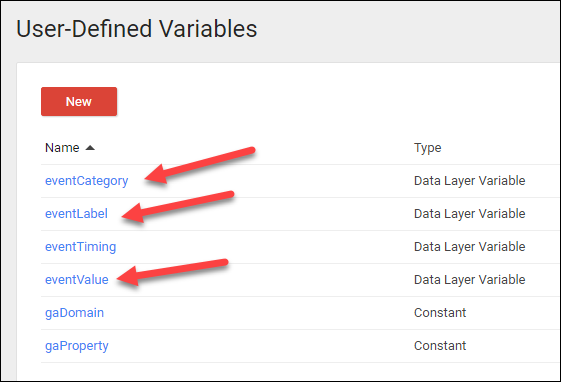
The scroll tracker needs three variables to help send information to Google Analytics. Again, to create a new variable, click the left-hand Variables menu, then click New underneath User-Defined Variables. You need to do this three times. The information for each variable is below. The variables must be named EXACTLY as they appear below, or the scroll tracker will not send information correctly. I’ve done a screenshot of the first one, and then hopefully you get the idea after that. 🙂
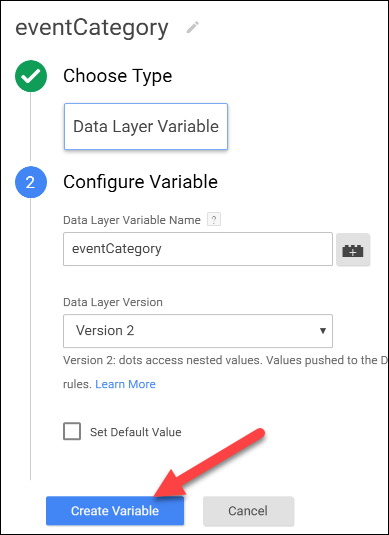
eventCategory variable
Variable name: eventCategoryChoose Type: Data Layer VariableData Layer Variable Name: eventCategoryData Layer Version: Version 2Click Create Variable
eventLabel variable
Variables > User-Defined Variables > NewVariable name: eventLabelChoose Type: Data Layer VariableData Layer Variable Name: eventLabelData Layer Version: Version 2Click Create Variable
eventValue variable
Variables > User-Defined Variables > NewVariable name: eventValueChoose Type: Data Layer VariableData Layer Variable Name: eventValueData Layer Version: Version 2Click Create Variable
Make sure you see the three variables underneath User-Defined Variables, and then you’re done with this step. (Don’t worry about eventTiming in the screenshot – that’s for something else.)
Create the tag and trigger to send scroll info to Google Analytics
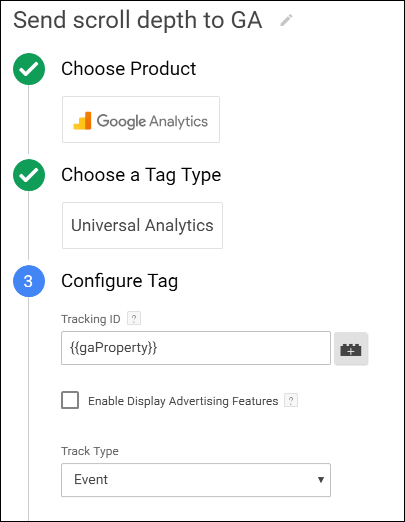
Now we’re going to create the tag and trigger that actually help send the scroll information to Google Analytics. Here’s the information you need. Click Tags from the left-hand menu, then click New. Enter the following information in your tag.
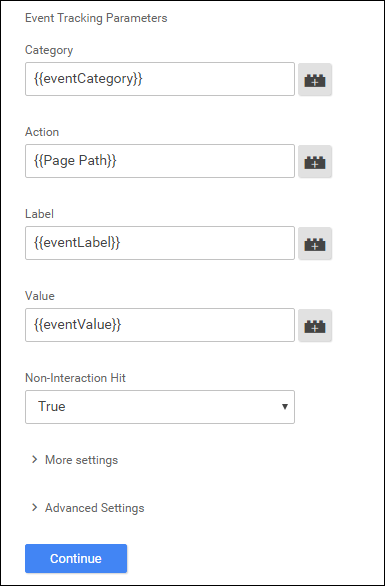
Tag name: Send scroll depth to GAChoose Product: Google AnalyticsChoose a Tag Type: Universal AnalyticsTracking ID: {{gaProperty}}Track type: EventCategory: {{eventCategory}}Action: {{Page Path}}*Label: {{eventLabel}}Value: {{eventValue}}Non-Interaction Hit: True
*Note: Again, I differ from the original tutorial here. Setting the action to {{Page Path}} is going to break your scroll depth down by page, which makes building the Power BI report easier. In the original tutorial, Action is set to {{eventAction}}, which is a custom variable that we didn’t create.
Under Fire On, click More, then New, and then enter the following information for the trigger:
Trigger name: Event equals ScrollDistanceChoose Event: Custom EventEvent Name: ScrollDistanceClick Create Trigger
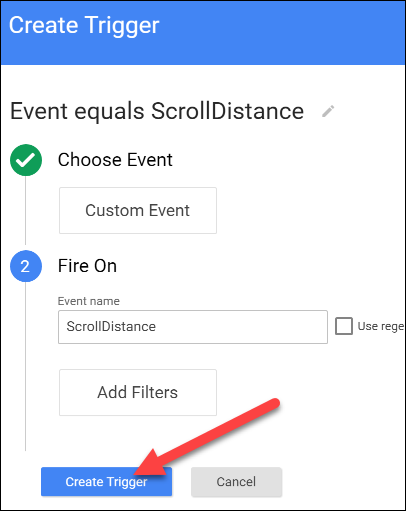
You’ll be returned to the tag creation screen. Click Create Tag.
Install your Google Tag Manager container on your website
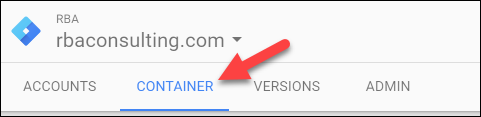
You may have also already completed this step. If not, now’s a good time to have your development team install the Google Tag Manager container on your organization’s website. Installation varies by Content Management system. If you ARE the development team, then leave me a comment and I can help you figure it out. To get the code for your container, click the container ID in the main navigation bar.

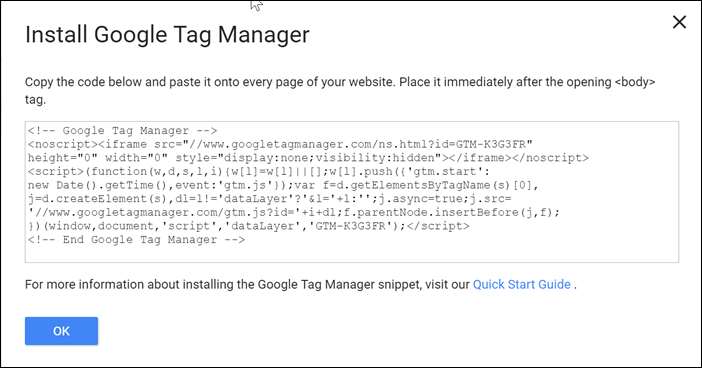
Place the container code right after the opening <body> tag, on every page on your website. If you already have Google Analytics code on your website, make sure you REMOVE it once the Tag Manager code is in place. Otherwise you will be double-counting everything on your website.
Publish your container
Nothing in Google Tag Manager goes live until you click the big Publish button in the top right corner. You can create hundreds of tags and triggers, but they don’t do anything on your website until they’re published.
Testing your tags is outside the scope of this tutorial, but keep in mind you never want to publish tags without first testing them. Google Tag Manager has a very robust preview mode. Measureschool has a good tutorial on YouTube about using Tag Manager’s preview mode.
Assuming everything is thoroughly tested, to publish your container and make all these new tags and triggers live, click the big Publish button.

That’s it – we’re done with steps in Google Tag Manager. We need to verify the data in Google Analytics, and then we can start building our Power BI dashboard.
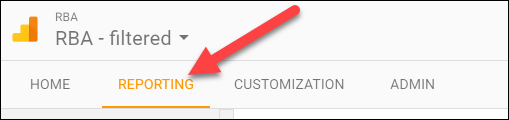
Verify the scroll data in Google Analytics
We’ve created new dimensions and measures that didn’t exist before in Google Analytics, so we’ll want to verify that we are starting to see data flow into Analytics. Of course, we’re assuming we already tested the tags and data, but to make things simple, verify the data in your Google Analytics account. To do that, go into your Google Analytics account and choose your Web property and view. Make sure you’re in the the Reporting menu, accessed from the main navigation.
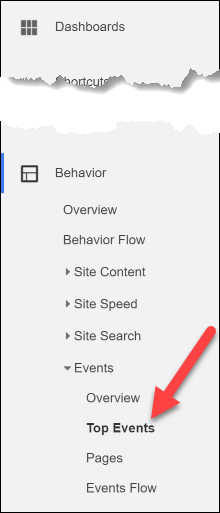
From the left menu, click into the following report: Behavior > Events > Top Events.
You should see a category here called Scroll Depth.
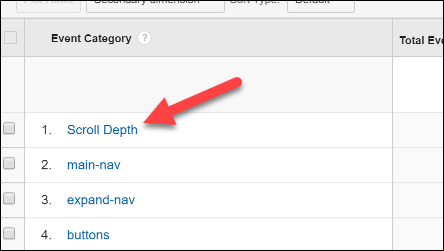
Clicking on Scroll Depth should produce a list of pages.
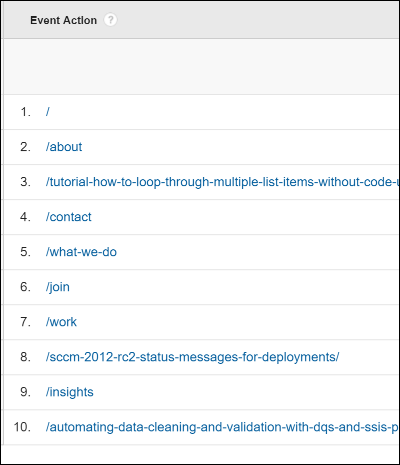
Clicking on a page will then show you your scroll performance for that particular page.

If you see all this information, congratulations! The Tag Manager tags, triggers, and variables are configured correctly, and the data is actively being passed to Google Analytics. We’re ready to build our Power BI dashboard.