The Model Context Protocol (MCP) standard has gained rapid adoption since it was first introduced in November 2024. Recent news that Anthropic is donating the MCP standard to the new Agentic AI Foundation, run by the Linux Foundation, will likely accelerate adoption even further.
In this post, we’re going to explore how to use the official C# MCP SDK to expose an existing application to AI agents that support the MCP standard. Specifically, we’ll look at how to use existing Microsoft Entra ID app registrations so they work cleanly with MCP endpoints and existing API code.
If you’re not familiar with developing an MCP server or client, the SDK includes several solid examples that are worth reviewing before you get started.
Sample Ticketing System
We’ve developed a simple ticket-tracking system to demonstrate several principles and opportunities for leveraging AI capabilities within an application.

This application is a good target for demonstrating LLM capabilities because it contains a mix of structured data (areas, assignments, statuses) and unstructured data (descriptions, comments, and notes).
Implementing a MCP Server
We wanted to expand this application by adding an MCP server that exposes common functionality like listing tickets, adding comments, and reassigning tickets.
There are many tools that can take an existing API and automatically expose endpoints as MCP tools. Depending on how your API is built, that may or may not be a good approach. By building a custom MCP server, you can expose targeted functionality that is always used in predictable ways, instead of relying on an LLM to stitch together multiple API calls, which can be brittle or error-prone.
In .NET, using the official SDK, implementing an MCP server is as straightforward as building any other API. You decorate your class with the [McpServerToolType] attribute and then decorate each tool method with a [McpServerTool] attribute.
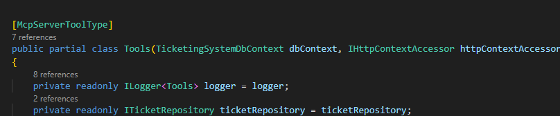
Here you can see that we inject IHttpContextAccessor, which allows us to retrieve the current ClaimsPrincipal, similar to how we would in a standard web API. This is important so we can determine which user is making a request and what claims or roles they have.
The method-level attribute is where context really starts to matter. As shown below, we provide detailed metadata and natural language descriptions for each tool, including what the tool does, its parameters, their meanings, and whether the action is read-only or destructive.
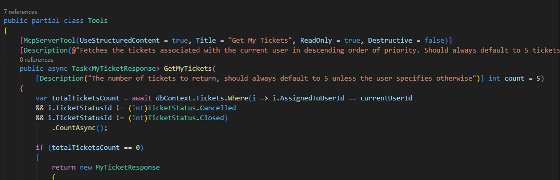
McpServerTool attribute usage
All of this information is passed to the LLM to help it choose the correct tool for a given scenario.
Testing Your MCP Server
When it comes to testing your MCP server, there are multiple ways to interact with and debug it. I typically use Postman, mostly because it’s already installed on many teams.
Within Postman, you can acquire access tokens through Entra ID and OAuth just like you would for any API, then pass those tokens along with requests. This allows you to test and debug locally without fully connecting your MCP to an LLM.
Connecting to your MCP via Postman is similar to connecting to any other API, with the caveat that you must use Postman’s MCP request type.
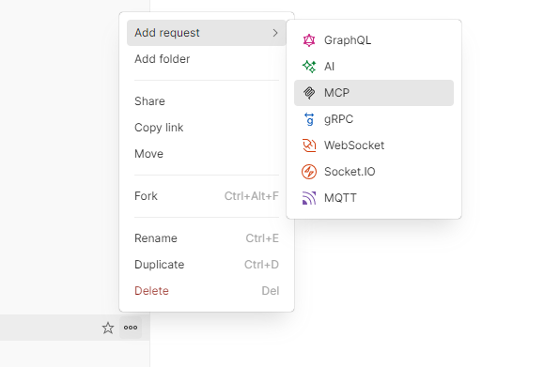
Postman MCP request type
Once connected, you can see all the tools exposed by your MCP server and invoke them just like standard API calls. You can also see the metadata added through attributes in the tool names, descriptions, and parameters.
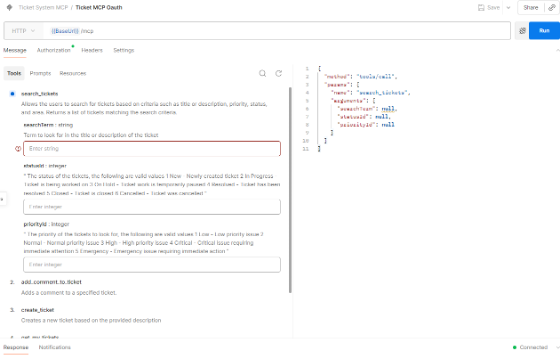
Postman tool listing
MCP and User Identity
Eventually, in production, your MCP client will not be Postman. It will be an AI agent or LLM that invokes MCP tools on behalf of users. That client must authenticate correctly so requests are made with proper authorization.
If your MCP server lives alongside existing API code, getting this right can be challenging.
If we want to return only a specific user’s tickets from an MCP call, the MCP server must know the user’s identity, including roles or claims. Because we’re hosting in a web API context and have access to IHttpContextAccessor, our MCP server can retrieve the current principal as long as authentication is configured correctly.
MCP and OAuth
For detailed information about authentication and security best practices in MCPs, I encourage you to review the official MCP site.
In theory, adding authentication to your MCP server is very straightforward in your Program.cs you can simply call the following.
app.MapMcp().RequireAuthorization()
Clients then use OAuth .well-known endpoints along with special headers that allow the server and client to discover URLs and redirects required to complete authentication. This works well in greenfield or standalone projects.
The MCP standard wants to do OAuth with Dynamic Client Registration. This is different than how you may have configured OAuth before where clients are manually configured with appropriate redirect urls. Not every identity provider supports DCR (for example, Azure’s Entra ID 😞) because the MCP client could theoretically be running anywhere we don’t know at initial setup where our OAuth redirects may need to go to.
The full OAuth setup is outside the scope of this article, but we’ll focus on one major pain point: redirects.
If we know our MCP is going to be used by specific agents and tools like Copilot Studio or Copilot in VS Code we can configure those redirects manually in our Azure App Registration like we normally would. You can follow the instructions here specifically for VS Code and add http://12.0.0.1:33418 and https://vscode.dev/redirect to your app registrations.
Also, because the root of my URL is my existing API I moved the MCP endpoints to /mcp
app.MapMcp(“/mcp”).RequireAuthorization();
For some reason this, along with my existing auth setup, broke the OAuth discovery and when adding my MCP to VS Code it was trying to use localhost to begin the OAuth process instead of Entra.
After digging through source code of both VS Code and the C# MCP SDK, along with request tracing I finally found the problem was that part of the auth process adds a WWW-Authenticate header from the MCP server with a resource_metadata uri that points to a .well-known endpoint on the MCP. The client uses that to make a call to the correct identity provider to begin the auth process.

resource_metadata header
That resource_metadata endpoint was missing from the header and causing VS Code to use a fallback localhost url to try to auth.
Fixing OAuth Discovery with a Custom Policy
We can make sure this header is added to our new MCP endpoint by using a custom auth policy and change our setup code to the following:
app.MapMcp(“/mcp”).RequireAuthorization(“McpPolicy”);
Then we can create our custom policy like so
services.AddAuthentication(JwtBearerDefaults.AuthenticationScheme)
.AddMcp(“McpAuth”, “McpAuth”, options =>
{
// Get the base URL – try Azure-specific environment variables first
var baseUrl = GetBaseUrl(configuration);
// ensures the WWW-Authenticate header contains the correct resource_metadata for Entra ID, in our case
options.ResourceMetadata = new()
{
Resource = new Uri($”{baseUrl}/mcp”),
AuthorizationServers = { new Uri($”https://login.microsoftonline.com/{configuration[“AzureAd:TenantId“]}/v2.0”) },
ScopesSupported = [$“api://{configuration[“AzureAd:ClientId“]}/access_as_user”],
};
})
services.AddAuthorization(options =>
{
// Policy for MCP endpoint – uses McpAuth scheme
options.AddPolicy(“McpPolicy”, policy =>
{
policy.AuthenticationSchemes.Add(“McpAuth”);
policy.RequireAuthenticatedUser();
});
// … other policies or auth requirements …
});
Now, when we add the MCP to VS Code, it will correctly begin the authentication process with Microsoft using a standard OAuth flow.

mcp.json
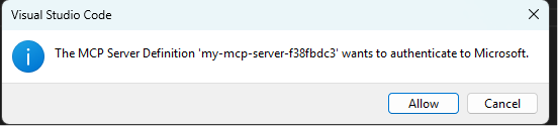
Auth confirmation popup
Once you’ve logged in with your credentials, you can then see that is connecting properly and listing the correct tool count.

Running mcp.json
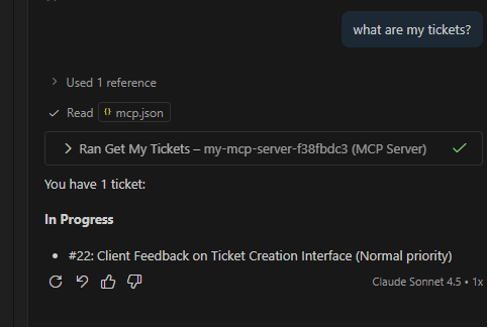
Now, when a user asks their chat agent about their tickets, the chat agent will discover an available tool that can retrieve that information, then invoke it and return it in a nicely formatted response.
Our MCP tool makes a database call to get open tickets for the current user, groups the tickets by priority, and returns a simple DTO object, which is serialized to JSON by the SDK. This then becomes the context for the LLM to work with and synthesize a response to your initial message.
{
“totalTicketsCount”: 1,
“numberofTicketsReturned”: 1,
“tickets”: [
{
“priority”: “Normal”,
“tickets”: [
{
“id”: 22,
“title”: “Client Feedback on Ticket Creation Interface”,
“priority”: “Normal”,
“status”: “In Progress”
}
]
}
],
“messageToUser”: “Here are your tickets grouped and sorted by priority.”
}
My Ticket response
Conclusion
With these changes, we’ve solved the missing resource_metadata issue and addressed the lack of Dynamic Client Registration support in Microsoft Entra ID.
If additional MCP clients are introduced, their redirect URLs must also be manually configured when using Entra ID.
The result is a fully functional MCP server that exposes existing application functionality to AI agents and LLMs while preserving established authentication and authorization patterns. Most importantly, MCP tools only allow AI agents to perform actions the invoking user is already authorized to perform, while maintaining traceability for any changes made on their behalf.
About the Author

Nick Olson
Principal Software Consultant
Nick has dedicated the past 20+ years of his career to development on the Microsoft tech stack, cultivating a deep expertise in this domain. He possesses an extensive, proven track record of successfully completing diverse development projects.
This article does a great job explaining how MCP can be used to extend existing APIs securely for AI agents — the examples really help ground the concepts. As I’ve been reading more about how MCP server implementation and deployment work in practice, I came across this resource here: https://mobisoftinfotech.com/services/mcp-server-development-consultation which offered some useful context on structured development and consultation around MCP. Thanks for sharing these insights!